Flash User Guide
Create Scenario
Selecting the menu item “Admin → Flash” brings you to the grid listing the scenarios that have been created for your site.
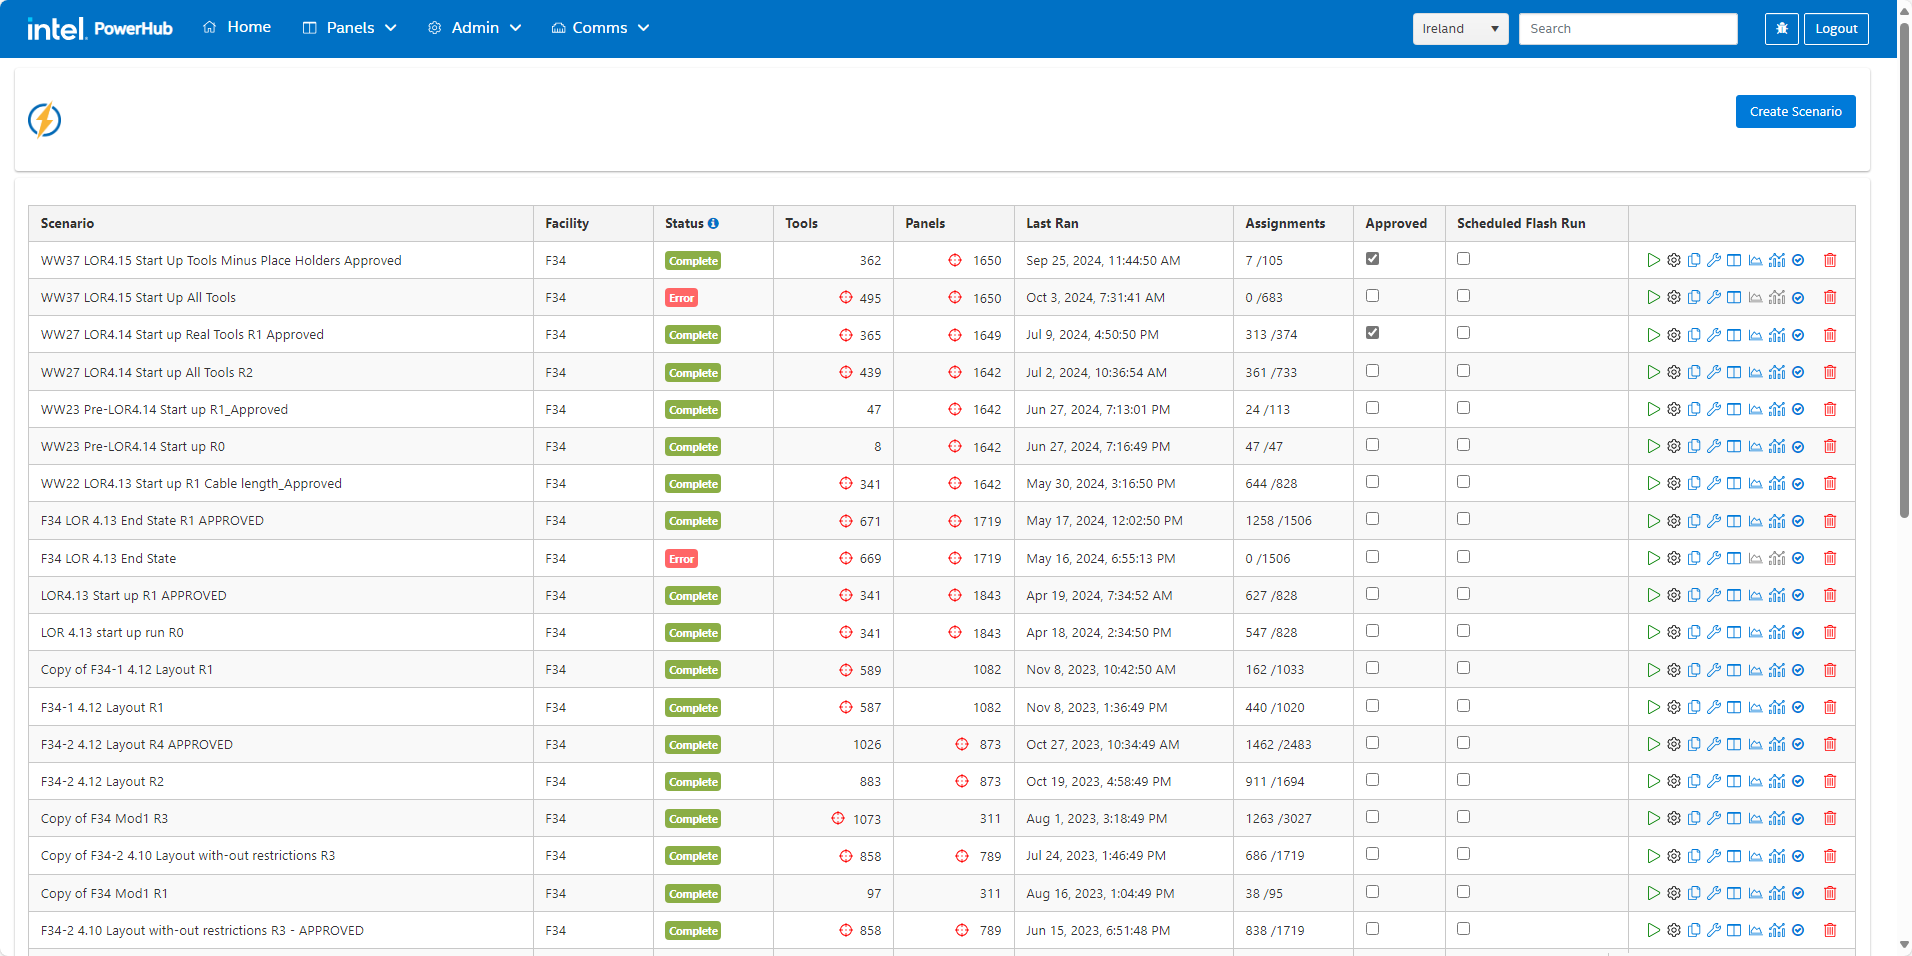
To add a new scenario press the “Create Scenario” button above the grid to the right.
The “Scenario Constraints” dialog is displayed.
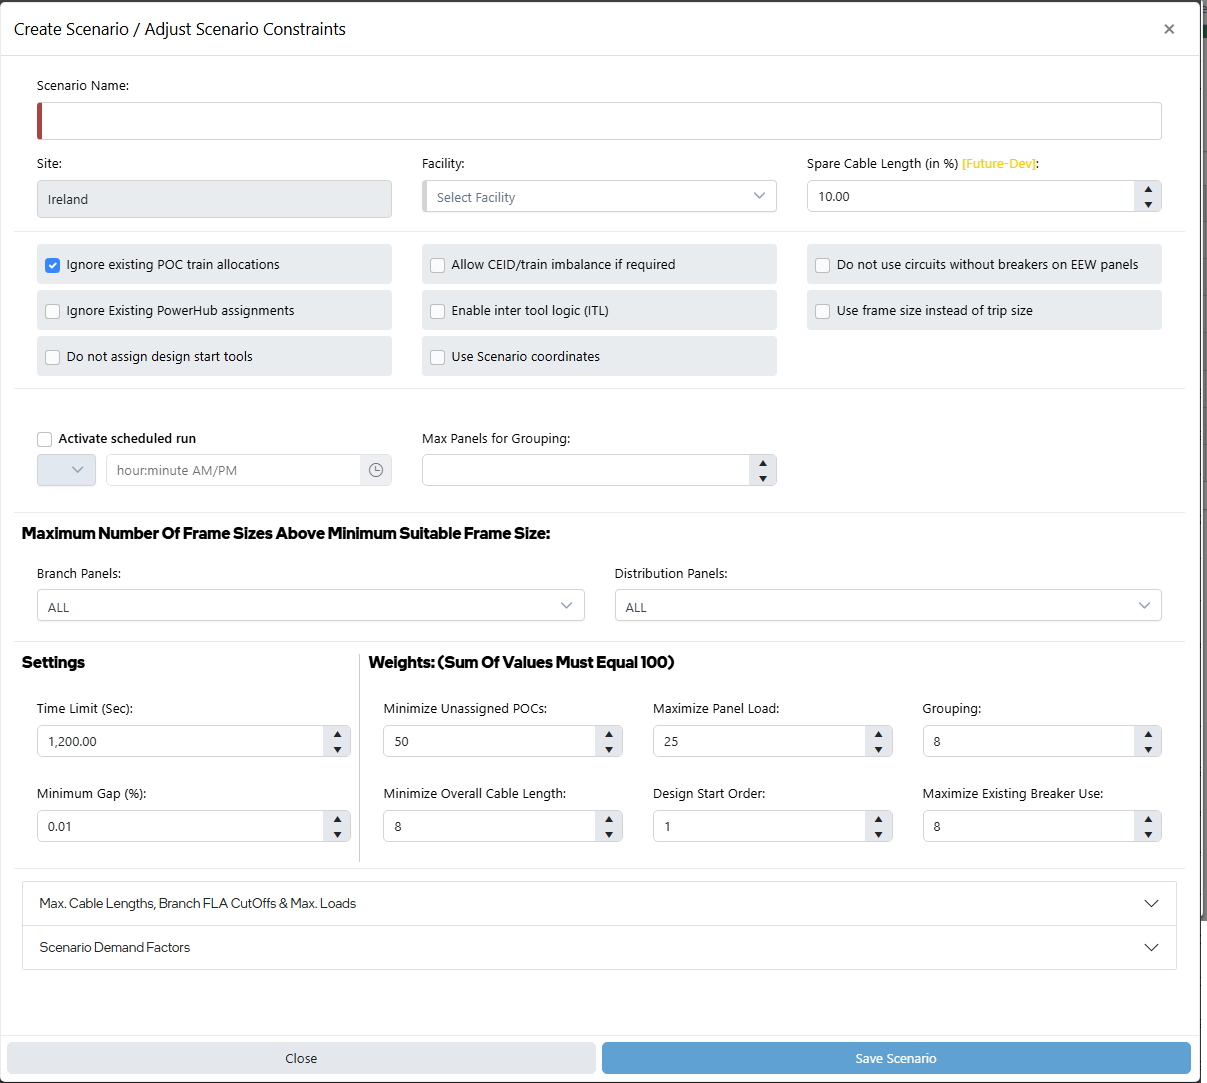
The fields in the dialog are as follows:
-
Scenario Name Enter a name for your scenario
-
Site Pre-filled label displaying the name of your selected site.
-
Facility Select a facility from the list of facilities on your site.
-
Spare Cable length (in %) (Future functionality) Enter the percentage too add to cable lengths to account for bending and deviations in the straight line path between tool and panel.
-
Ignore Existing POC train allocations POCs may have trains allocated to them before a scenario is run. Checking this box will ignore the existing train allocations and allow for each POC to be assigned to any train. This will make it easier for the optimiser to balance CEIDs across trains. Leaving this box unchecked will mean that only the train that the POC is currently allocated to will be considered for that POC. This may give rise to poorer balance of CEIDs across trains. Also, leaving the box unchecked will mean that any POC that does not have a pre-allocated train will not be included in the scenario.
-
Allow CEID/train imbalance if required When working on a new fab you will always want to balance trains, so you should leave this box unchecked. When creating a scenario for tools in an existing fab with limited available panels you would check this box to improve the overall assignment rate at the expense of CEIDs being balanced across trains. This setting is only available when "Ignore existing POC train allocations" is checked.
-
Do not use circuits without breakers on EEW panels Checking this box will prevent Flash from assigning to SPACEs on panels which are set as "EEW" panels.
-
Ignore Existing PowerHub assignments Tools in your scenario may already have pre-assignments, or panels in your scenario may already have other POCs assigned to them. This checkbox allows flash to ignore existing tool and panel pre-assignments. Flash will find assignments for those POCs already assigned in PowerHub and will consider all of the scenario panels to be free of any existing loads.
-
Enable inter tool logic (ITL) If predecessor and successor relationships have been uploaded using the Bulk Management feature, then checking this box will cause flash to give successor tools in ITL relationships priority (over all other tools in the scenario) to capacity being released by their predecessor tools. This means that ITL tools will get assigned before any other tools marked as priority 1 in the flash user interface. This setting is only available when "Ignore Existing PowerHub assignments" is not checked.
-
Use frame size instead of trip size If a panel has breakers preinstalled and those breakers have a trip size then Flash would use that trip size when finding suitable panels to assign POCs to. Check this box tp allow a panel to be used even if all the preinstalled breakers are too small for the POC (as the unused breaker can be replaced with a bigger one, up to the circuit frame size). This setting does not apply to busways.
-
Do not assign design start tools Tools which you have added to the scenario that have a design start before today plus 2 weeks will not be included in the Flash run as they are expected to be already assigned or manually assigned in the coming days.
-
Use Scenario coordinates To use the latest X & Y coordinates that is currently on tools, leave this box unchecked. To use coordinates from a Layout Release, then use the “Import Scenario Entities” feature in Bulk Management to import coordinates from the layout and check this box. If coordinates are uploaded to the scenario for a tool, then flash will use those coordinates instead the coordinates on the tool (or POCs) in PowerHub.
-
Activate Scheduled Run To run this scenario once every week, check this box. Scheduled Run Day / Time - Select a day and a time for the scheduled run to start. Note that you can set a schedule for many scenarios but only one scenario per facility will be scheduled. To set a scenario as the one that will run on its schedule go back to the main grid of scenarios and check the box under the “Scheduled Flash Run“ column.
-
Max Panels for Grouping Sets the maximum number of panels that 'groups' of POCs on a tool are assigned to. Groups of POCs are those POCs on a single tool which share the same voltage requirement, utility supply type, power tags and FLA range (low->BP or high->DP). Ideally, all POCs in a group would be assigned to the same panel, setting this value to 1 would achieve that but could leave more unassigned POCs. A blank value means that each POC in a group could be assigned to a different panel.
-
Maximum Number Of Frame Sizes Above Minimum Suitable Frame Size For both branch panels and distribution panels, you can specify how many frame sizes, above the minimum suitable frame size, flash may select for POC assignment. Leaving the value at the default of ALL would mean that any frame size that is on a panel could be used. Setting it to 0 would mean that only the smallest suitable available frame size on the panel could be used.
-
Time Limit (Sec) Enter a time limit in seconds for which the scenario should run. If the optimiser has not achieved the minimum gap (see next setting) by this amount of time, the results will be the best scenario achieved by that time.
-
Minimum Gap (%) This is the percentage of unassigned POCs that you deem acceptable before the optimiser stops running. The optimizer will keep iterating to try to lower the gaps until the percentage of unassigned POCs is below this value or until the time limit is reached, whichever comes first.
-
Weight: (Sum of values must equal 100) - The optimiser balances the six constraints below according to the weighting you apply to each. The weightings should add to give a total of 100. Use higher numbers for the outcomes which are more important.
i. Minimize Unassigned POCs - Importance of assigning more POCs
ii. Maximize Panel Load - Importance of utilizing panels efficiently.
iii. Grouping - Focuses on grouping tools of the same voltages, utility types, and power tags and assigning them to the same panel.
iv. Minimize Overall Cable Length - Importance of maintaining the lowest sum of all cable lengths used to assign tools and panels.
v. Design Start Order - Importance of giving higher priority to tools with earlier design start.
vi. Maximize Existing Breaker Use - prioritize circuits on panels with preinstalled breakers (SPAREs) over circuits on panels without breakers (SPACEs)
-
Max Length / FLA Cutoff / Maximum Load grid For each panel voltage you can select:
i. The maximum cable length for standard (non busway) panels
ii. The maximum cable length for busways
iii. The maximum FLA of individual POCs that should be assigned to branch panels
iv. Maximum percentage load on distribution panels (Future functionality)
v. Maximum percentage load on branch panels (Future functionality)
-
Scenario Demand Factors Demand factors approved by IMDS are set in PowerHub and these values are picked up by Flash by default. There should be no reason to change the values in the grid except as part of a 'what if' analysis in conjunction with the IMDS group. For each panel voltage you can select the demand factor used by the Flash scenario for NPS, CPS and EPS for both distribution and branch panels.
Grid Settings and Actions
Approved
Only scenarios that are marked as approved will be listed in the dropdown on the PowerHub home page for selection. PowerHub users will then be able to promote the flash suggestions from the scenario to become pre-assignments.
Scheduled Flash Run
To set a scenario as the one that will run on its schedule check one box under the “Scheduled Flash Run“ column for each facility.
Run Scenario
 Pressing the ‘play’ button will run the scenario. You cannot run a scenario if another scenario is already running.
Configure Scenario
 Pressing the settings button will open the “Scenario Constraints” dialog selection as described in the “Create Scenario” section above
Copy Scenario
 Pressing this button makes an exact copy of a scenario including the selected tools and panels. The new scenario will be displayed in a new row with the name "Copy of {copied scenario name}".
Copied Scenario Record

Once you have your copy, press the setting button and change the name and edit the other settings as appropriate.
View Scenario Tools
 Clicking on the tool icon displays a list of all tools in the scenario's facility.
List of Scenario Tools
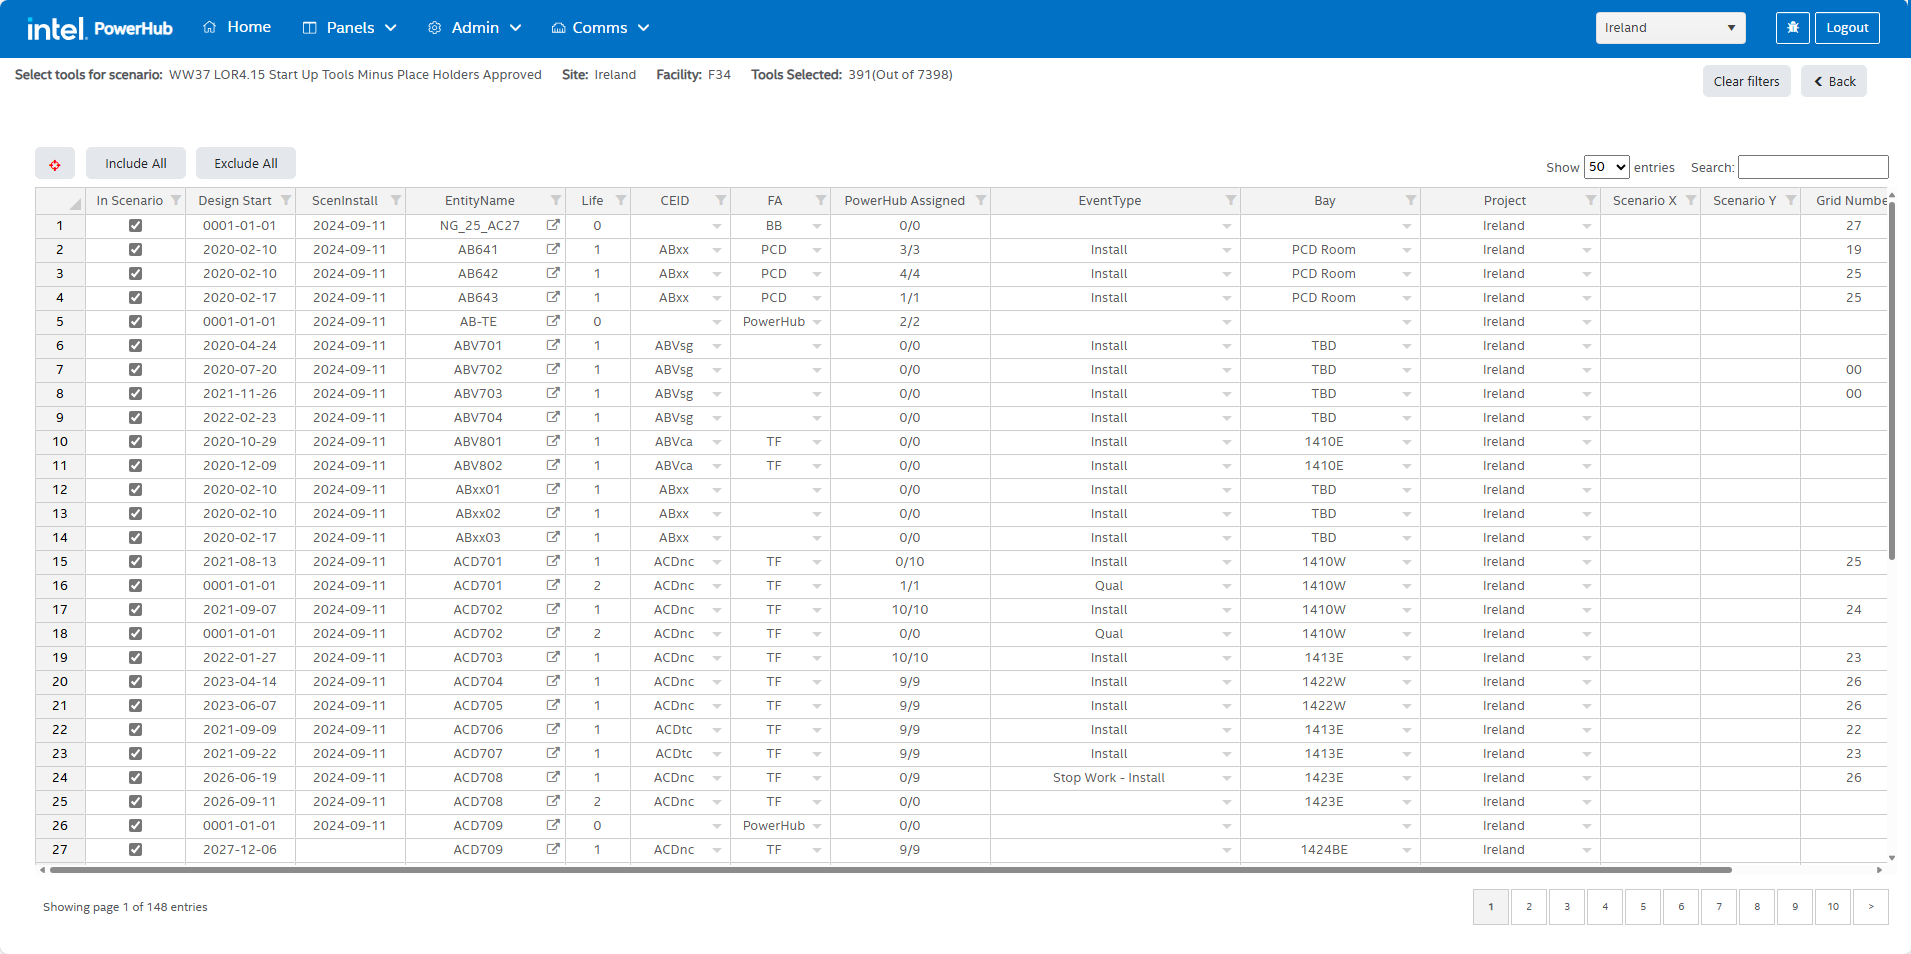
On this screen you can:
-
See all the tools in the facility and filter any of the columns to find specific tools.
-
Filter to a text string in any column by searching for the text on the “Search box”
-
Include or remove individual tools from the scenario by checking/unchecking the box in the first column.
-
Include or remove multiple tools from the scenario by filtering the grid and using the “Include All” and “Exclude All” buttons.
-
View POC details of a tool by clicking the arrow icon beside the tools name.
-
Set the optimiser priority of tools in the last column. Tools set with priority 1 will be considered first, tools with 2 will be considered second, and so on. Tools with no priority set will be considered last.
-
To set priorities: filter to the tools that should have priority 1, type 1 in the prioity column on the first row, drag the plus icon at the bottom right of the cell to all the other tools as in the animation shown below.

Note: You can bulk add tools to a scenario by going to the “Bulk Management” section of PowerHub.
View Scenario Panels
 Clicking on the panels icon displays a list of all panels in the scenario's facility.
List of Scenario Panels
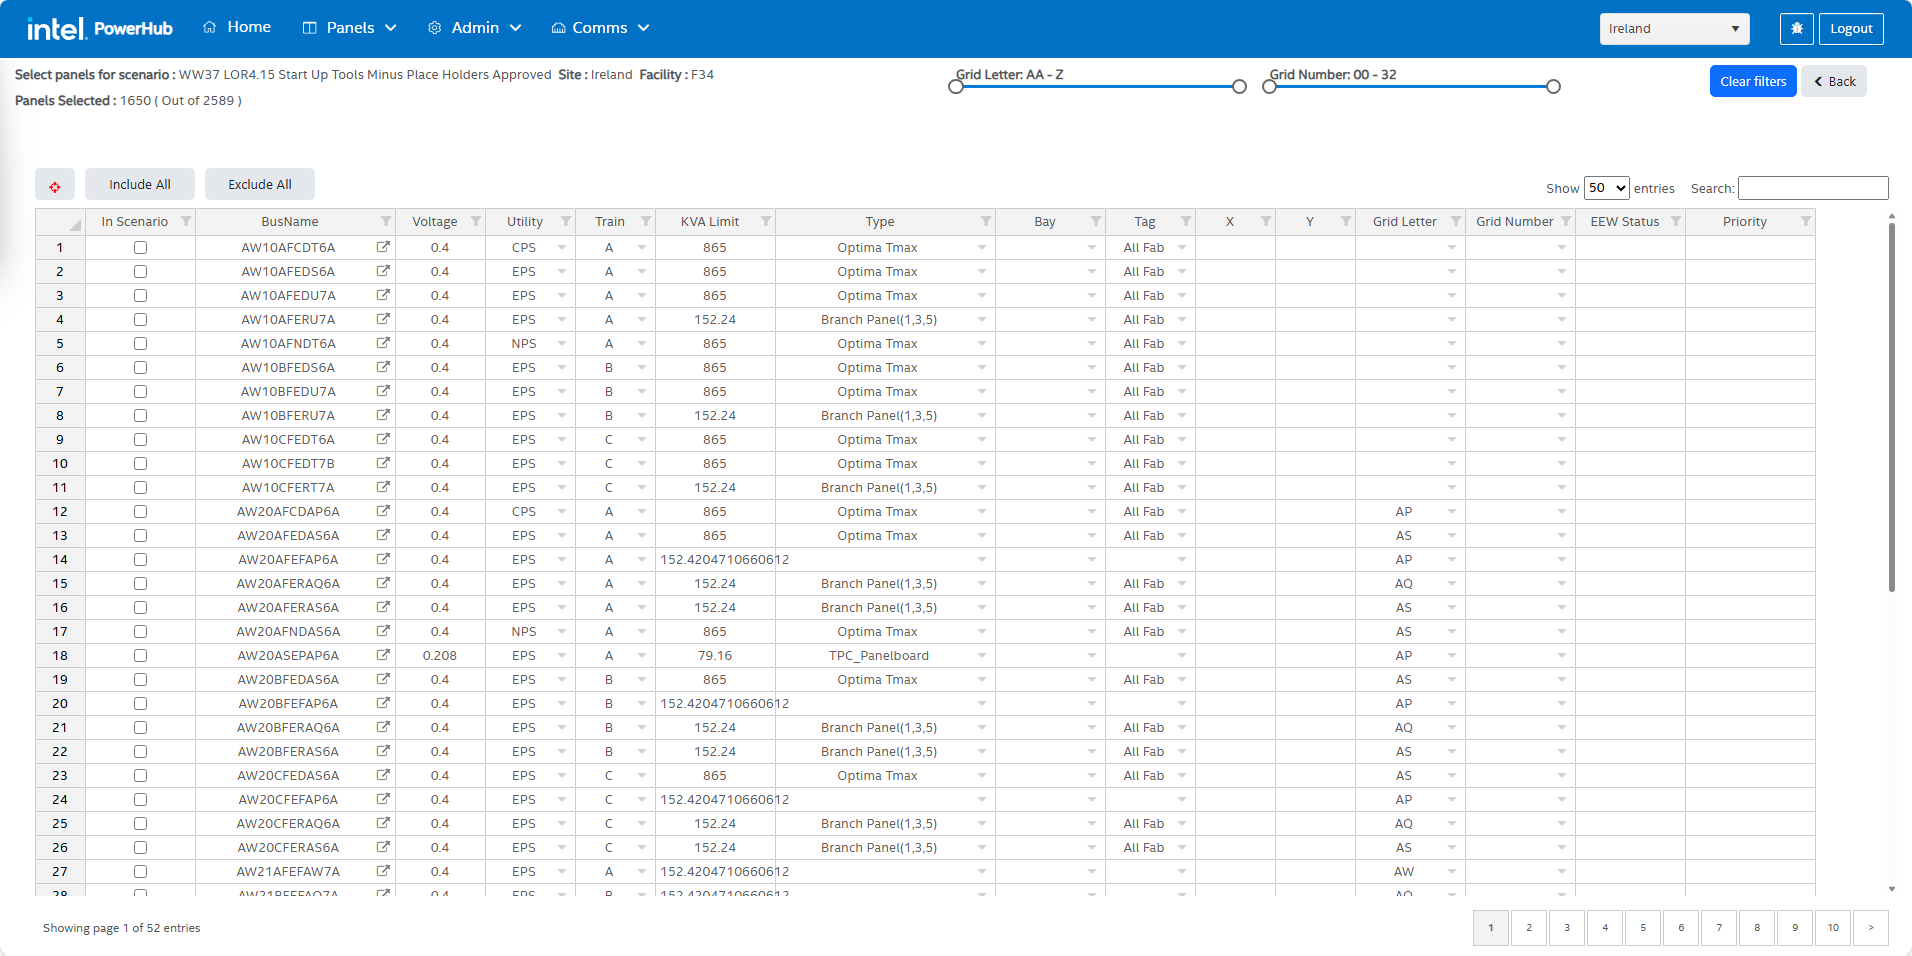
On this screen you can:
-
See all the panels in the facility and filter any of the columns to find specific panels.
-
Filter to a text string in any column by searching for the text on the “Search box”
-
Include or remove individual panels from the scenario by checking/unchecking the box in the first column.
-
Include or remove multiple panels from the scenario by filtering the grid and using the “Include All” and “Exclude All” buttons.
-
Set the optimiser priority of panels in the last column. Panels set with priority 1 will be considered first, panels with 2 will be considered second, and so on. Panels with no priority set will be considered last.
-
To set priorities: filter to the panels that should have priority 1, type 1 in the prioity column on the first row, drag the plus icon at the bottom right of the cell to all the other panels as in the animation shown below.
Note: You can bulk add panels to a scenario by going to the “Bulk Management” section of PowerHub.
Scenario Roxtecs
To see or modify which Roxtecs flash will consider as useable, review the value of the “Flash Useable” field under "Admin -> Roxtec"
Scenario Analysis
 Clicking on the scenario analysis icon brings you to the datasets which report on all the aspects of the completed scenario.
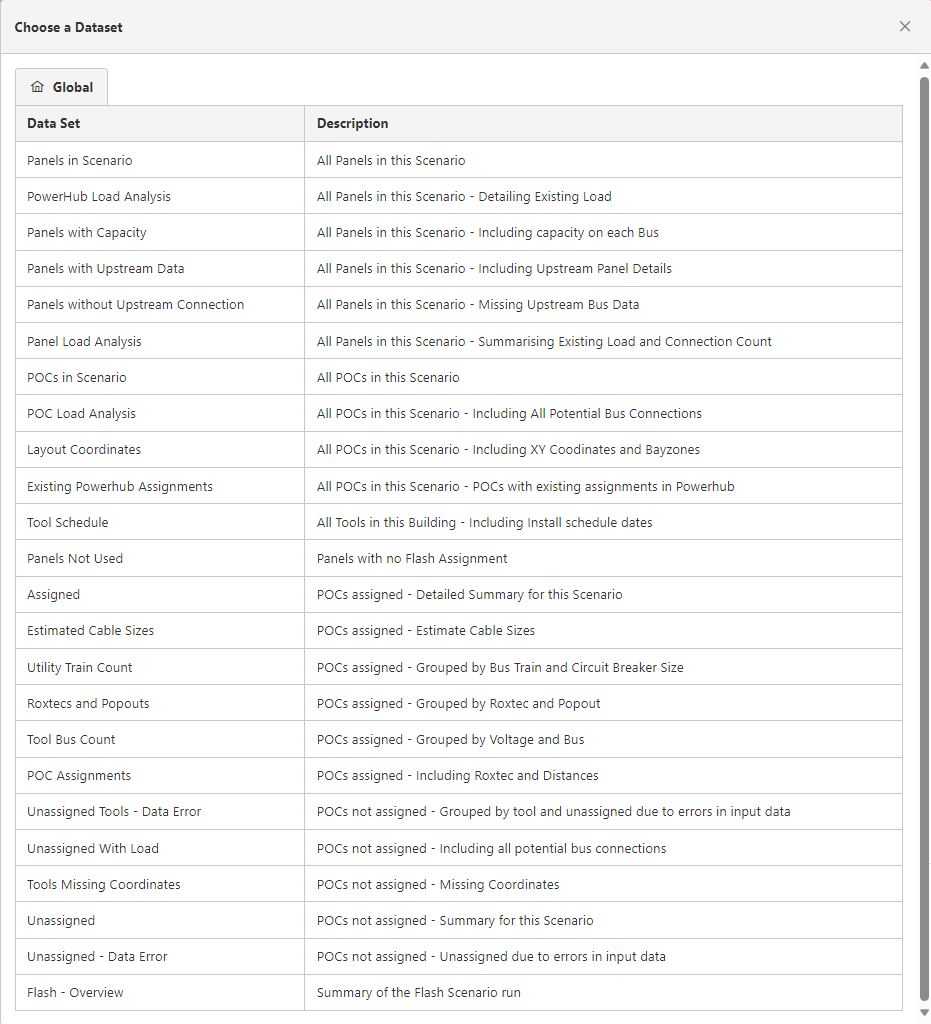
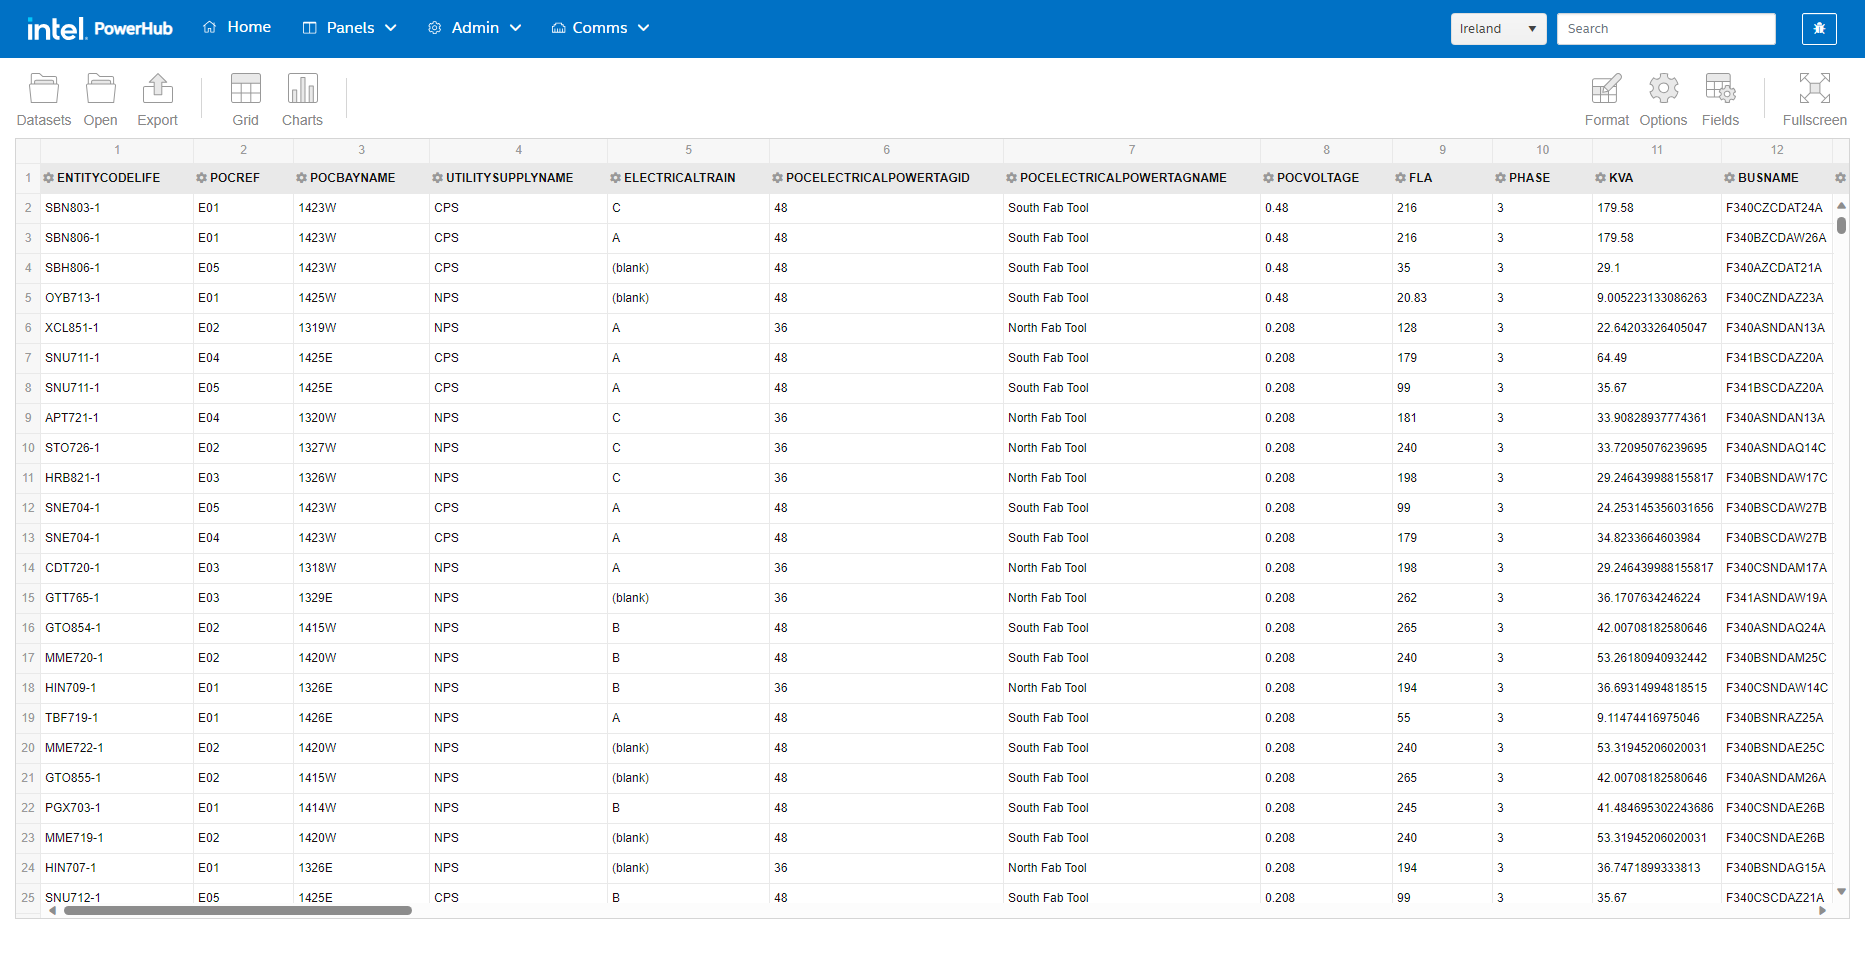
Select a dataset from the list shown and the dialog will close and the report will be displayed in a grid.
Above the grid you will see the following button:
-
Datasets: To select a different report, click on the “Datasets” folder icon above the report grid to display the list of datasets again.
-
Export: Use this button to print or export the report in various formats
-
Grid: Switched to grid display (grid is the default which is shown when you first open a report)
-
Charts: Used this button to display the data in various chart formats.
-
Format: You can format the way the data is displayed in individual columns and you can format individual cells with different font and colours if the values meet certain criteria.
-
Options: You can change how totals are displayed and the overall layout of the grid
-
Fields: allows you to remove fields from the grid or add a new calculated value
-
Fullscreen: Maximise the grid to use the full screen
Power BI Gap Analysis
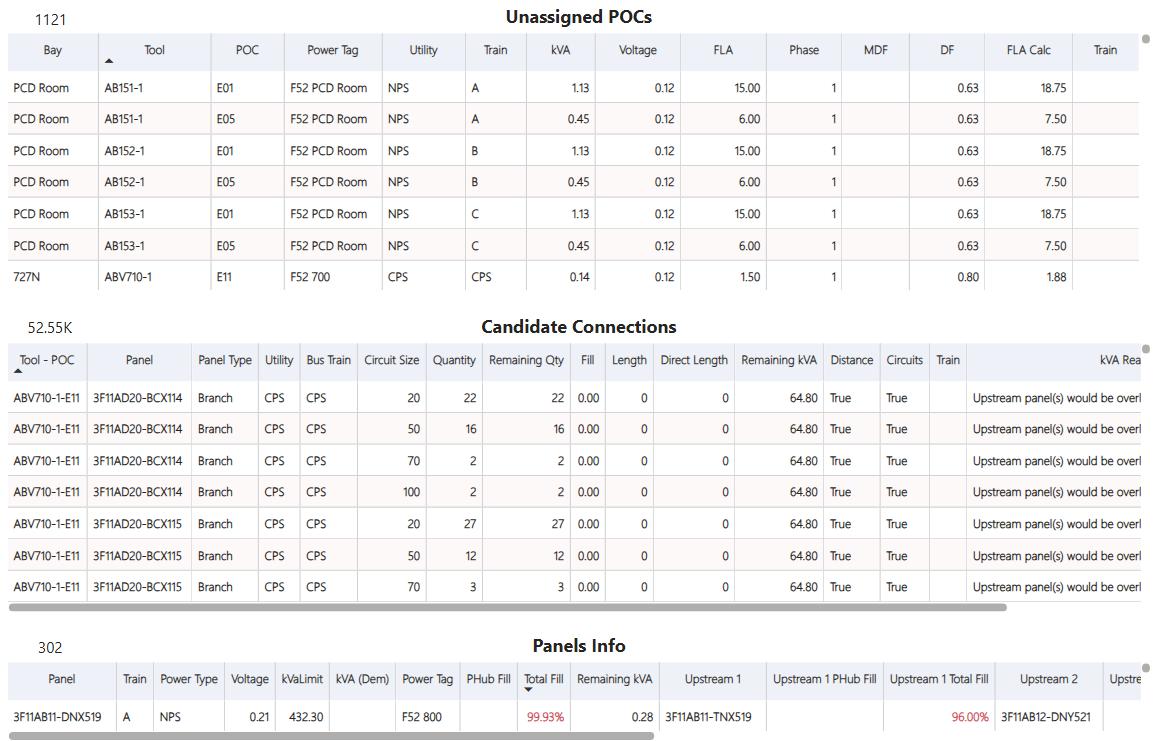
 The Power BI Gaps Analysis report helps the user to amalyse the reasons for unassigned POCs.
This report is accessed by clicking on the ‘View Scenario Analysis’ icon on the flash scenarios grid. When you run the report, the first filter defaults to unassigned POCs for which there are candidate connections. You can also use the “Assignment Type” filter to select POCs that were not assigned for other reasons.
The report contains 3 tables:
Unassigned POCs: Each POC that was not assigned If there were candidate connections, they will be listed in the second table. Click on a row in the top table to filter the rows in the second table.
Candidate Connections: This table shows all the possible connections for a POC. The ‘Distance’, ‘Circuits’, ‘Train’ and ‘kVA’ columns indicate why that candidate was not feasible with the ‘kVA Reason’ gives further detail on why the panel or its upstream panels failed the capacity criteria. Whilst holding the CTRL key, click on a row in the second table to filter the rows in the third table.
Panels Info: This table shows the details of the panel and it upstream panels so as you can see where any bottleneck is occurring.
Power BI Data Check
 Before you run a flash scenario, you should click on the “View Data Check Report” icon.
This report provides a comprehensive data check on the scenario and all the tools, panels and POCs. The report will list the number of tools and panels in the scenario and display a table showing the number of panels of each utility supply type per train. It lists all the issues with the data so as the user can address them before running the scenario. The errors can also be exported to a spreadsheet.
The checks on data issues are listed below:
| Category | Error |
|---|---|
| Scenario | There are no tools in the scenario |
| Scenario | There are no branch panels in the scenario |
| Scenario | There are no distribution panels in the scenario |
| Scenario | Facilities use Roxtecs but there are no flash useable Roxtecs |
| Scenario | Facilities have no gridlines |
| --- | --- |
| Panel | Panels are not in this scenario’s facilities |
| Panel | Branch type and branch flag on panels do not match |
| Panel | Panels are not distribution boards or branch panels |
| Panel | Panels have no coordinates |
| Panel | Panels have coordinates outside of facility gridlines |
| Panel | Panels have no maximum load set |
| Panel | Upstream panels have no maximum load set |
| Panel | There are NPS panels in the scenario but no NPS POCs |
| Panel | There are EPS panels in the scenario but no EPS POCs |
| Panel | There are CPS panels in the scenario but no CPS POCs |
| Panel | Panels have no power tags |
| Panel | Panels have no train |
| Panel | Panels have no voltage |
| Panel | Panels have no utility supply type |
| Panel | Panels have voltage but no POCs with suitable voltage in scenario |
| Panel | Panels have power tags but no POCs with matching power tags in scenario |
| Panel | Panels have circuits without a frame size |
| Panel | Panels have no upstream panel |
| Panel | Panel-Upstream Panel combinations are missing diversity or correction factors |
| --- | --- |
| Tool | Tools assigned to same circuit have clashing active to/from dates |
| Tool | Tools have no power POCs |
| Tool | Tools have no CEID |
| Tool | Tools have no coordinates |
| Tool | Tools have coordinates outside of facility gridlines |
| Tool | Tools are not in this scenario’s facilities |
| Tool | Tools are not in the P3 schedule |
| Tool | Tools have POCs on different trains |
| --- | --- |
| POC | POCs have coordinates outside of facility gridlines |
| POC | POCs have no FLA |
| POC | POCs have no train |
| POC | POCs have train set but no panels in scenario with the same train |
| POC | POCs have no utility supply type |
| POC | POCs have no voltage |
| POC | POCs have no phase |
| POC | POCs have no power tags |
| POC | POCs have utility of NPS but no NPS panels in scenario |
| POC | POCs have utility of EPS but no EPS panels in scenario |
| POC | POCs have utility of CPS but no CPS panels in scenario |
| POC | POCs have voltage set but no panels with suitable voltage in scenario |
| POC | POCs have power tags but no panels with matching power tags in scenario |
| POC | POCs have no default demand factor |
Delete
 Use this button the completely delete the scenario and all its results.