
Introduction
LSPx offers an enhanced suite of features across multiple modules. The modules include Location-Specific Package Publishing (LSP), Revision Packages, Drawing and Popouts Management, Facility Data Sheets (FDS), Popout assignment, RODs, DCRs, SDDs, ECNs, DMRs, and reports. Built on a robust database architecture which integrates with the PowerHub, LSSHub, FCE Home and GAPs applications, LSPx provides users with a comprehensive suite of features designed to streamline and optimize project management workflows.
One of the key components in LSPx is the Tool Install Schedule, which serves as the home page and central hub for managing tools and their Points of Connection (POCs). This module allows users to easily view, edit, and manage tools and their associated connections, ensuring seamless project execution.
Title bar and Navigation
When you access LSPx, you will see the purple title bar at the top of the screen. From here you can navigate around the application. First time users will be directed to the home page, where you can view the Tool Install Schedule for your site. If you navigate to a different module within the site, you can easily return to the Schedule by clicking the LSPx logo at the top left of the page.
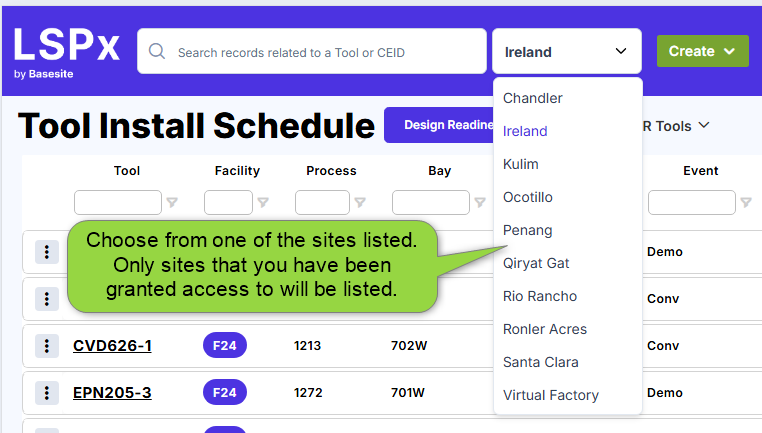
Site Location Filter
In the center of the tool bar, you'll find the Site selection dropdown. This dropdown allows you to pick sites based on your assigned permissions. Once a site is selected, the tool install schedule will automatically update to display the relevant tools for the chosen location. For example, if "Ireland" is selected from the dropdown menu, only the tools on the Ireland site will be displayed on the page.
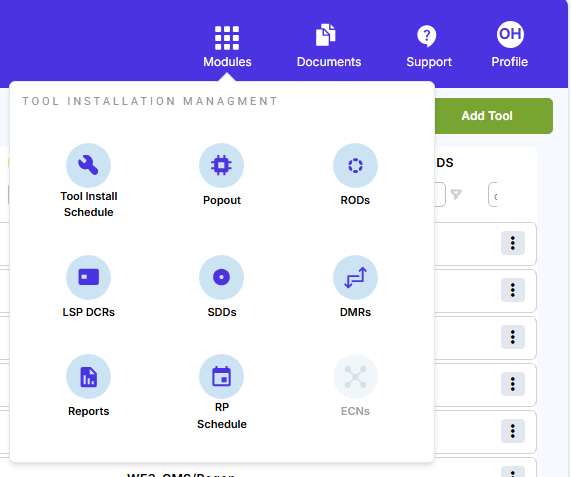
Navigating to all the LSPx modules
You will find the Modules menu icon in the toolbar at the top of the page. When you click it, you will see icons which will bring you to any of the LSPx modules includingthe Popout assignment page, RODs, LSP DCRs, SDDs, ECNs, DMRs, Reports and the RP Schedule. If you do not have access to a module, then that module’s icon will be greyed out.
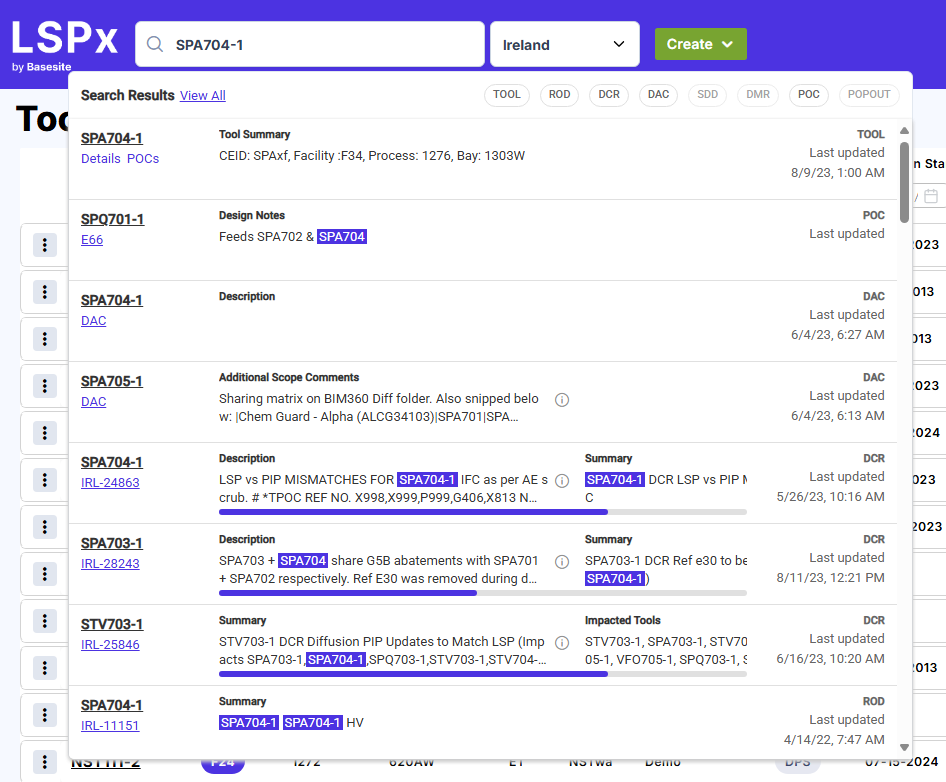
Searching for records relating to tools
On the top-center of the page, you'll find the tool search box. This allows you to find all records (RODs, DCRs, DACs, SDDs, DMRs) related to a tool from any page in the application. It also shows records from other tools which mention the searched tool in their key fields. Records from individual POCs or Popout assignments which refer to the searched tool in their comments are also returned. Users can also search for a CEID to get all the tools of that model and any other records than refer to the CEID. You don't need to navigate to different modules to find related information. A single search query gathers all relevant data. You can then follow the links to bring you directly to the relevant record. The system saves your last 10 searches per site, allowing users to quickly re-access frequently needed information.
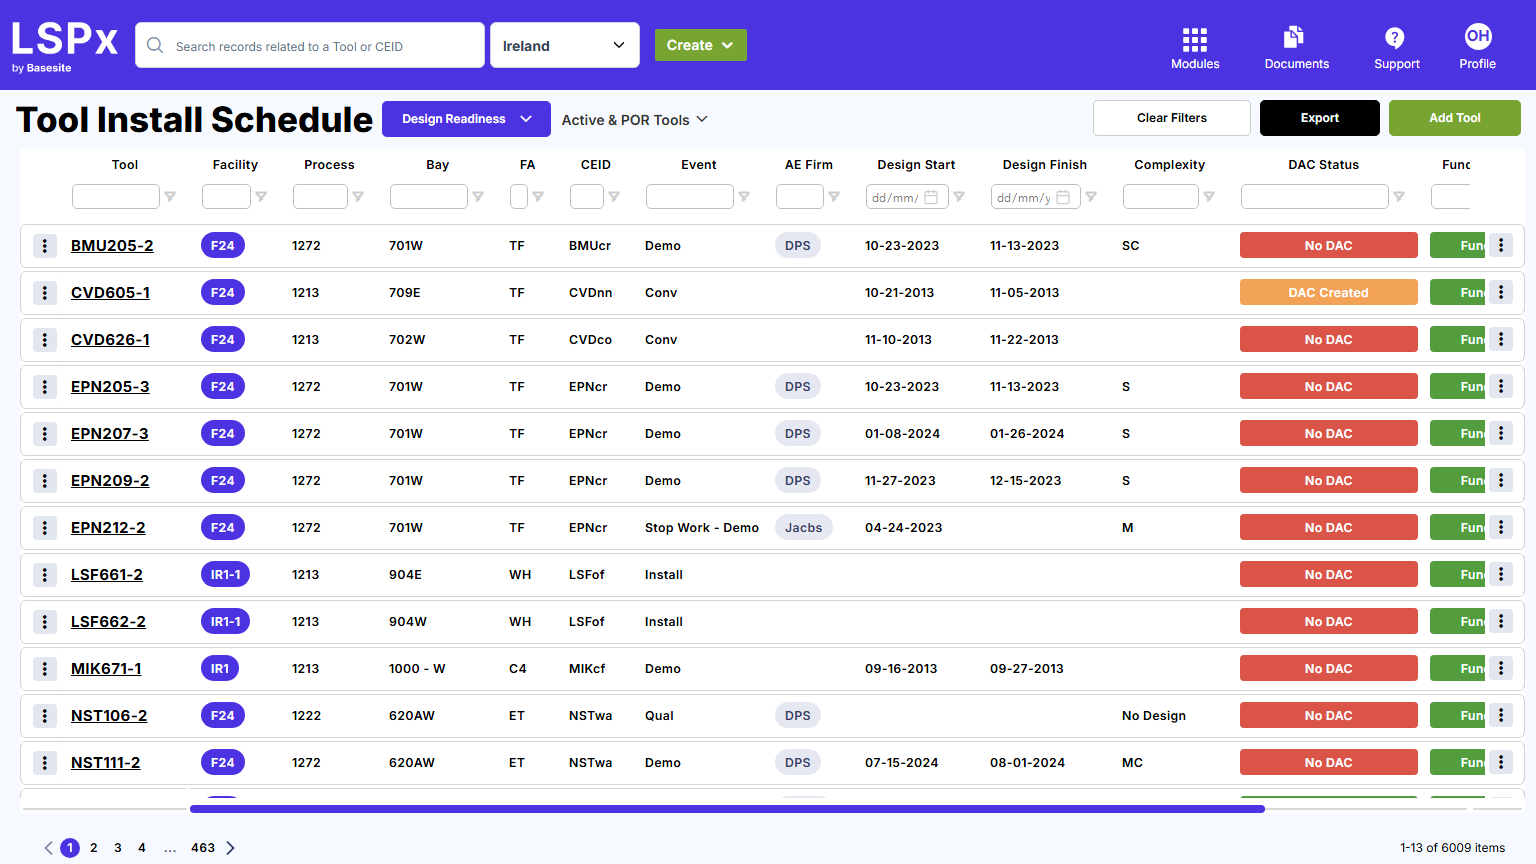
Tool Install Schedule
The Tool install Schedule grid shows many details of tools on the site you are working on and gives you access to get to the tools' details and the details of POCs and other records related to the tools.
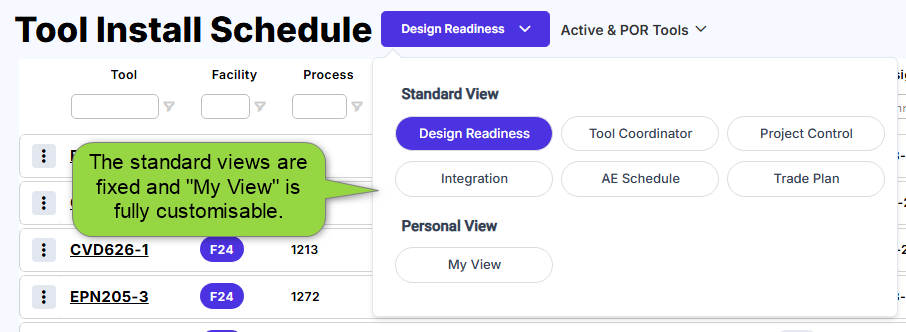
Role-Based & Customizable Grid Views
Above the tool install schedule grid there is a dropdown with six pre-configured, fixed views tailored to specific roles (e.g., Design Manager, Tool Coordinator) and a fully customizable "My View". The first time you log in, the system defaults to the most relevant view based on your roles. "My View" allows you to tailor the grid to your specific needs, showing only the columns that matter to you. Unlike the fixed views, changes to the columns shown, the column order and column widths in "My View" are automatically saved. The system remembers which of the views you last used on each site and returns you to that view when you access the application again.
Row Filtering
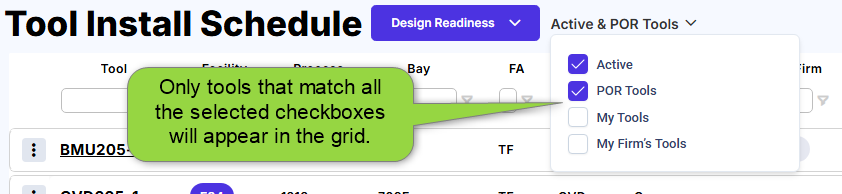
To the right of the view dropdown is the row filter dropdown. It has four checkboxes. Checking these boxes will reduce the number of tools displayed in the grid. By default, the "Active" and "POR" values are checked for everyone. For tool to be listed in the grid it must meet all the criteria of the selected filters.
- Active All tools in projects which are active and not archived.
- POR All tools which are on the P3 schedule
- My Tools Tools where you are assigned a role on the tool, for example Area Coordinator or Tool Owner
- My Firm's Tools Tools where the company you work for has any of the following roles on the tool: AE Firm, Trade Mechanical, Trade Electrical, Trade Architectural, Trade Structural, Trade Rigging Trade LSS.
When you select values from the dropdown, the name of the filter changes to reflect the checkboxes you have selected. Your last settings are stored for each site. Be sure to review these filters whenever you cannot find a tool in the grid.
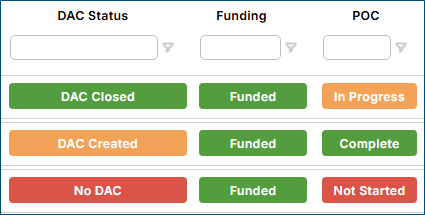
Design Readiness "Traffic Light" Indicators
Some of the columns on the tool install schedule have a red, orange or green colored background. These are the design-readiness fields which give an at-a-glance status of each tool.
Readiness columns
DAC Status
The DAC Status columns will show the following colors depending on the tool's DAC
- "No DAC": Red
- "AE Draft" Orange
- "DAC Created": Orange
- "TO Reviewed": Orange
- "Returned to Tool Owner": Orange
- "DAC Closed": Green
Funding
On HVM sites the funding column will be one of:
- "Funded": Green - means that the tool is on the POR
- "Not POR": Red - means that the tool is not on the POR
On Tool Design sites the funding column will be one of:
- "No DCN": Red �
- "Awaiting DCN": Orange
- "Funded": Green - means that the DCN has been approved by the Design Manager
SYCCB
The value of the SYCCB column depends on whether there are open requests for a tool in the CRANE system
- CRANE ID: Red - means that the tool has an open request in CRANE
- OK: Green - means that the tool does not have any open requests in CRANE
Layout
The value of this column depends on whether the layout has been released to design
- No Layout: Red - not released to design
- RTD: Green - released to design
POC
This column indicates the completion status of the tool's disciplines.
- “Not Started”: Red - means that none of the disciplines have been set to "Y" or "N/A"
- “In Progress”: Orange - means that at least one of the disciplines has been set to "Y" or "N/A"
- “Complete”: Green - means that all the disciplines have been set to "Y" or "N/A"
Features of the Tool Install Schedule Grid
The Tool Install Schedule grid displays all tool data in a tabular format. Expand the section below to see all the available fields:
Fields and description
| Field | Description |
|---|---|
| Tool | Name of tool |
| Facility | Name of facility |
| Process | Process number |
| Bay | Bay number |
| FA | Functional Area |
| CEID | Copy exactly ID |
| Event | Tool event type (Install, Demo, CIP etc.) |
| AE Firm | The Architerctural Engineering Firm assigned to the tool |
| Design Start | Tool design start date |
| Design Finish | Tool design finish date |
| Complexity | The complecity of the tool |
| Latest RP Revision | The latest RP revision |
| DAC Status | The Design Activities Confirmation Status of the tool |
| Funding | The funding status of the tool |
| Layout | Whether the tool layout has been released to design |
| POC | Shows the completion status of the tool's disciplines |
| Latest LSP Revision | The latest issued revision of the tool |
| Functional Area Team | Functional Area Team for the tool |
| WSTIE | Wafer Start TIE - The Wafer Start number linked to the tool on the P3 schedule (eg. 1000, 2000, etc.) |
| Pedestal DS | Pedestal Design Start date |
| Pedestal DF | Pedestal Design Finish date |
| Prefac Start | Tool install construction work start date prior to delivery of the tool onsite |
| Prefac Finish | Tool install construction work finish date |
| SL1 CS | Safety Level 1 start date; a tool installation milestone where the Intel safety team determines that electriical power may be safely introduced to the tool |
| SL1 CF | Safety Level 1 finish date |
| SL2 CS | Safety Level 2 start date |
| SL2 CF | Safety Level 2 finish date |
| Mech | The Mechanical Trade Company assigned to the tool |
| Elec | The Electrical Trade Company assigned to the tool |
| Arch | The Architectural Trade Company assigned to the tool |
| Struct | The Structural Trade Company assigned to the tool |
| Rigging | The Rigging Trade Company assigned to the tool |
| LSS | The LSS Trade Company assigned to the tool |
| DS WW | The Design Start Work Week |
| Basis Design Type | The basis of the design e.g. LSP Go/By, P1276 RP |
| Go By | The GoBy of the tool |
| Tool Owner | The LSS Trade Company assigned to the tool |
| Area Coordinator | The LSS Trade Company assigned to the tool |
| Project Manager | The LSS Trade Company assigned to the tool |
| Process | The Process Trade Company assigned to the tool |
| First Kind | The First instance of a tool within a CEID and Process group. The one with the first design start date is the First-of-a-kind (VFK) |
| DAC Returned | The date the DAC was actually returned |
| DAC Return Due Date | The date the DAC must be closed by this date. Differs for each site |
| Tool IFC Finish | Issue For Construction Finish date |
| Pedestal Install Start | Pedestal Install Start date |
| Pedestal Install Finish | Pedestal Install Finish date |
| Fabrication Start | Fabrication Start date |
| Fabrication Finish | Fabrication Finish date |
| Tool Set Start | Tool Set Start date |
| Tool Set Finish | Tool Set Finish date |
| SL1 Signoff Start | Safety Level 1 Signoff Start date |
| SL1 Signoff Finish | Safety Level 1 Signoff Finish date |
| SL2 Signoff Start | Safety Level 2 Signoff Start date |
| SL2 Signoff Finish | Safety Level 2 Signoff Finish date |
| DAC Created Date | DAC Created Date |
| Active From Date | The date the tool will be 'live' from an electrical pojint of view |
| Active To Date | The date the tool will be 'live' until |
Column Options
Although you can use the features below to change the 6 fixed views temporarily, your changes are not saved to those views. Only changes to "My View" are saved. If you work on multiple sites, changes to "My View" are site specific and allow you to have a different configuration for each site.
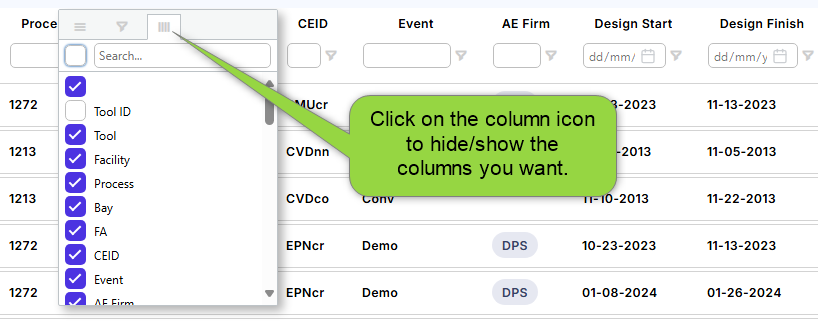
You can perform several actions on the grid columns by clicking the hamburger icon next to the column header:
- The Pin feature lets you move and pin a selected column to the far left or right in the grid. For example, clicking Pin Left will move the column to the leftmost position, making it the first data column in the grid. If you select No Pin, the column will return to its original position.
- Autosize This Column will automatically adjust the selected column's width to fit the widest content displayed on screen.
- Autosize All Columns will automatically adjust all the grid's columns width to fit their widest content displayed on screen.
- Reset Columns will revert all columns to their default positions and unpin pinned columns.
- Click on the column icon and use the Search... field to find specific columns.
- To show or hide a column, simply select or deselect the corresponding checkbox.
Changes you make to the columns in "My View" are saved to your profile and will be available on your next visit to the application. Changes made to the standard fixed views are not saved.
Filtering Column Values by Attributes
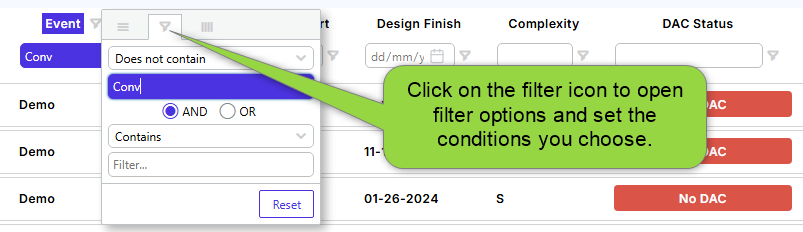
You can filter the values in each column for any attribute by setting your desired conditions. For example, to filter the values for Facility:
- Enter a value directly into the textbox below the Facility column header.
- Alternatively, click the filter icon next to the textbox to open filter options.
- Choose a filter condition, such as Contains, and enter the desired facility name.
This will display only the data that matches your filter criteria.
Filter highlighting and clearing filters
Once you filter on any columns, the filtered columns will be highlighted with a background color to give a visual reminder that you have filters on. You can clear individual column filters by clicking on the filter icon in the column and clicking reset.
You can clear all the column filters by clicking on the "Clear Filters" button above the tool install schedule grid. Note that this does not affect the row filters (All Tools, POR, etc.).

Navigating to tool details and POCs
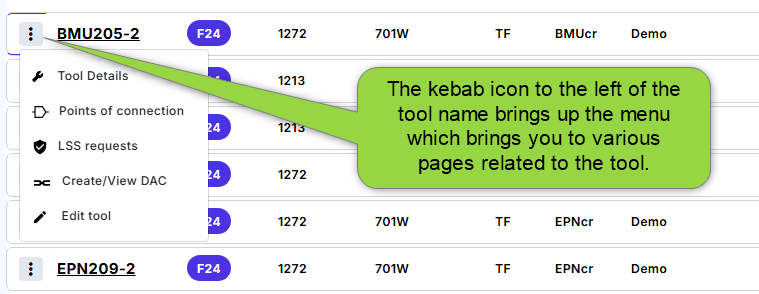
The kebab icon to the left and right of the grid gives access to different pages of a tool and to POC details. Expand the menu by clicking on the kebab icon. See the table below for details on the menu items available:
| Menu | Purpose | Screenshot |
|---|---|---|
| Tool Details | Brings you to the tool information page with Stakeholders, Preassignment Tracker, difference forms, leadsheet, tool history, tool comments and DMRs. Revision packs can also be issued from this page | 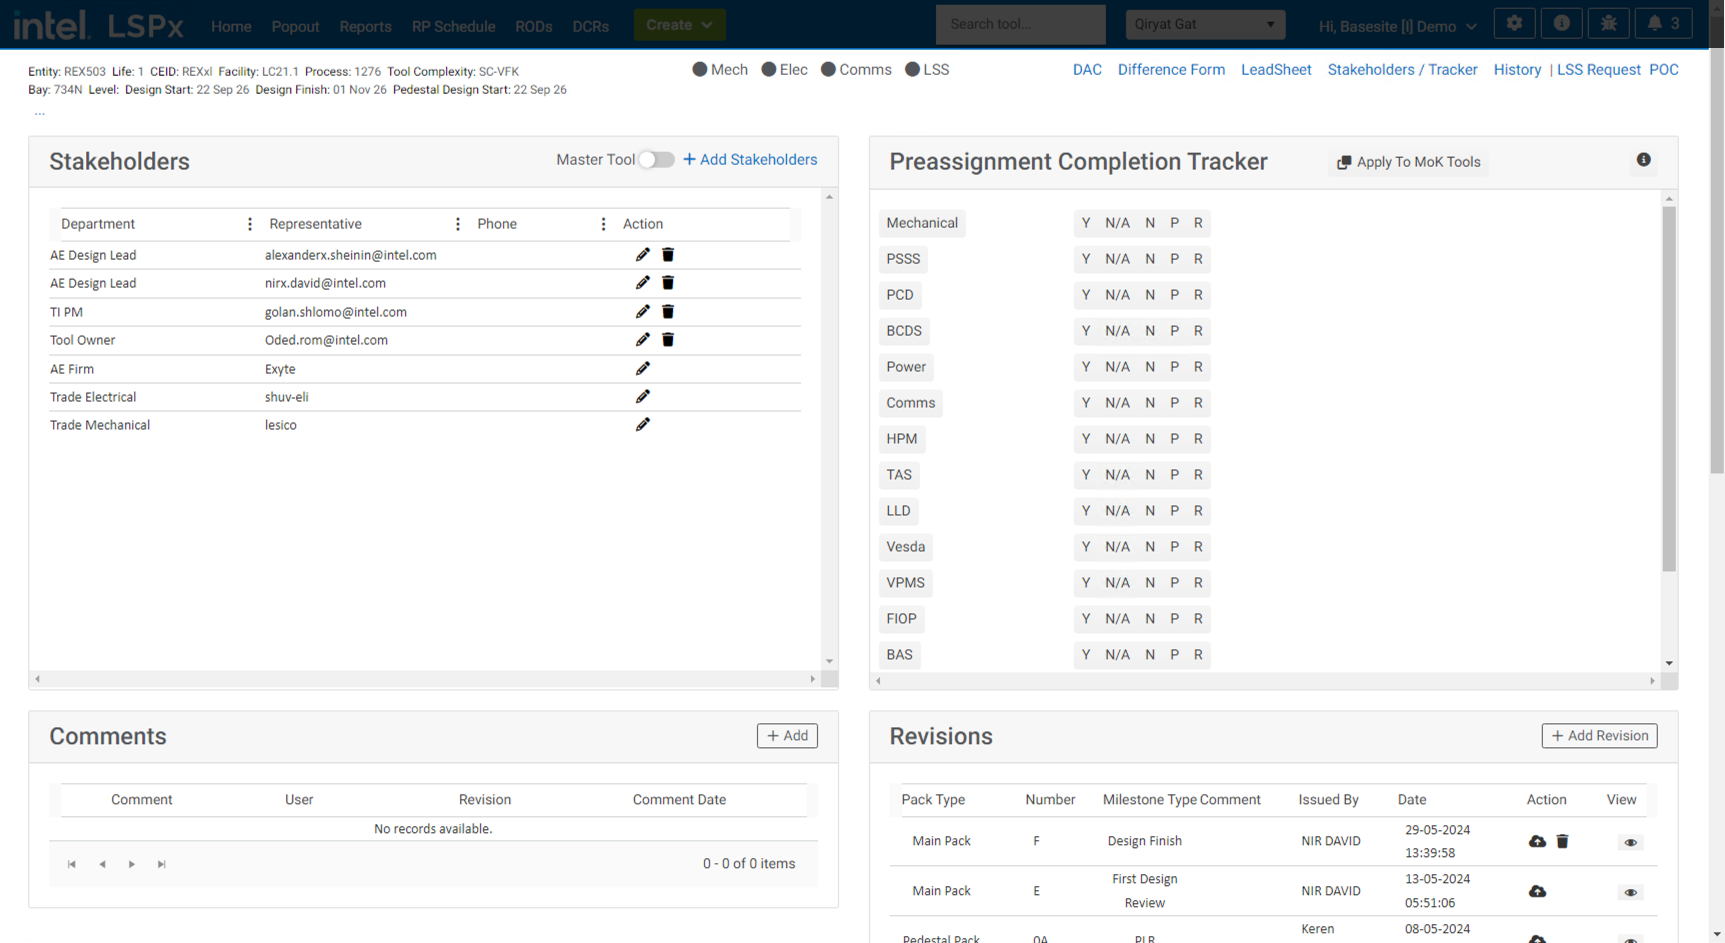 |
| Points of Connection | Takes you to a tabbed page which lists all the POCs across multiple disciplines associated with the tool. This data is gathered from multiple sources including FaSTr, PowerHub, CommsHub and LSSHub. Database Modification Requests (DMR) can be raised from the discipline tabs. You can also see assigned Popouts and all RODS for the tool | 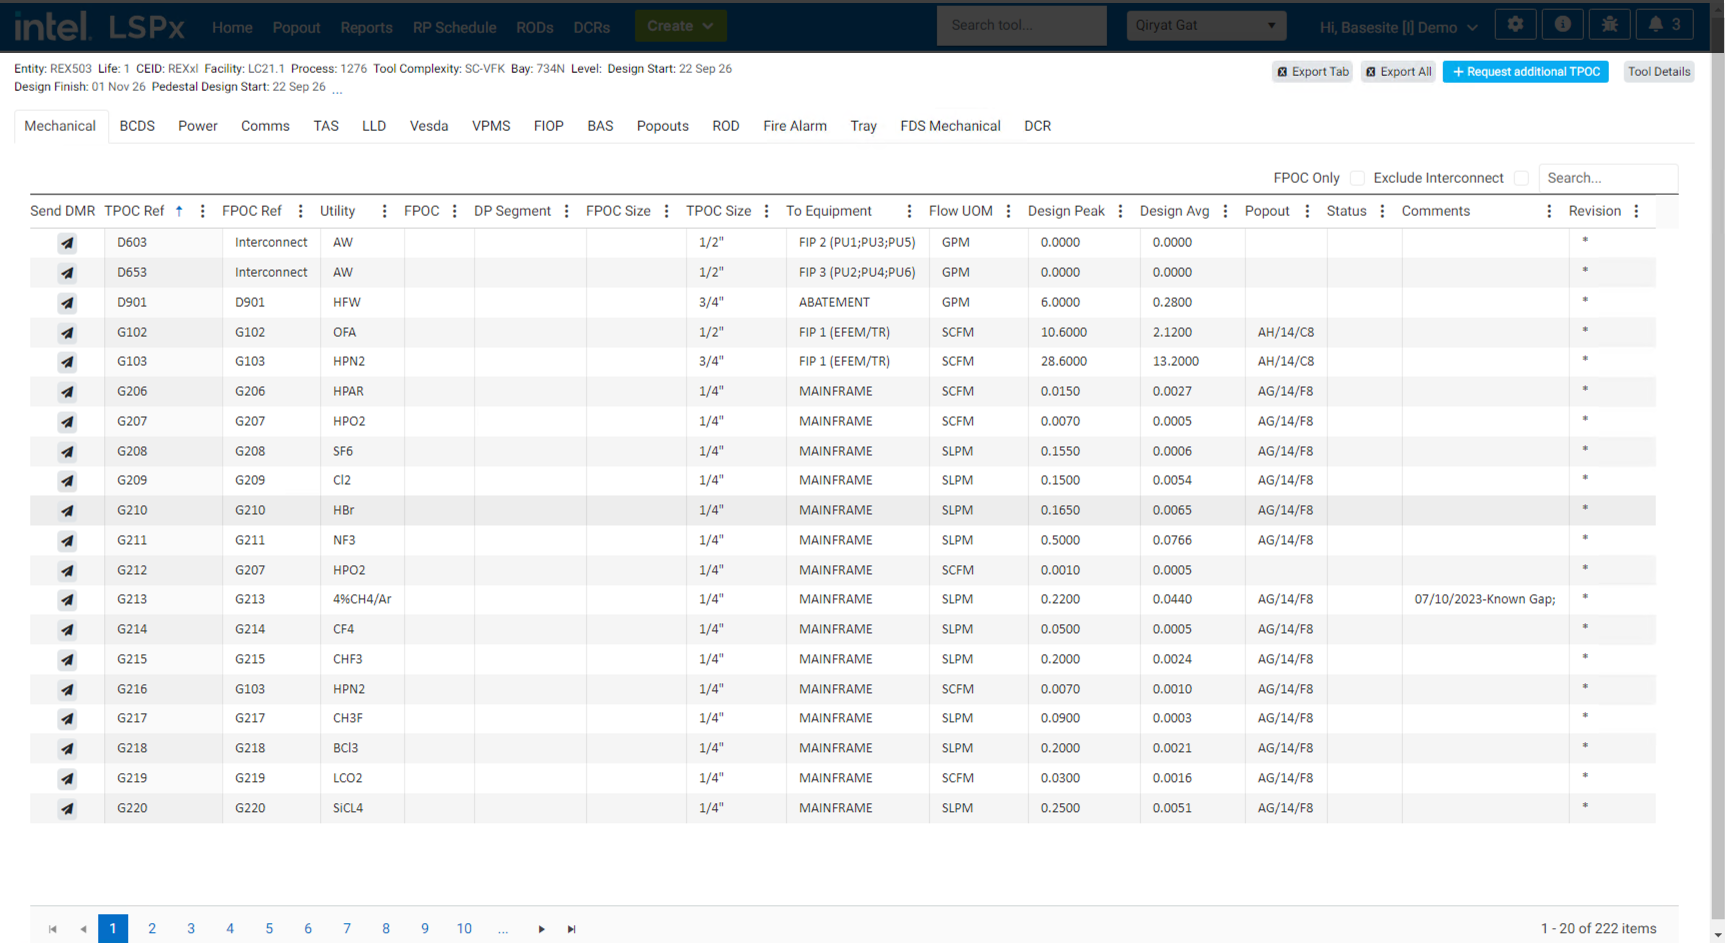 |
| LSS requests | Used to access Life Safety System details for tools for some disciplines on some sites. | 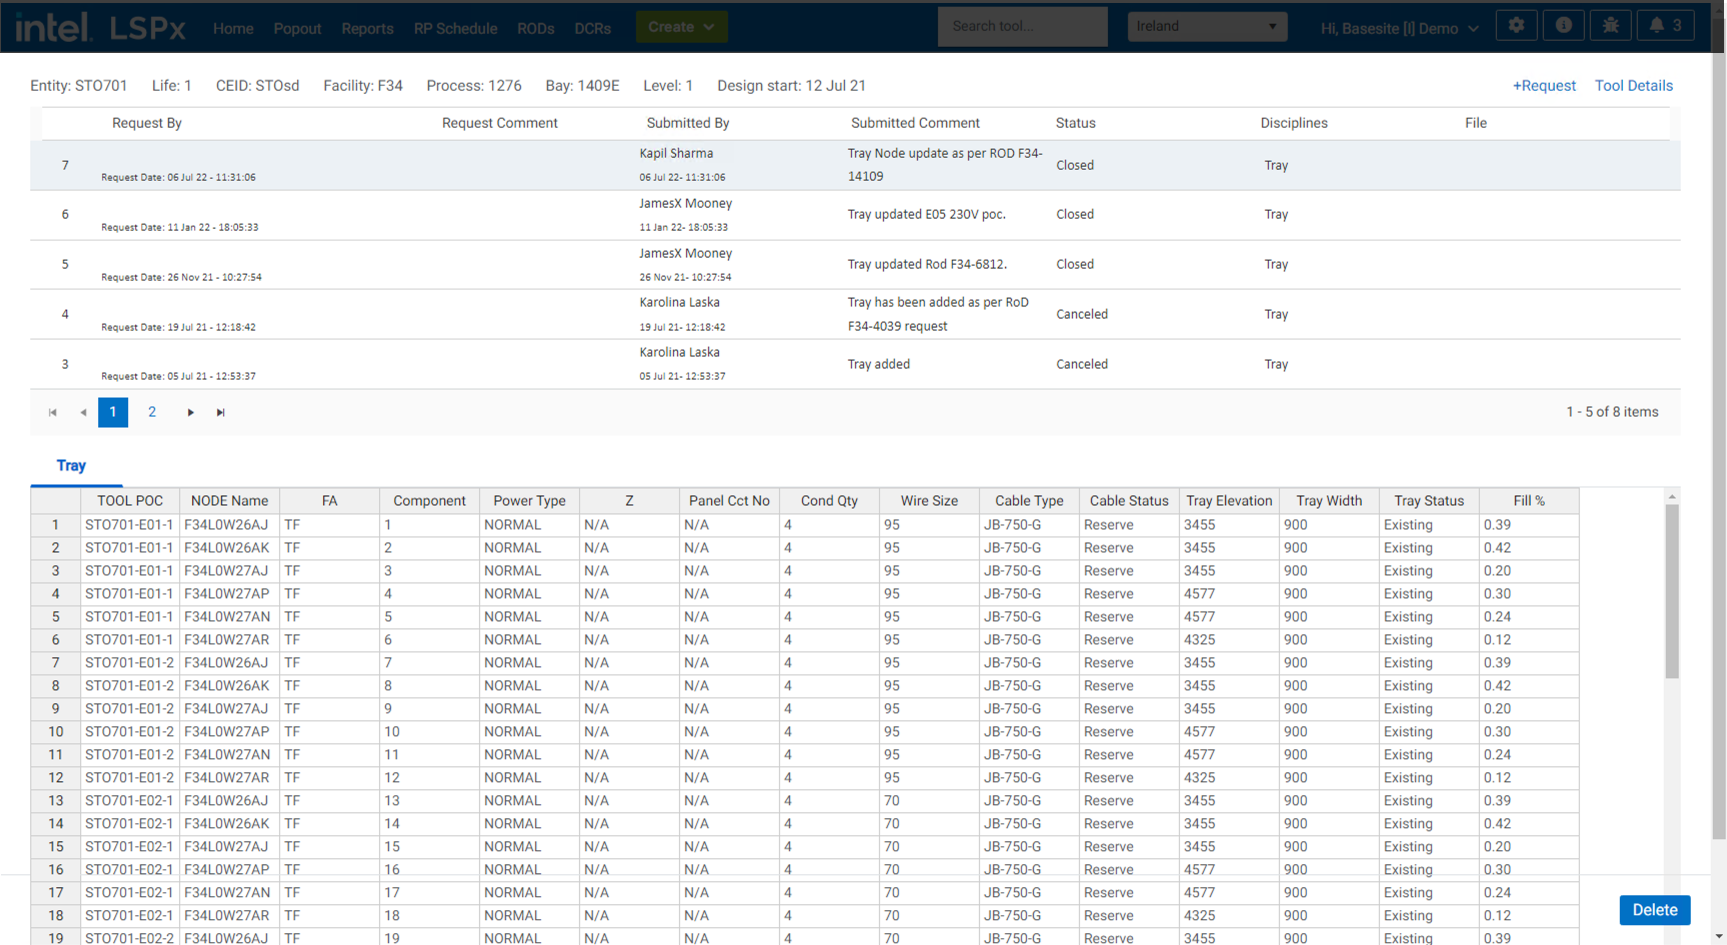 |
| Create/View DAC | If a DAC exists for the tool, you will be redirected to view the DAC Form. Otherwise, it will open the new DAC form for you to create a DAC | 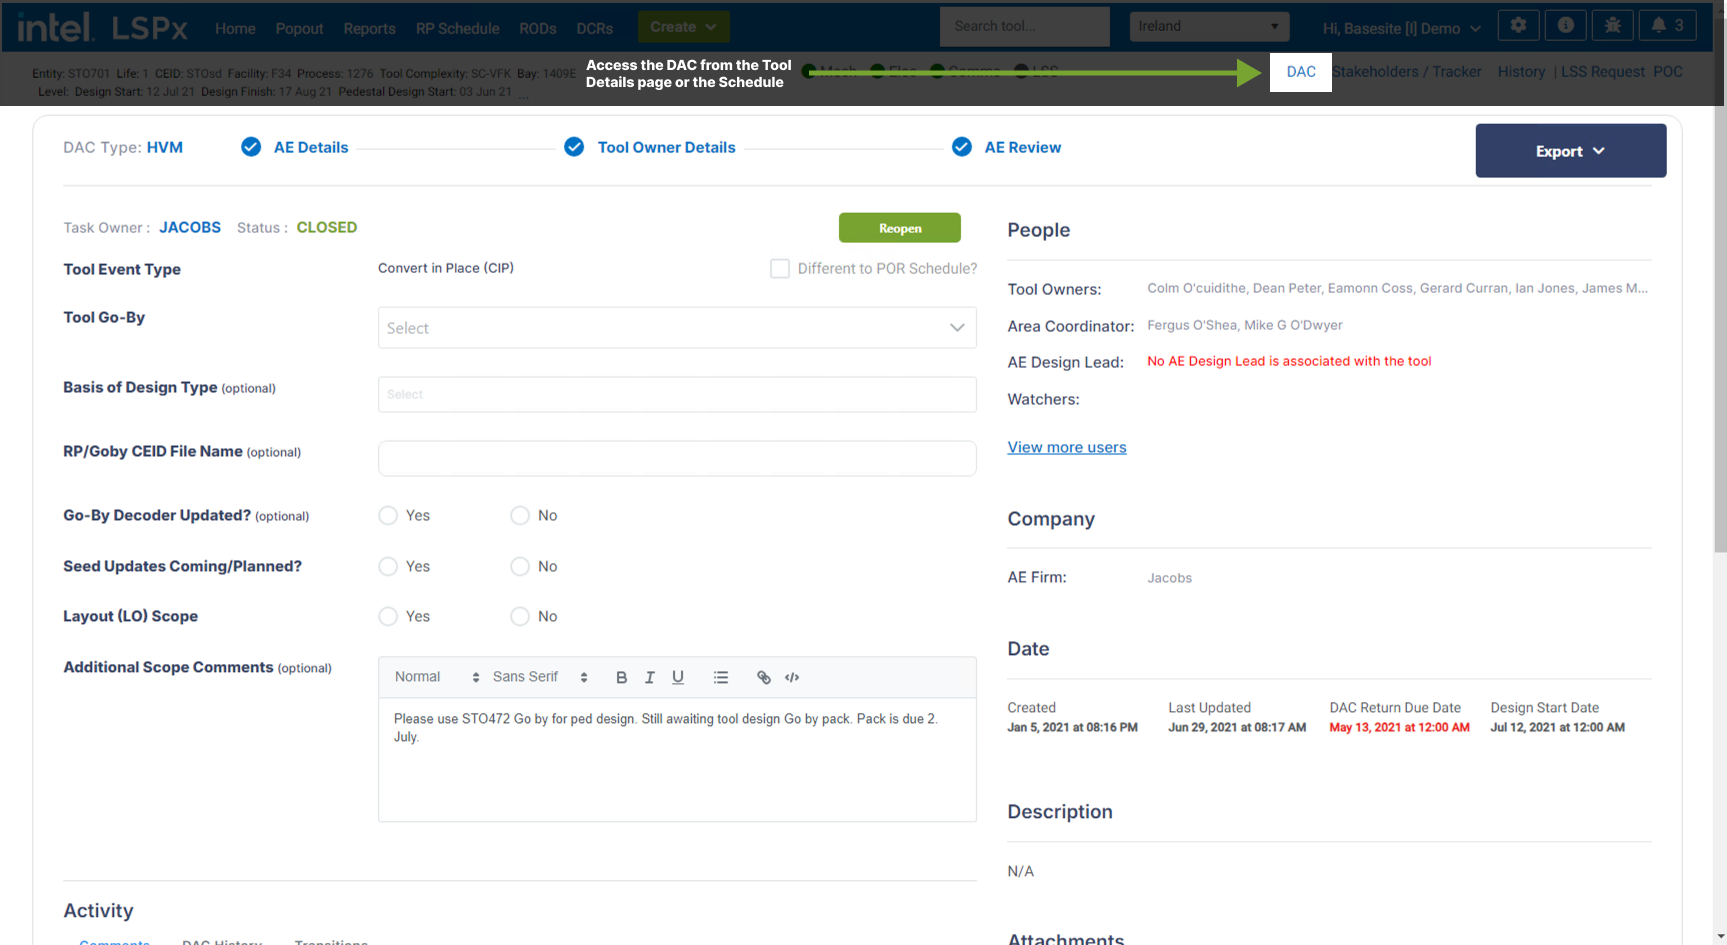 |
| Edit tool | Clicking the Edit icon will display a pop-up window that allows you to change the tool's information. Some fields such as Entity Code, Life and Facility are mandatory. Save your changes to update the tool. | 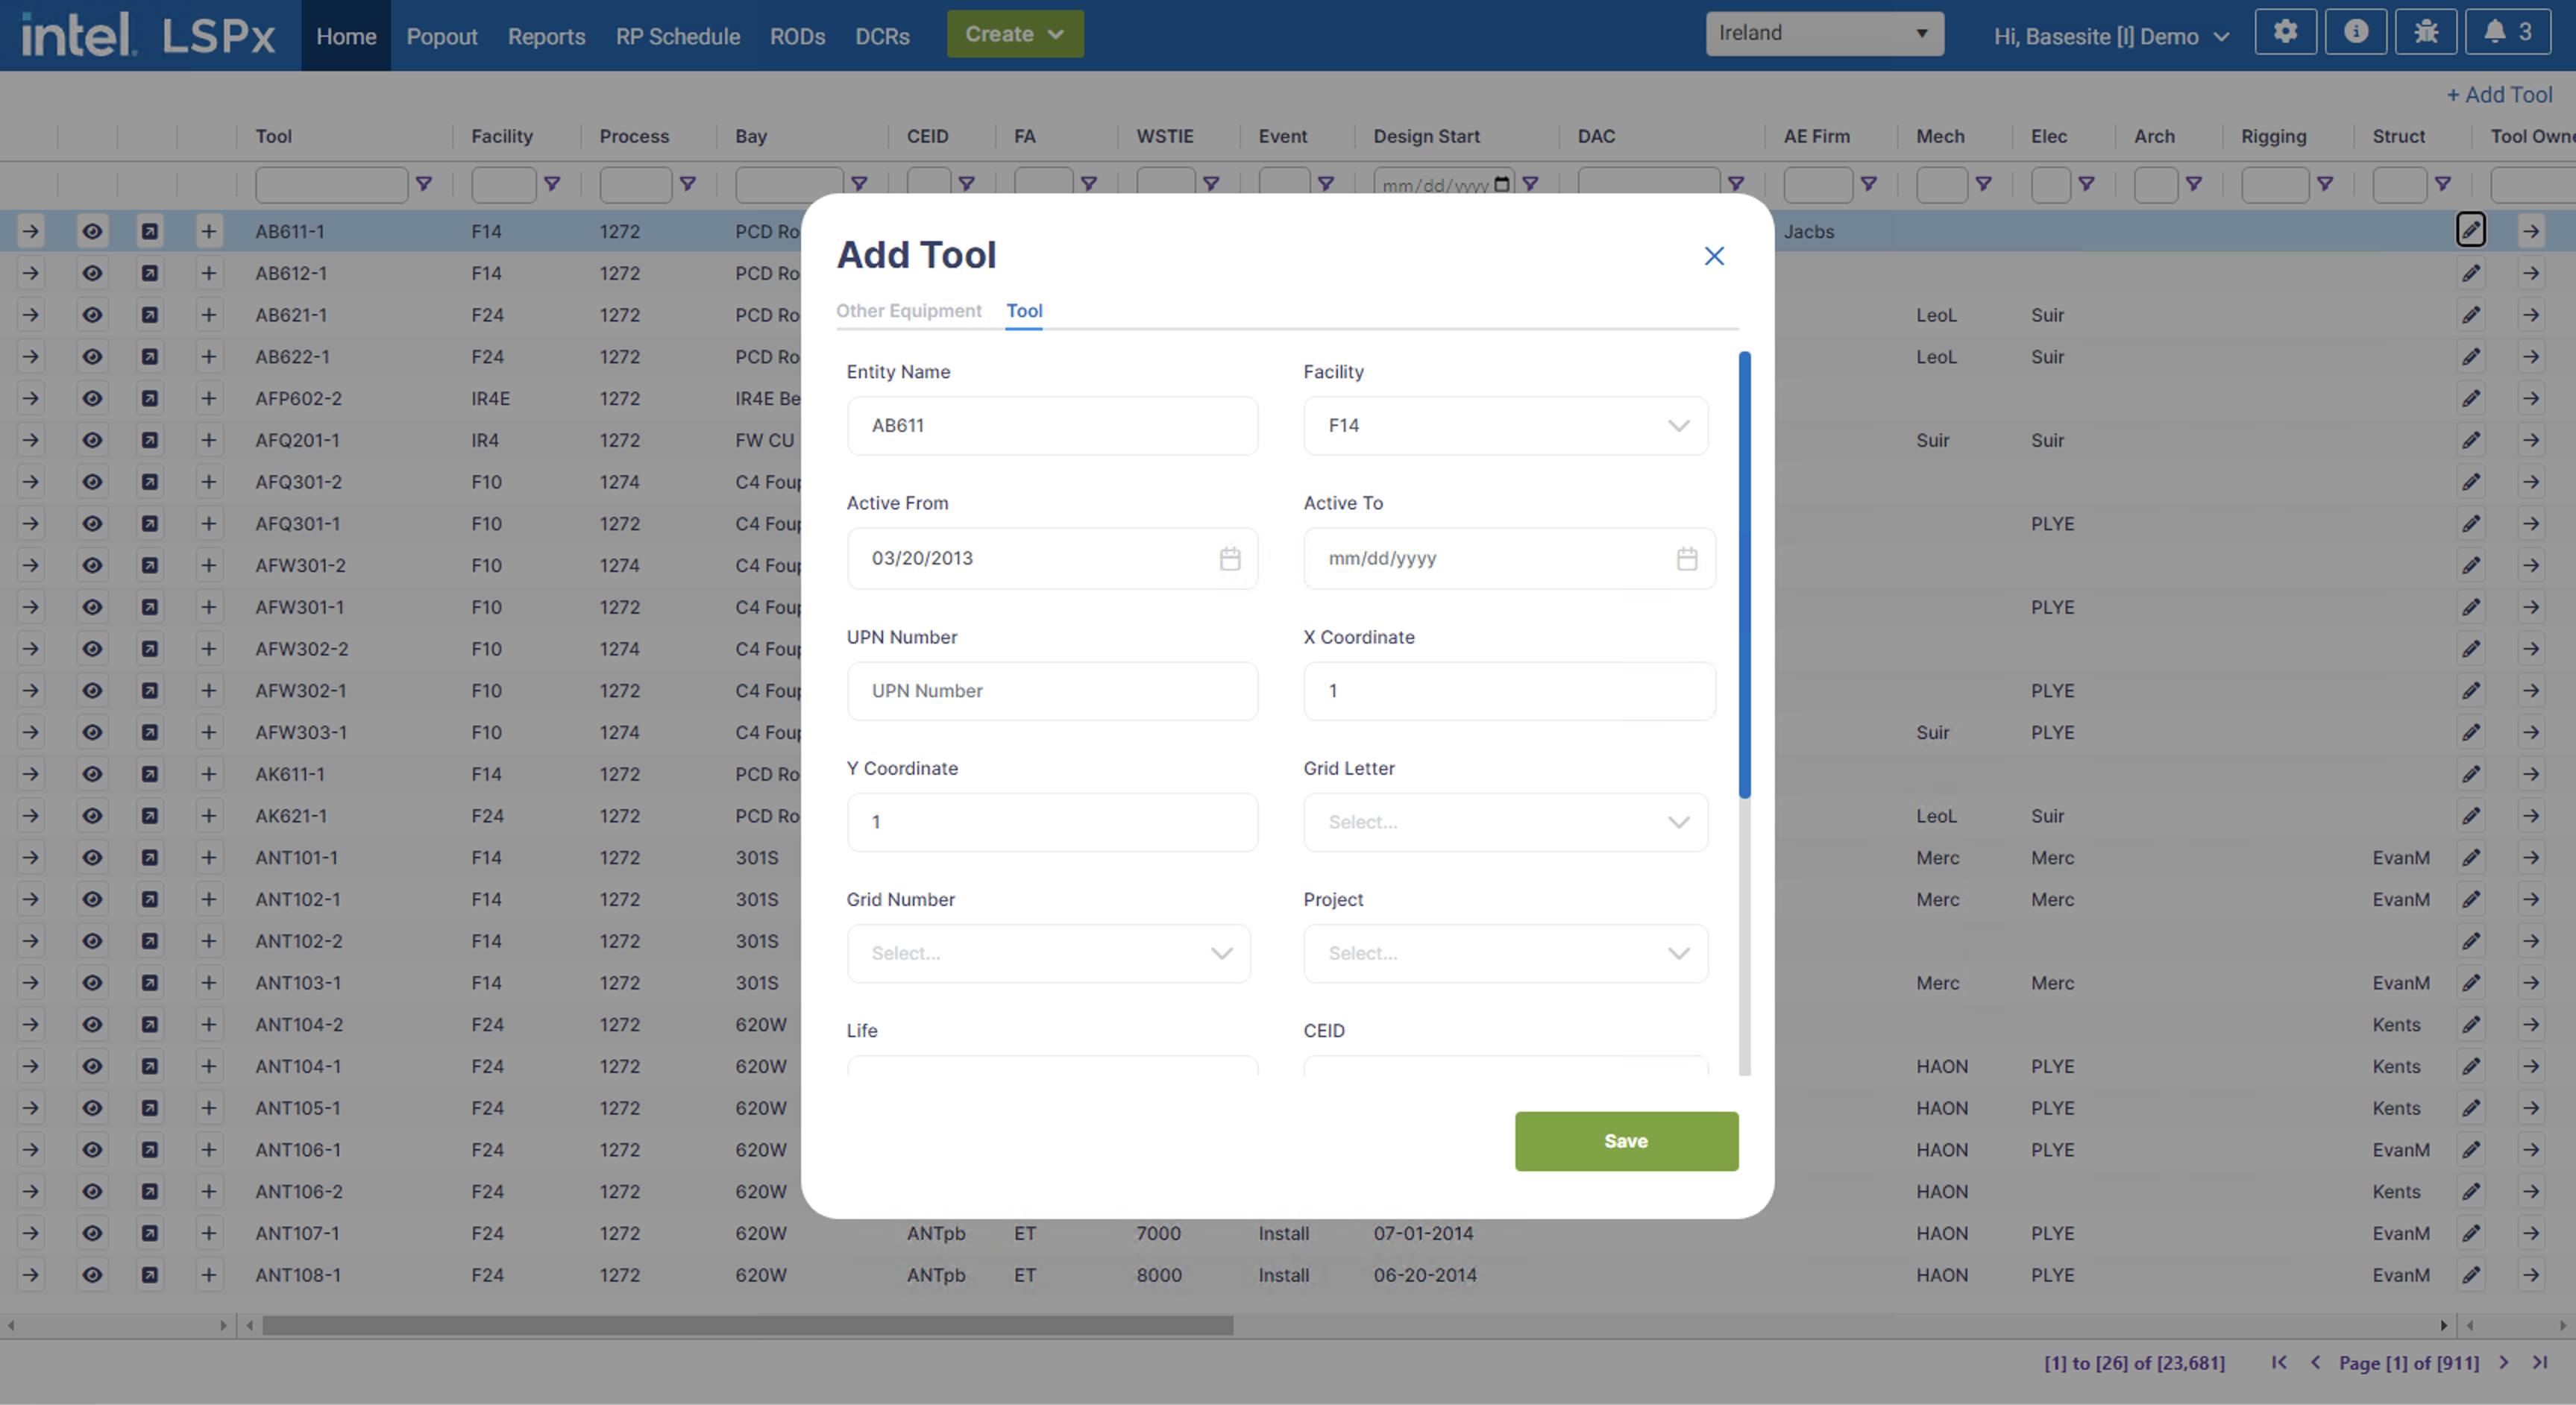 |
Accessing some of these pages requires you to have the appropriate role. Refer to our Permissions Guide for the roles required to access a feature or page.
Exporting the tool list
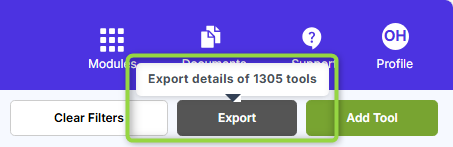
The Export button to the top-right of the tool install schedule will export the data in the grid. It will only export the tools that you have filtered to, and it will only export the columns that are shown in the grid. When you hover over the export button, a tooltip will display how many tools will be exported.
Adding a New Tool to LSPx
To add a new tool to the application, follow these steps:
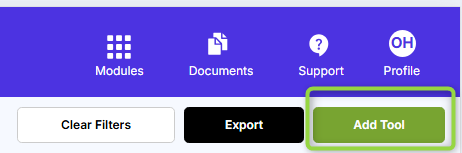
- Locate the Add Tool button in the top-right corner of the page and click on it
- A modal window will appear.
- Complete the form by providing mandatory fields such as Facility, Entity Name and Tool Life
- After entering the necessary information, click the "Save" button to complete the process and add the tool to the system.
You can only add a tool via the LSPx application. Adding other equipment such as Safety Shower is currently not supported.