CommsHub - User Guide
CommsHub is part of the PowerHub application with specific functionality for assigning telecoms POCc to consolidation point panels.
The CommsHub application is accessed from the Comms menu at the top of the screen which has 3 menu items:
-
Comms
-
CPs
-
Port View
CommsHub Home Page
Selecting the Comms menu item from the Comms menu brings you to the CommsHub home page. The CommsHub home page shows a grid of of Telecom POCs for one or more tools. Details of each POC and its tool are shown: tool entity code and life, tool connection name, port, POC name, panel & port assigned, maximum whip length, actual whip length, tool’s process, tool’s bay, and POC comment.
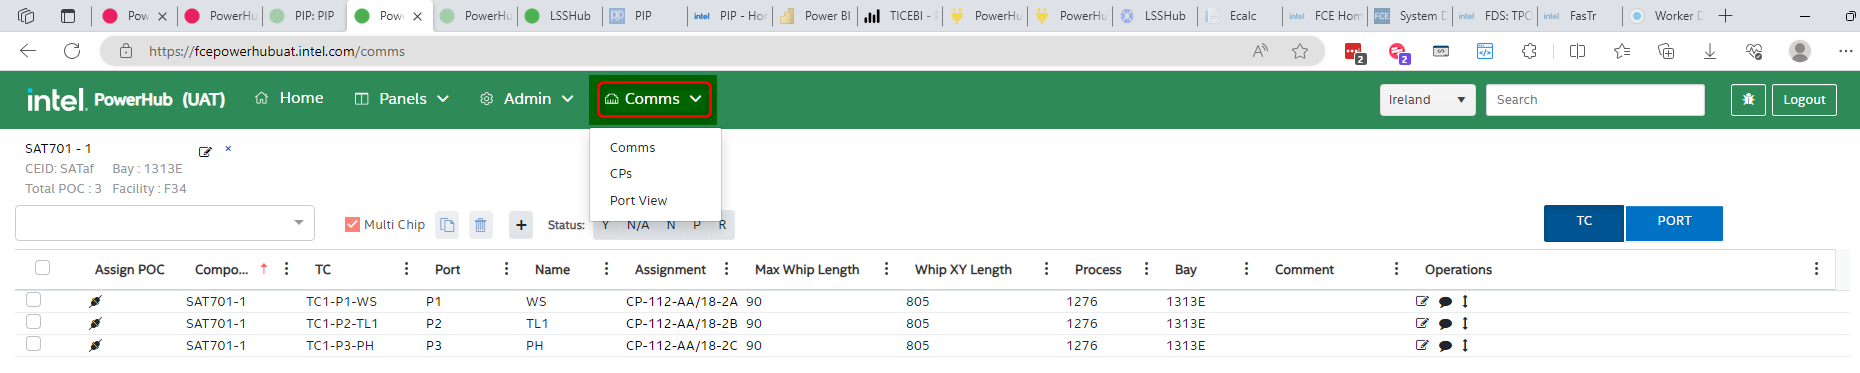
The CommsHub home page has the following features:
-
Tool search dropdown
-
Multi tool 'chip' checkbox
-
Tool ‘chip’ with tool details
-
Edit POCs icon
-
Remove icon
-
POC selection checkboxes to the left of the grid
-
Copy POC icon
-
Delete POC icon
-
Add POCs icon
-
TC button
-
Port button
-
Assign POC icon
-
Edit tool icon
-
Edit comment icon
-
Edit whip length icon
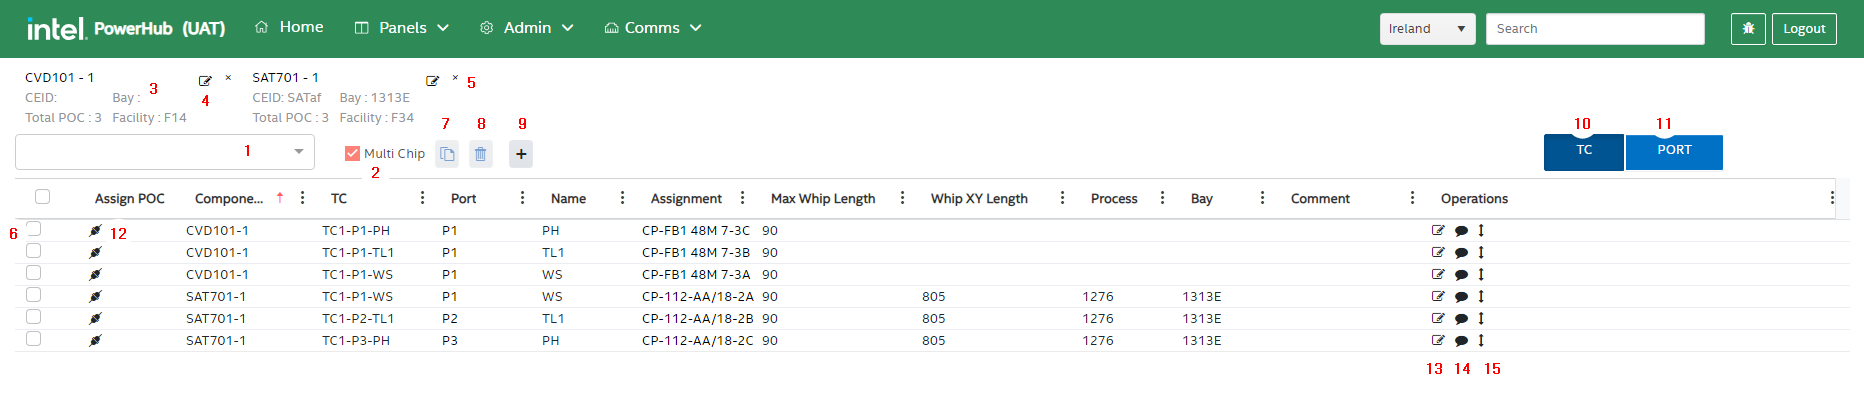
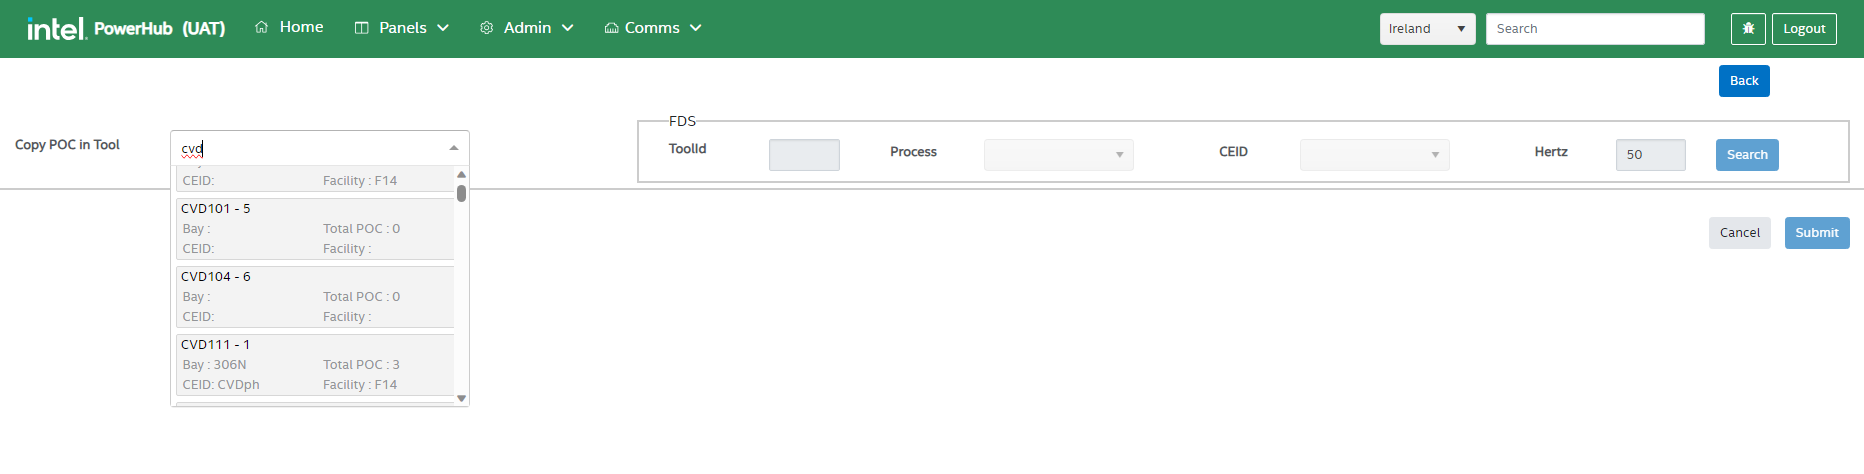
1. Tool search dropdown
When a user types into the tool search dropdown, a list of matching tools will be displayed in the dropdown with some details of the tool including:
-
Tool entity code and life
-
The tool’s Bay, CEID and Facility
-
The number of Telecoms POCs that are on the tool
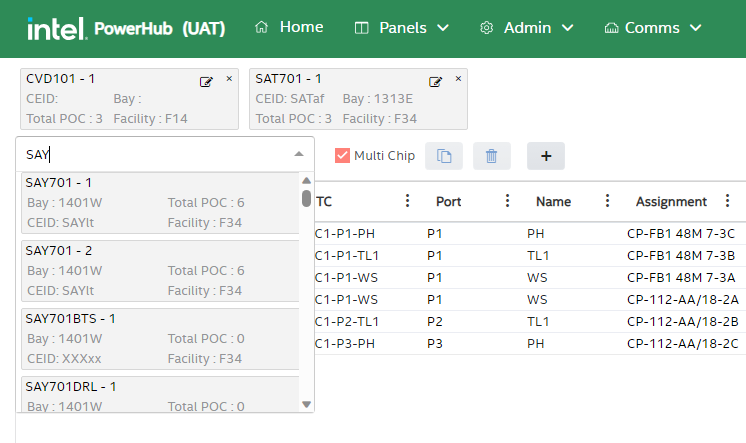
Selecting a tool from the dropdown will display the tools POCs (if any) in the POC grid.
2. Multi Chip
 The ‘Multi Chip’ icon is available beside the tool search dropdown. It enables the user to display the POCs of more than one tool at a time in the grid. If you leave this icon unchecked, when you select a tool from the search dropdown, any POCs currently displayed in the grid will be replaced by the newly selected tool’s POCs. If the ‘Multi-Chip’ option is selected the grid will be populated with associated POCs for multiple tools.
3. Tool ‘chip’ with tool details
Details of each tool selected for display in the grid will display above the grid in ‘chips’. Alos in the chip are ‘POC edit’ and ‘remove chip’ icons.
4. Edit POCs icon
 Clicking on the small pencil/edit icon in a chip will bring the user to another page where telecom POCs can be added to the tool and the existing POCs can be edited
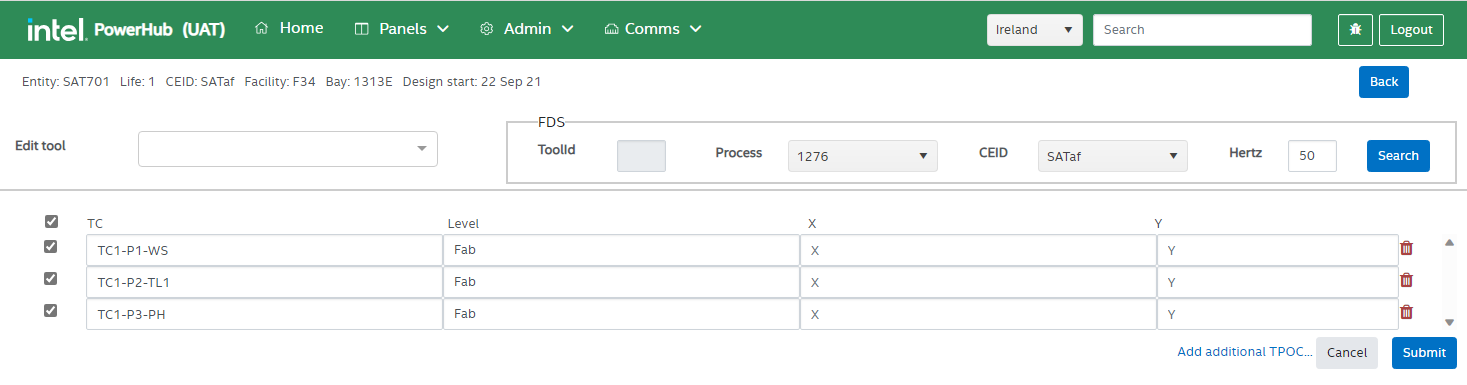
In this screen users can:
-
Switch to another tool using the Edit tool dropdown
-
Add POCs from FaSTr by selecting a process and CEID int he FDS area and clicking the Search button
-
Edit the POCs int he grid by typing into each field
-
Add POCs from scratch using the Add additional TPOC button
Once the user is satisfied with the POC values in the grid, they can select the POCs they want to update using the checkboxes to the left of the grid and pressing the Submit button.
The level and whip coordinates (X, Y) should be the same for all POCs in a whip. Generally, he user does not need to enter XY coordinates for telecom POCs. If no coordinates are entered, then the system will use the centre of the tool as the TPOC coordinates when calculating distances to CPs.
5. Remove icon
 Clicking on the x icon in a chip on the home page will remove that chip and remove that tools POCs from the grid.
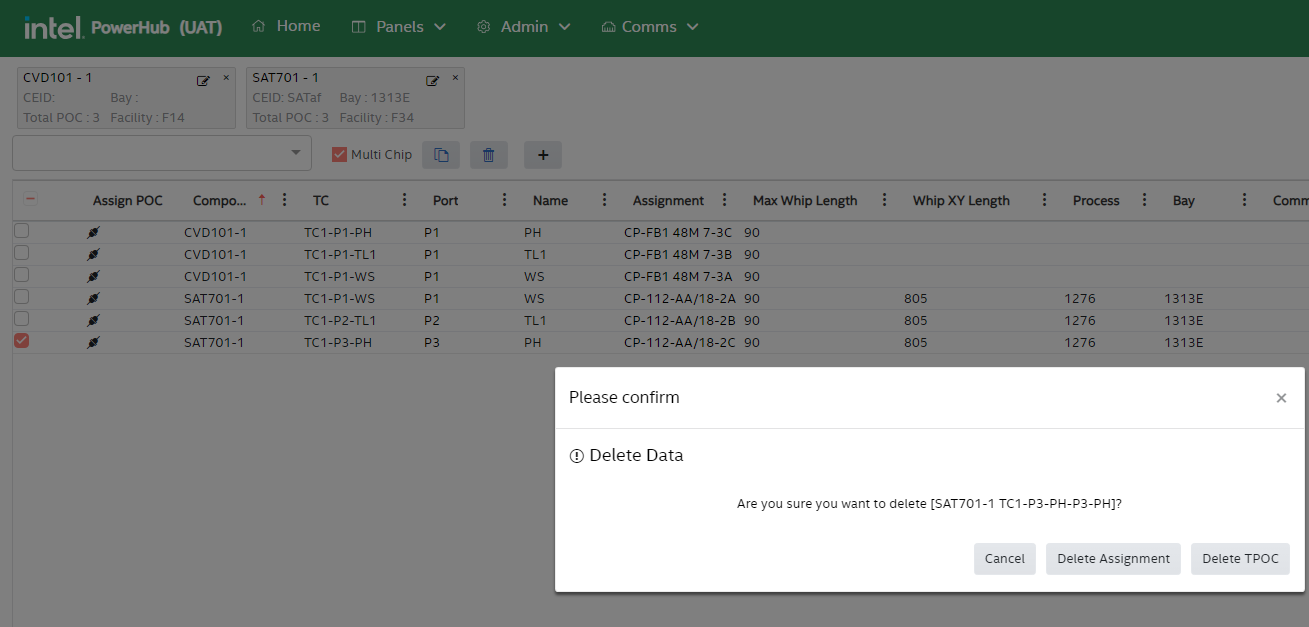
6. POC selection checkboxes to the left of the grid
 On the left of the POC grid on the CommsHub home page there is a checkbox against each POC. There is also a select-all checkbox in the grid title bar. Use these checkboxes to select POCs that you wan to copy or delete.
7. Copy POC icon
 Once the user has checked the box beside one or more POCs they can then copy those POCs to another tool. Clicking on the copy button will bring the user to the copy POC page. When the copy POC page displays the user needs to search for and select a destination tool from the dropdown list.
A copy of the POCs selected on the home page will then be displayed in the grid. The user can make edits and needs to click on the Submit button to save the POCs to the destination tool.
8. Delete POC icon
 Once the user has checked the box beside one or more POCs they can delete thos POCs or delete the assignments on those POCs. A confirmation dialog is displayed and the user should choose either “Delete Assignment” to remove the assignment to the CP or “Delete TPOC” to remove the POC from the tool completely.
9. Add POCs icon
 When the user clicks on the add POCs icon '+', they are brought to the add POCs page. This is the same page as described above in section 4, but the grid is empty and the user starts by searching for a tool to add POCs to.
10. TC button
 Before a user assigns POCs to CPs they need to decide if the are assigning a single cable or a group of cables in a whip. By default the “TC” button is selected meaning that all the POCs with the same TC number will be assigned at the same time as part of a whip. The number of cables in a whip cannot exceed the number of ports in a single TO on the CP panel. Different CPs in different buildings may have 3, 4, 5, 6 or 8 ports on a TO. The most common CP has 3 ports per TO and users will assign groups of 3 cables in a whip.
11. Port button
 If the user only want to assign a single cable instead of a whip, they need to click on the “PORT” button before clicking the assign icon to the left of the POC.
12. Assign POC icon
 Clicking on the assign/plug icon to the left of a POC will bring the user to the CP assignment page. If, for example, there are 3 POCS with the same TC number, the user can click on any of the icons for those 3 POCs and all three will be assigned when a free port is selected on the next page. See the next Assigning POCs to CPs section below for details on assigning telecoms POCs.
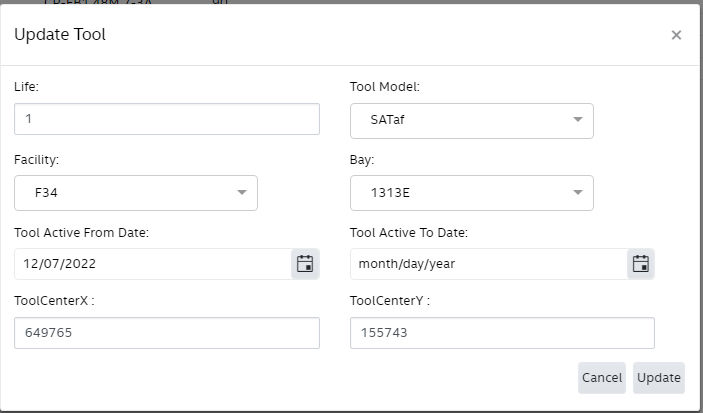
13. Edit tool icon
 Pressing this icon on the right hand side of the grid will display a tool edit dialog where the users can view/edit some details for the tool.
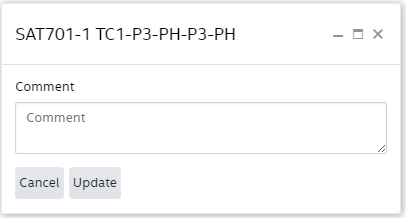
14. Edit comment icon
 Pressing this button will display a dialog where the users can enter/edit a comments related to the POC.
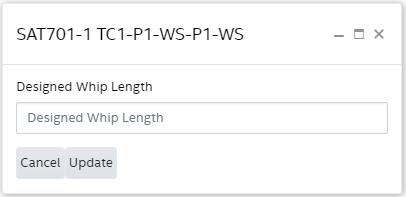
15. Edit whip length icon
 Pressing this button will display a dialog where the users can replace the system calculated whip length with a value that more accurately reflects the whip length in the field.
Assigning POCs to CPs
When a user clicks on the assign icon on the CommsHub home page they are brought to the CP assignment page.
At the top of the page are the details of the tool you are assigning. Below the tool details is a dropdown list of consolidation point panels. The list contain all the CPs that are in the same facility as the tool. It also shows the distance to the CPs from the tool. Users can type or paste into the dropdown to search for CPs with names which contain the typed/pasted text.
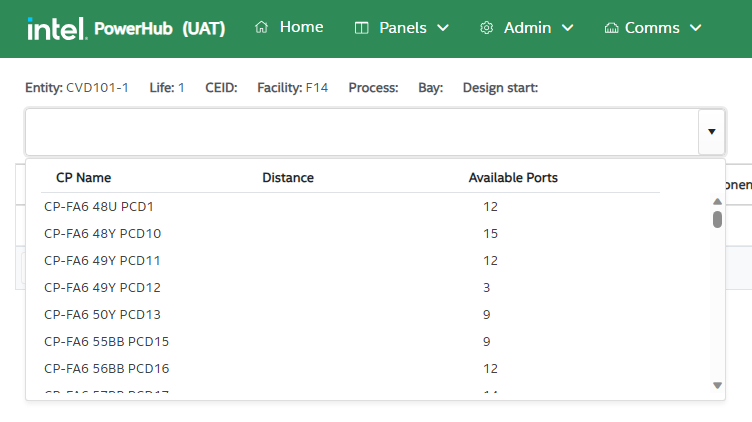
When the user selects a CP from the dropdown a grid of the ports will be displayed. The assign the whip (more than one cable ) or cable to ports the user needs to click on the assign icon in the port grid to the left of the desired port.
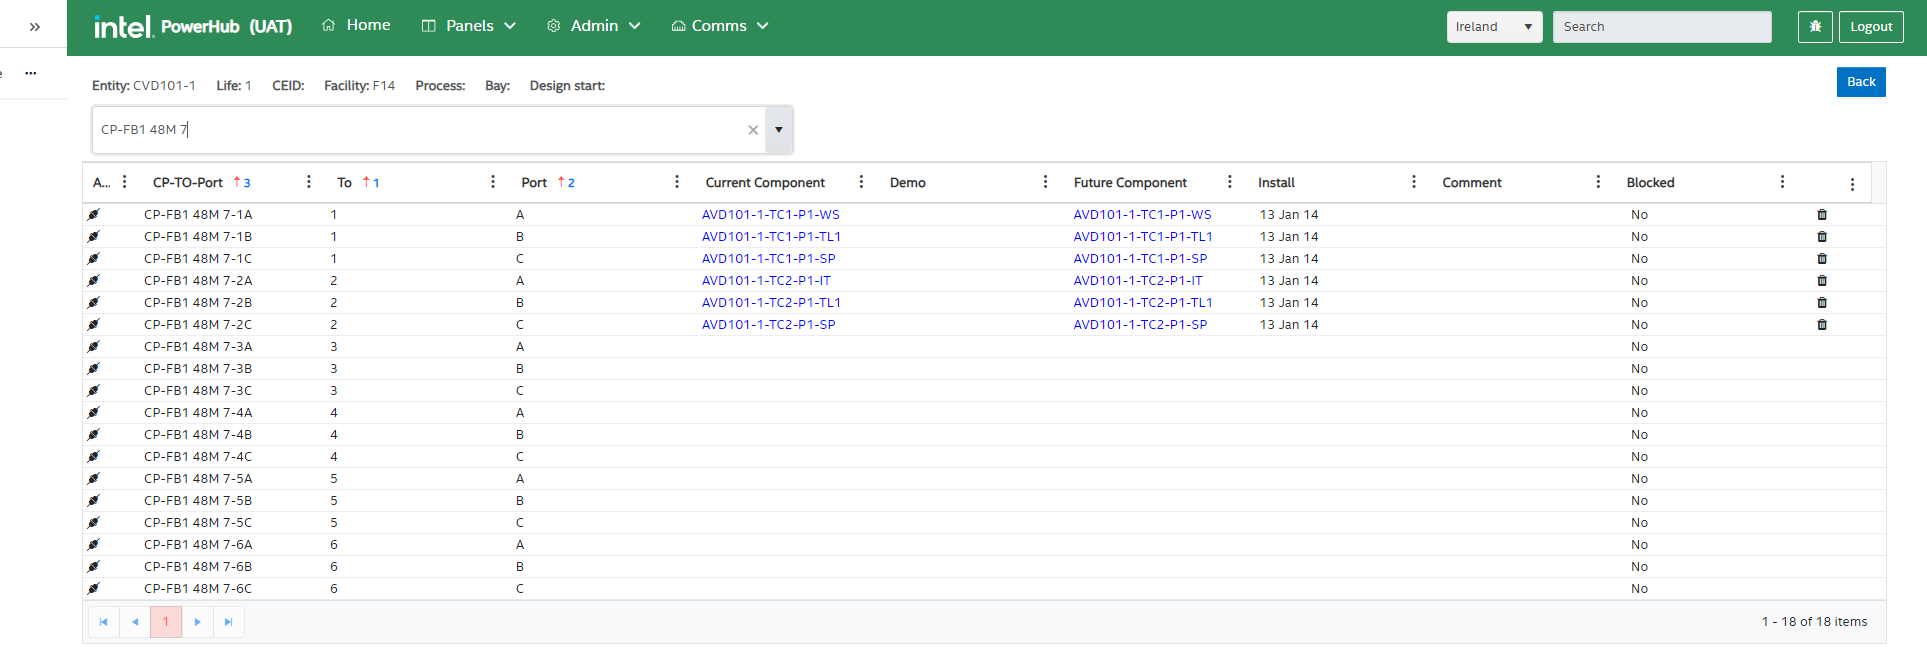
It the user left the “TC” button selected on the home page, when they click on the assign icon of a port then all the POCs in the whip will be assigned to the selected port and the subsequent ports.
It the user selected the “PORT” button on the home page, when they click on the assign icon of a port then only the POC selected on the home page will be assigned to the selected port.
A number of warning dialogs or error messages may appear during assignment. To avoid getting warning messages, do the following:
-
Make sure that the XY coordinates of the tool (or the POCs if applicable) are correct. Tool coordinates are updated from the latest layout release drawings on a daily basis, so they should be correct if the layout is correct.
-
Make sure that the CP has the correct coordinates.
-
Make sure that the distance from the CP to the comms room is set correctly (in metres or feet) for each CP.
-
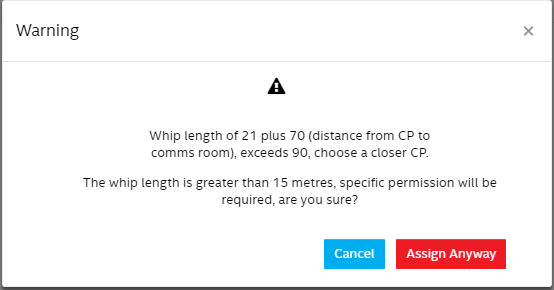
Do not select a CP that is more than 45 feet (USA) or 15 metres (outside USA) from the tool
-
Make sure that the total length from comms room to the CP plus whip length from the CP to the tool does not exceed 300 feet/90metres. This can happen if the CP is more than 255 feet/75 metres from the comms room.
-
Make sure that the number of cables in the whip does not exceed the number of port per TO in the CP. For example, the TOs on the CP in the image above have 3 ports (A, B & C) each.
-
Make sure that when assigning, for example a whip with 3 cables, that you assign to port A so as all 3 cables are assigned within the same TO.
-
Make sure that you select an available port and that there are enough subsequent ports for your whip. Ports are only available if they do not have a value in the grid under the “Future Component “ column.
If the user gets a warning message, the details in the warning message will guide them to which of the above recommendations have not been met. An example of one of the warning messages is shown below.
CPs(Consolidation Points)
Selecting the CPs menu item from the Comms menu brings you to the grid of consolidation points.
CP details displayed in the grid are:
-
CP Name
-
SCC
-
Facility
-
Comms Room
-
Length to room (n feet or metres)
-
X & Y coordinates
-
Grid coordinates
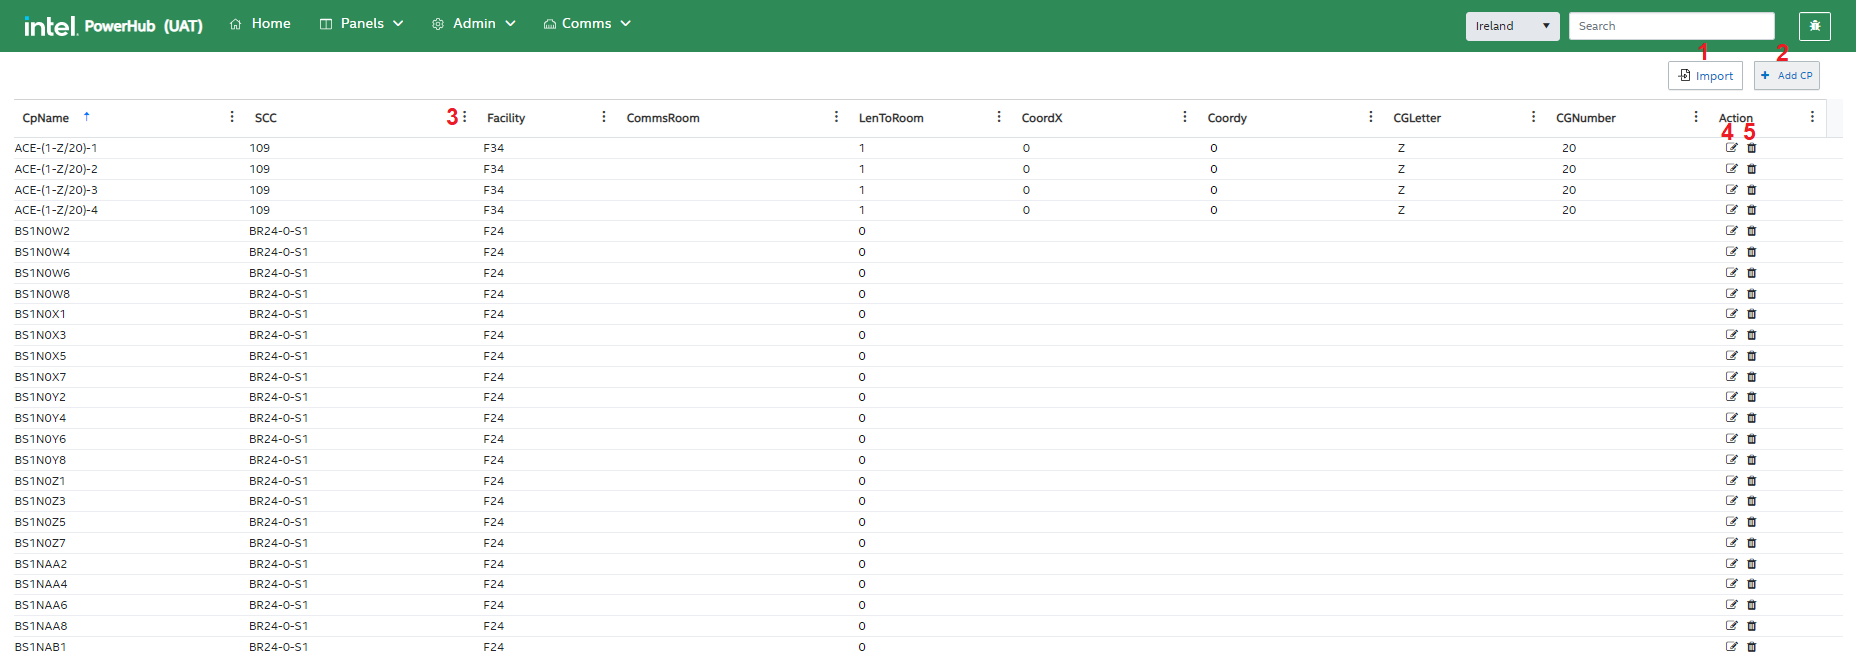
This page has the following functions:
-
Import
-
Add CP
-
Filter the CPs Attribute
-
Edit CP
-
Delete CP
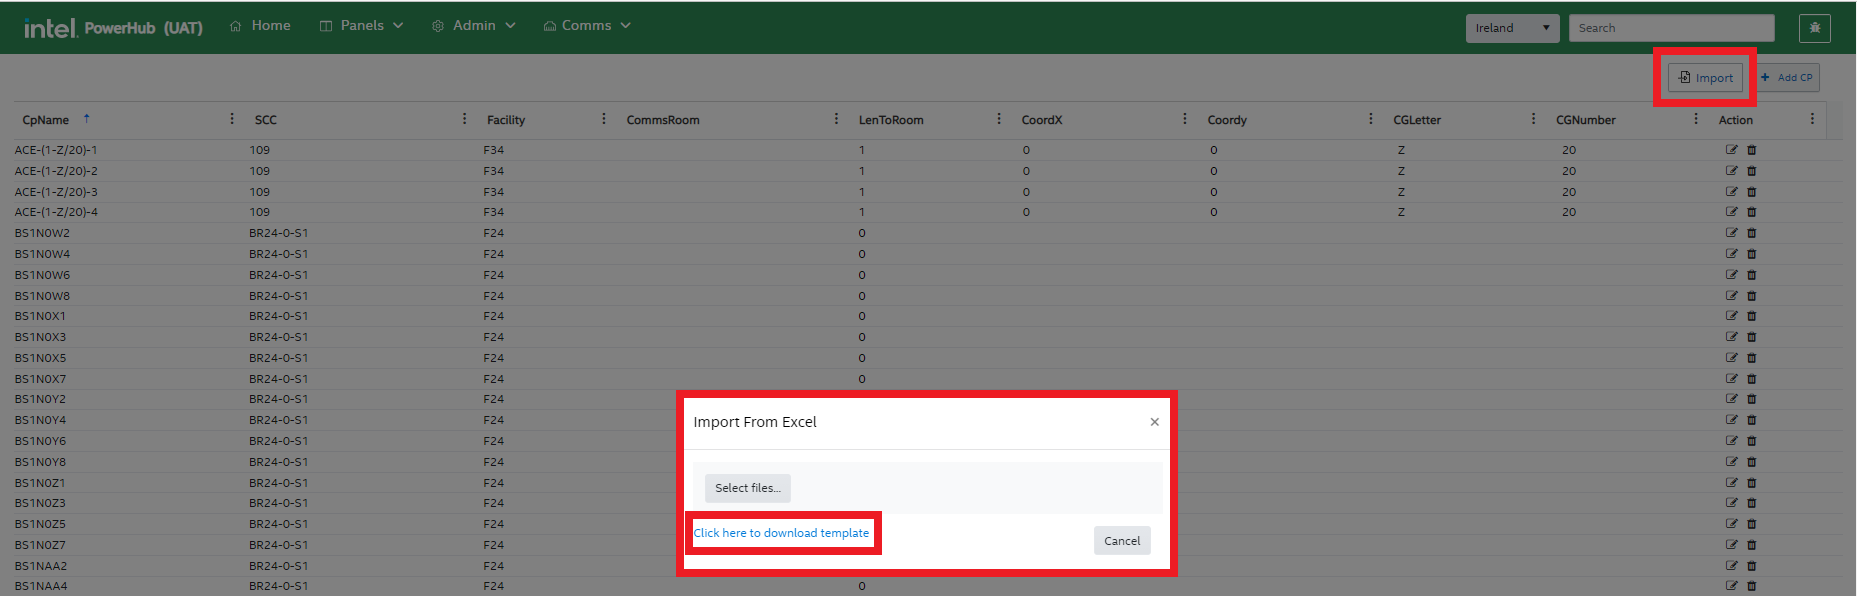
1. Importing multiple consolidation points
The import button in the top-right corner of the screen is used to import CP details. The user can download a template to create an upload the file by clicking the link Click here to download template.
CP details that can be populated in the template are:
-
CP Name
-
Facility
-
CP Configuration Type (you must use one of the existing pre-set types)
-
Facility Level that the CP is on
-
SCC
-
SL Number
-
Grid coordinates
-
X & Y coordinates
2. Adding individual consolidation points
When the user clicks the “+ Add CP” button, they are brought to the “Add Consolidation Point” screen. The user needs to enter the following fields at a minimum:
-
CP Name
-
CP Configuration Type
-
SCC
-
Facility
-
Facility Level
-
Grid coordinates OR X & Y coordinates
Adding the length from the CP to the comms room (in feet/metres) is also recommended.
Click Save to create a new CP with the ports as per the selected template.
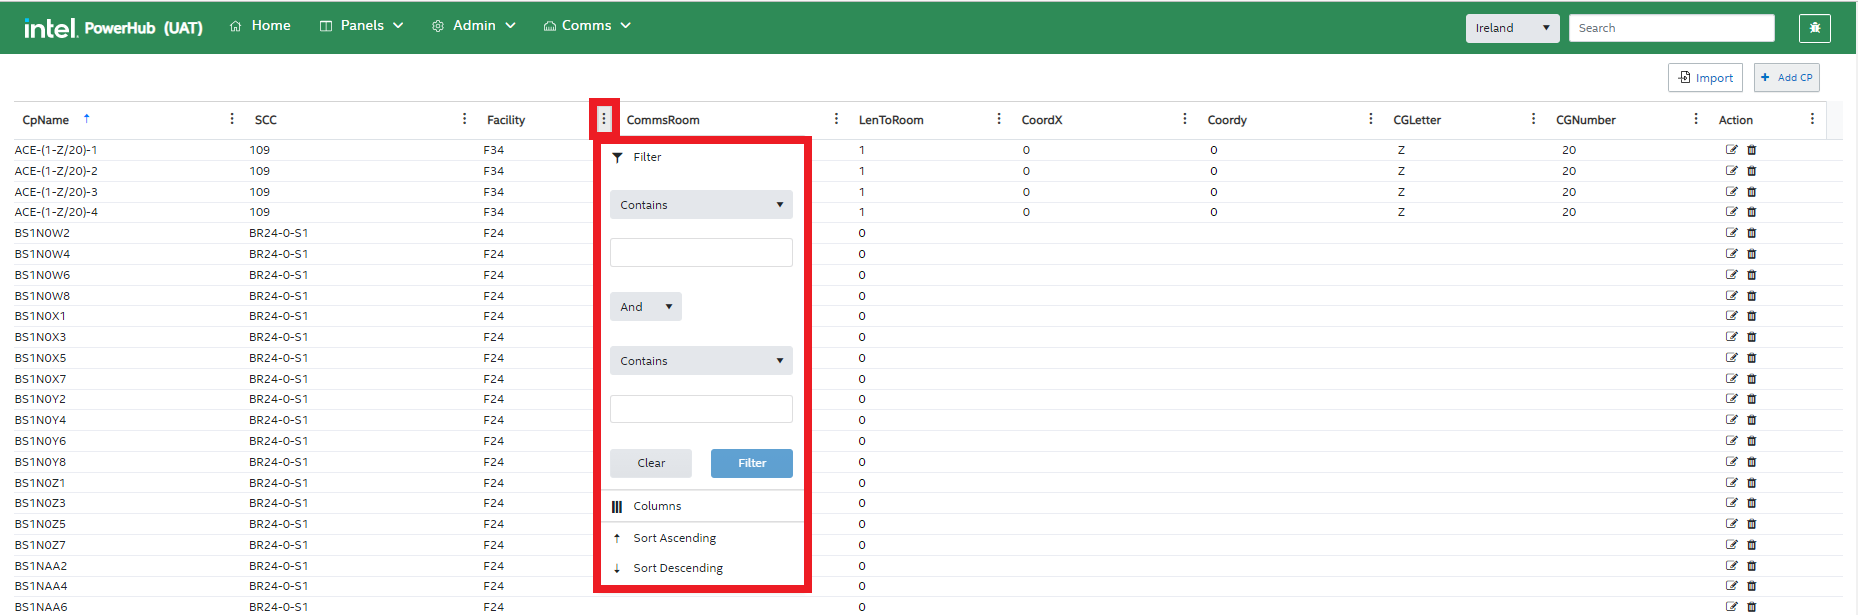
3. Filtering the CPs grid
Users can filter the CPs displayed the grid by using the filter icon in each column header.
For example, you can filter the values for “Facility” in the grid by clicking on the filter icon and specifying the filter condition such as is equal to the desired facility.
4. Editing CP and port details
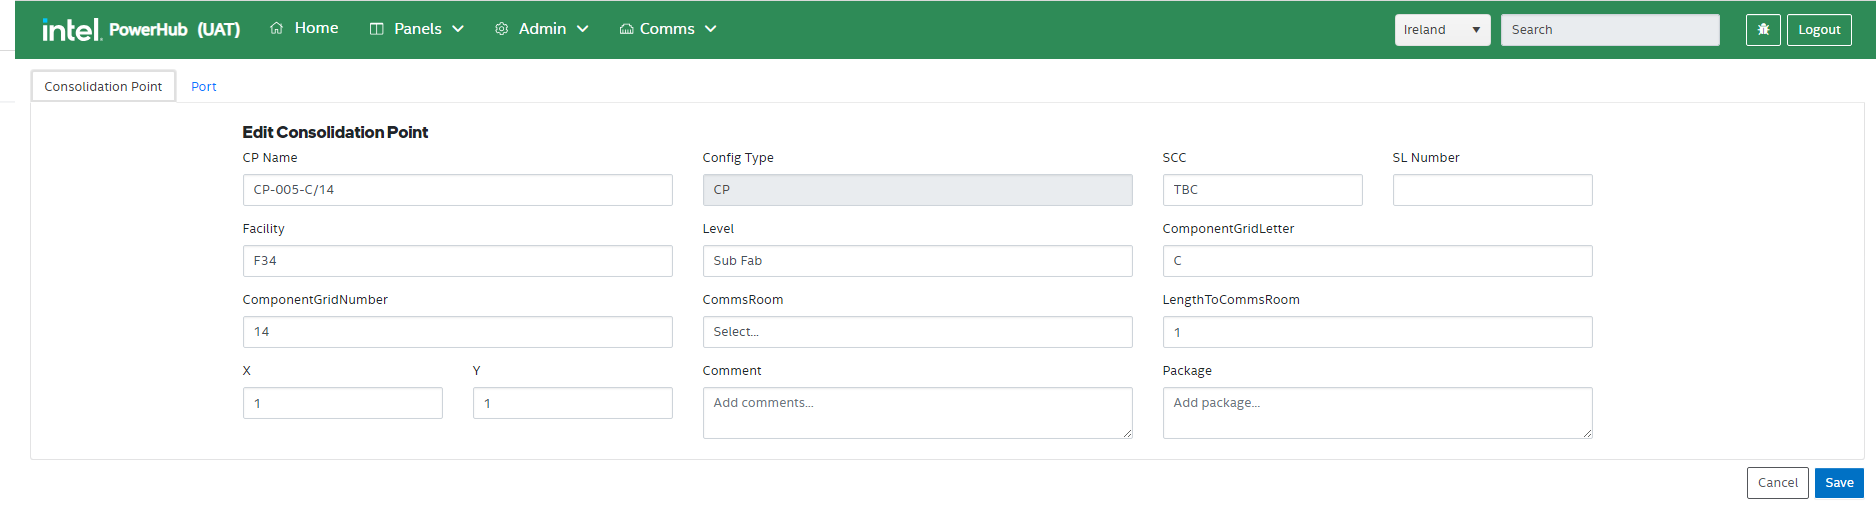
Clicking the pencil icon in the ‘Actions’ column to the right of a CP in the grid brings the user to the “Edit Consolidation Point” screen. There are two tabs on this screen:
-
Consolidation Point” tab displays data about the CP
-
The “Port” tab displays individual port data
Editing CP details
The “Consolidation Point” tab allows the user to edit the following properties of the CP:
-
CP Name
-
SCC
-
SL Number
-
Facility
-
Facility Level
-
Grid coordinates
-
Communications room that the CP is connected to
-
Distance to comms room
-
X & Y coordinates
Editing Port details
The “Port” tab allows the user to edit the following properties of individual ports
-
TO
-
Port Letter
-
Panel
-
Panel Port
-
Panel Rack
-
Switch Port
-
Port
-
Comment
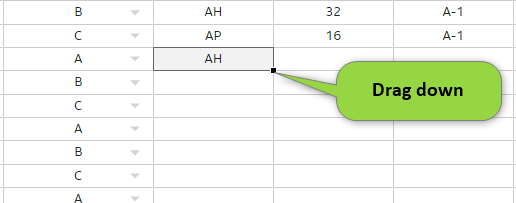
To edit the details listed above users can double click on the required cell and type in a value.
To enter the same value in multiple adjacent cells, you type in one cell and drag the bottom right corner of the cell across other cells.
Users with the CommHub Admin can also do the following on the “Port” tab
-
Block and unblock ports by checking/unchecking the checkbox on the right of the grid
-
Remove assignments from ports by selecting one or more rows and right clicking to bring up the context menu.
-
Delete Ports by selecting one or more rows and right clicking to bring up the context menu.
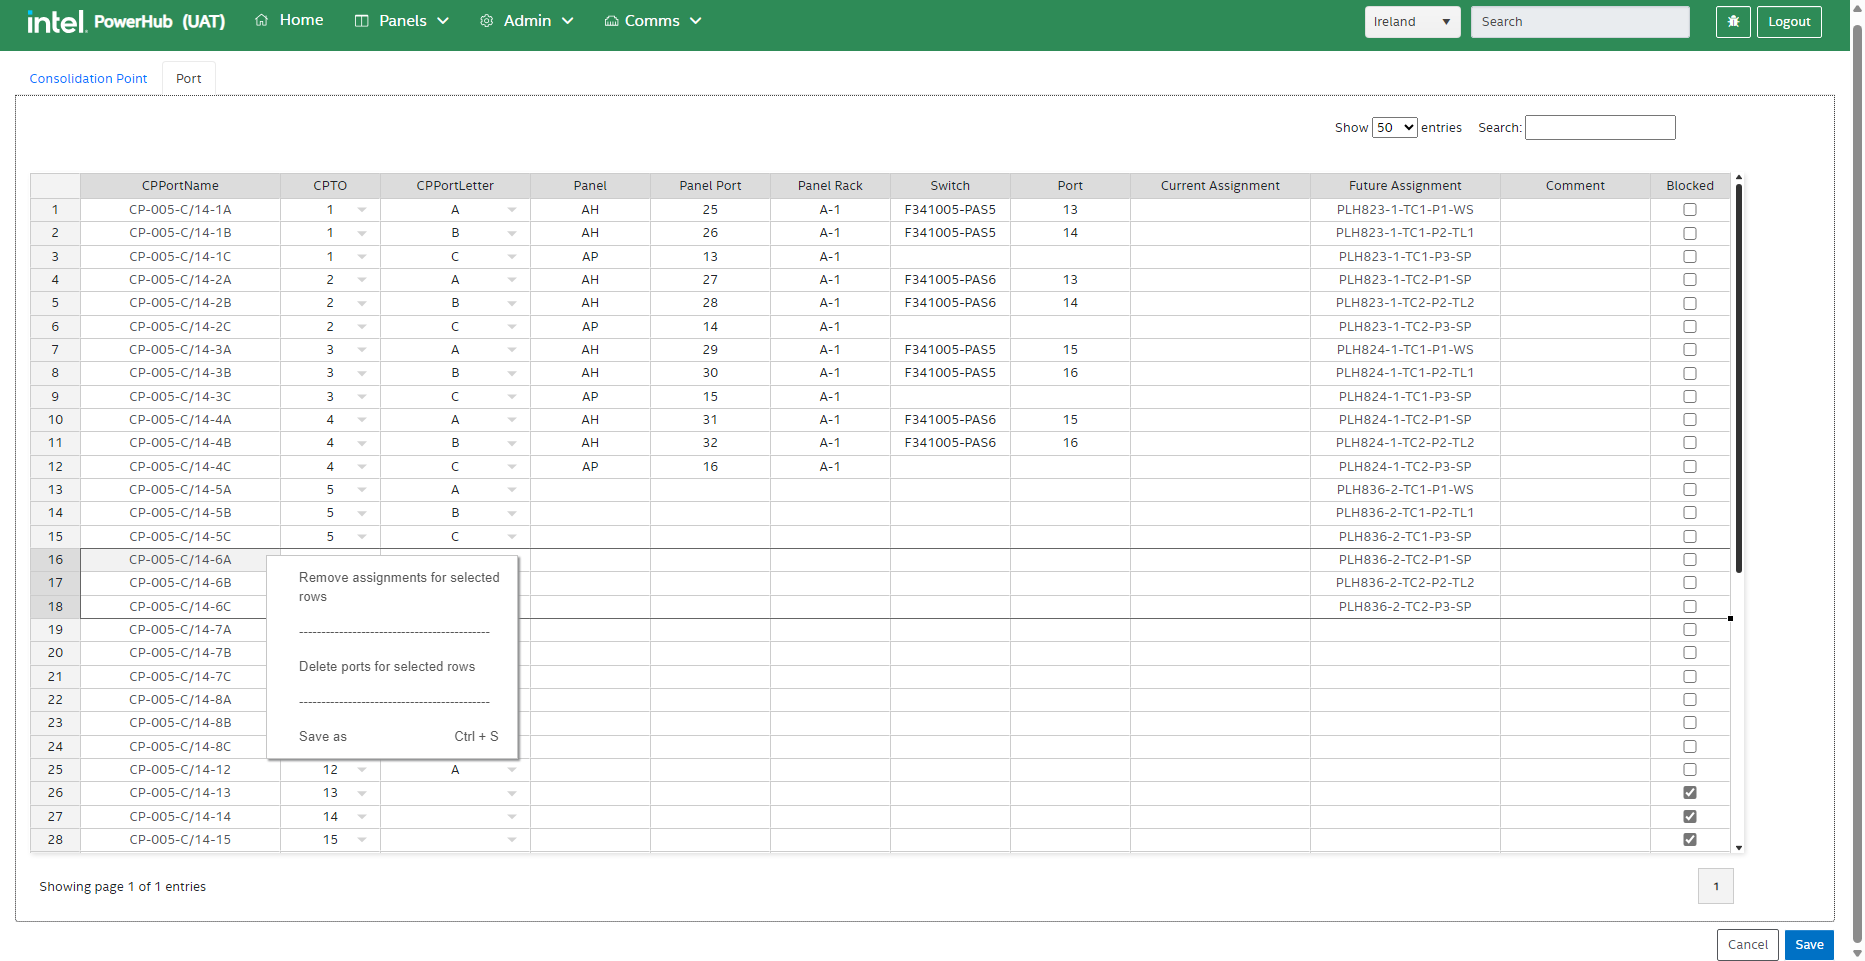
After making updates to either tab the user should press Save. If any mandatory fields are not populated on the “Consolidation Point” tab, the Save button will not be enabled.
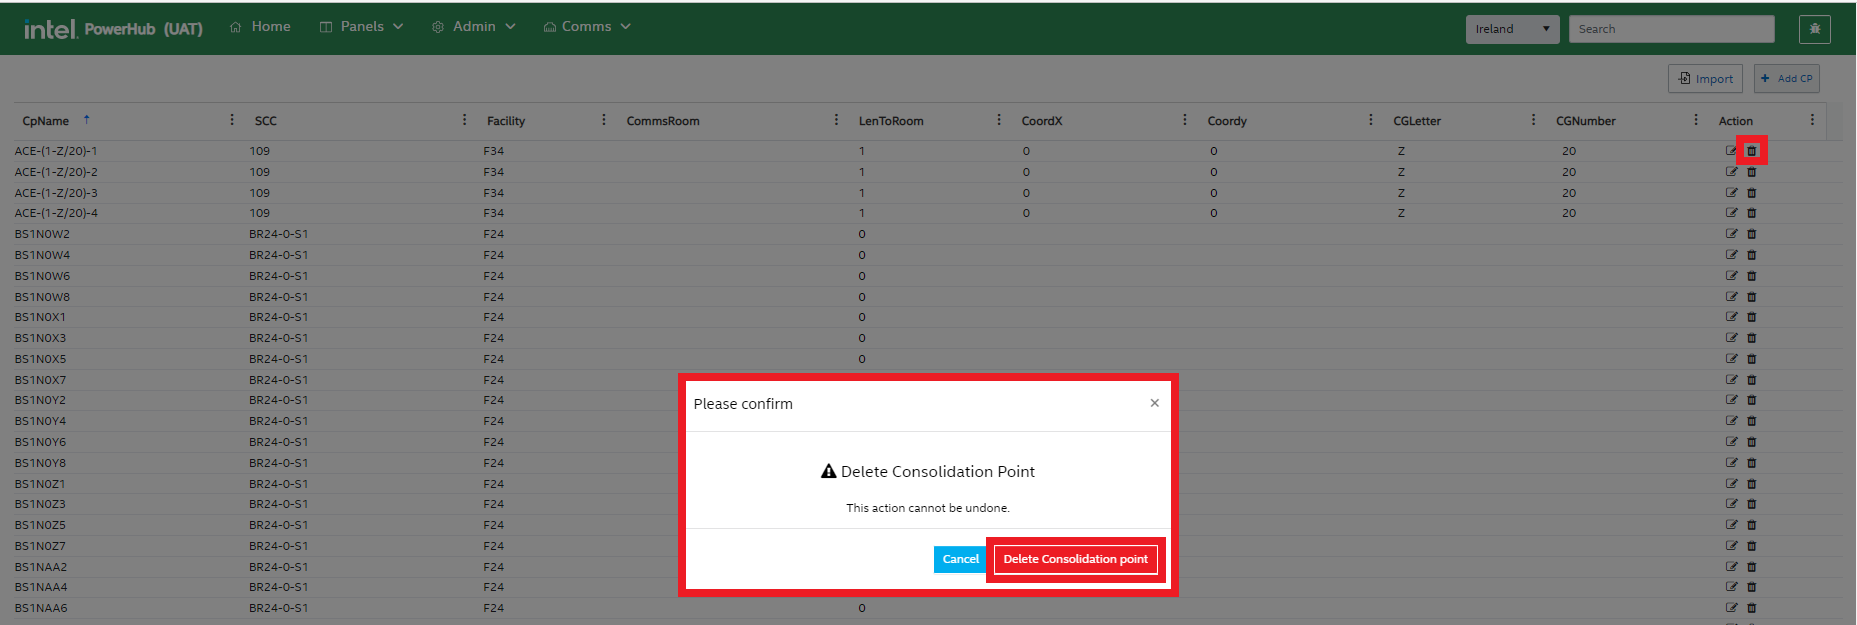
5. Delete CP
Clicking the trash icon in the ‘Actions’ column to the right of a CP in the grid allows users to delete that CP. A confirmation dialog pops up. To permanently delete the consolidation point, click Delete Consolidation Point.
Port View
Selecting the Port View menu item from the Comms menu brings you to the port view. Selecting a facility from the dropdown displays a grid listing every port on every CP in that facility.
This page will have the following functions:
-
Search for CPs or assignments
-
Filter the ports displayed in the grid
-
Import Ports
-
Export Ports
-
Block Ports
-
Remove assignments
-
Delete Ports
-
Edit port details
1. Search
When a user types into the field, the grid will filter to all rows which contains the typed text in any column of the grid.
2. Filter the ports
Filter the values in the grid for any of the attributes by selecting the possible values of the attribute.
For example, you can filter the values for “CP Port Name” in the grid by clicking on the adjacent filter button and selecting the records to filter the data.
3. Import Ports
The import button in the top-right corner of the screen is used to import the port details. The user can also download the template to create the file by clicking the link Click here to download template.
4. Export Ports
It is used to export port details of the selected facility into an Excel sheet.

5. Block Ports
Sometimes only half of a CP may be wired leaving the remainder unusable. Only users with the LSSHub Admin role can block ports. Check or uncheck the checkbox in the ports grid to block or unblock certain ports. To block more than one port you can check one box and drag the corner of the cell down to other cell s to copy the value to those cells.
5. Remove assignments
Remove assignments from ports by selecting one or more rows and right clicking to bring up the context menu.
6. Delete Ports
Delete Ports by selecting one or more rows and right clicking to bring up the context menu.