PowerHub Panels
The Panels module allows users to view, add, configure and delete panels in PowerHub. It also allows users to compare the loads on panels in PowerHub with the load on those panels in POR (EasyPower or SKM).
Power panels have many different configurations depending on manufacturer, capacity, voltage etc. Each panel has multiple circuits to which individual loads or other downstream panels can be connected. Users can search for panels to view panel properties as well as the associated circuits and loads.
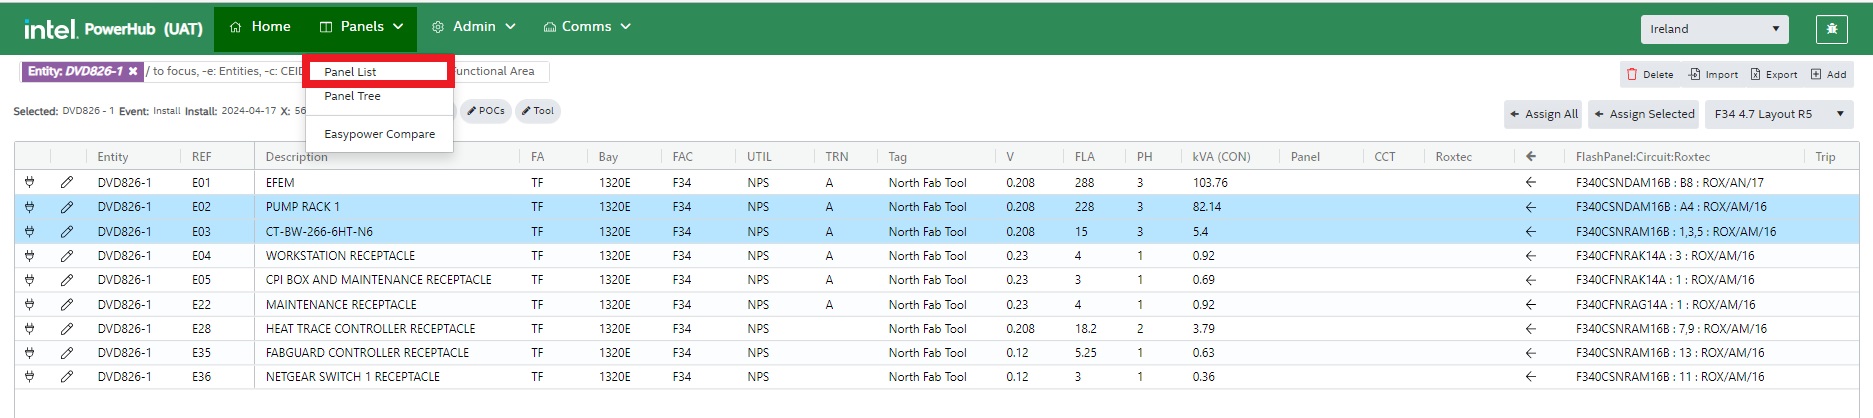
Panel List
Selecting “Panel List” from the Panels menu at the top of the PowerHub app will bring the user to the the Panel List page.
The Panel List Page shows details all the panels in the currently selected site in a grid view. This page has the following features:
-
Facility Selection
-
Panel Grid
-
Edit Panel
-
Delete Panel
-
Filtering
-
Add Panel
-
Export
-
Import
-
Analyse mode
-
General Search
-
Clear Filters
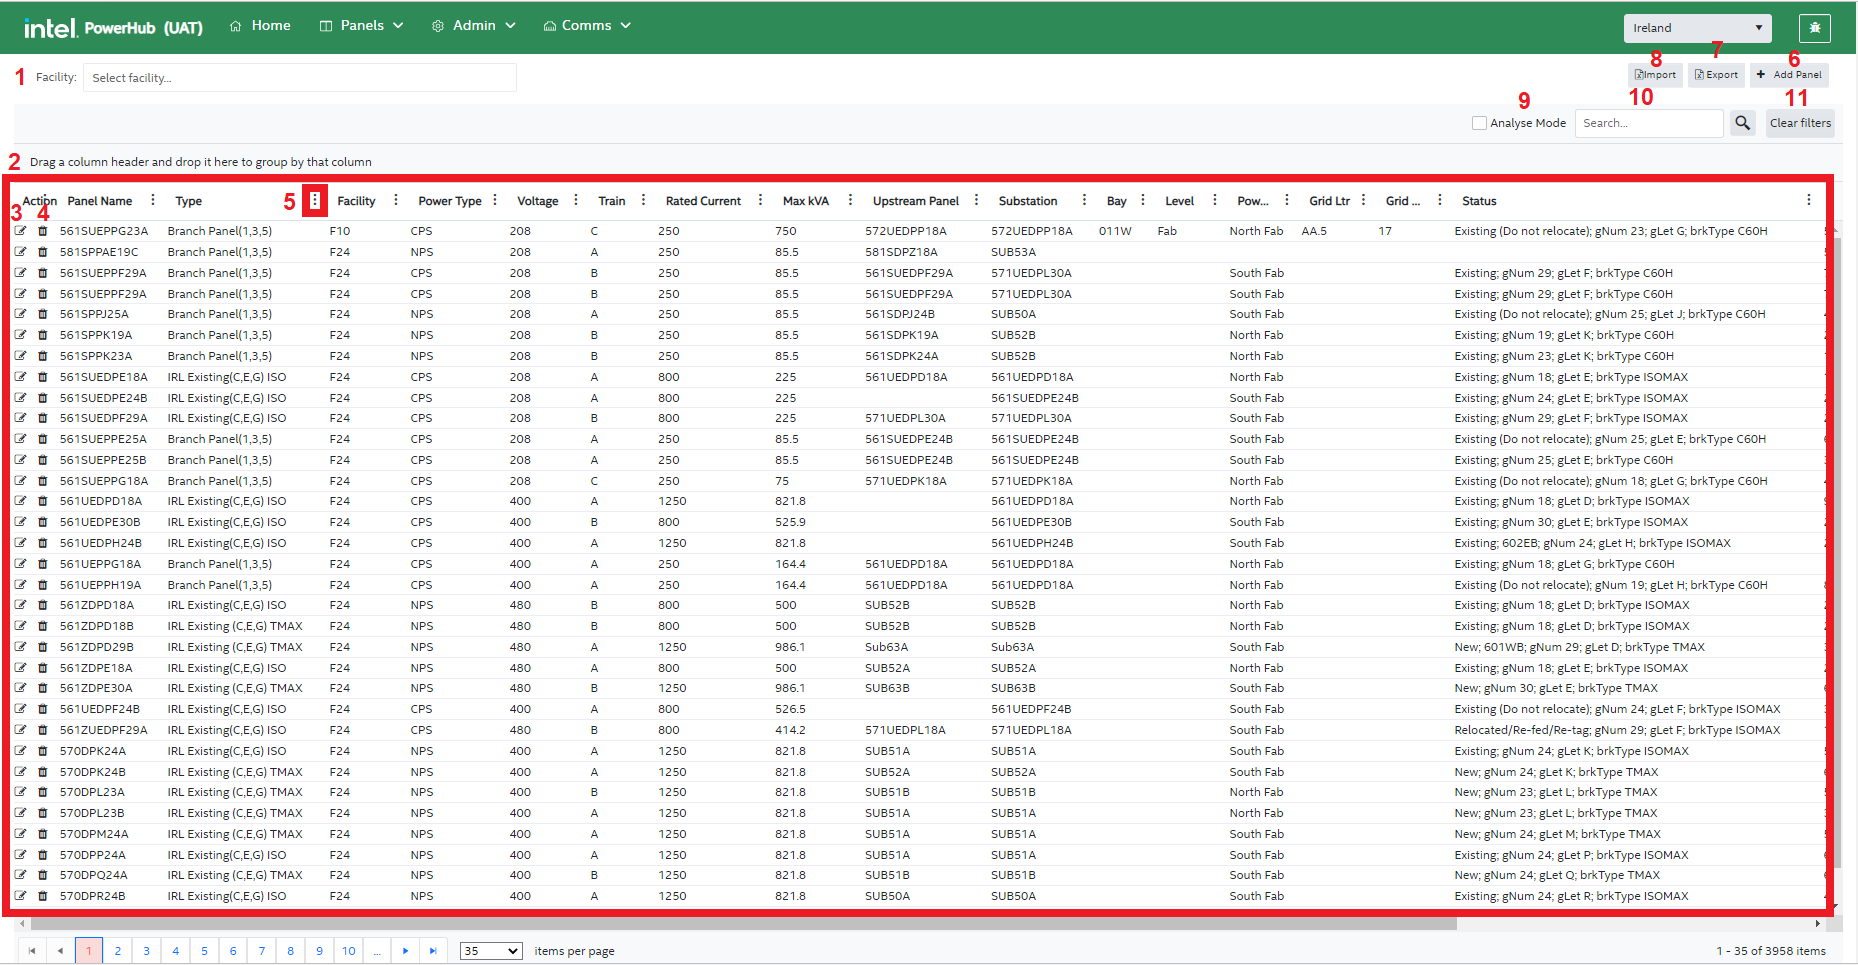
1. Facility Selection
In the top left corner of the page, there is a facility selection bar which lists the facilities in the user’s currently selected site. Selecting one or more facilities will filter the grid to panels in those facilities.
2. Panel Grid
In the panel grid, all the details of panels are displayed including panel name, facility, power type, voltage, train, rated current, max kVA, upstream panel, substation, bay, level, and more.
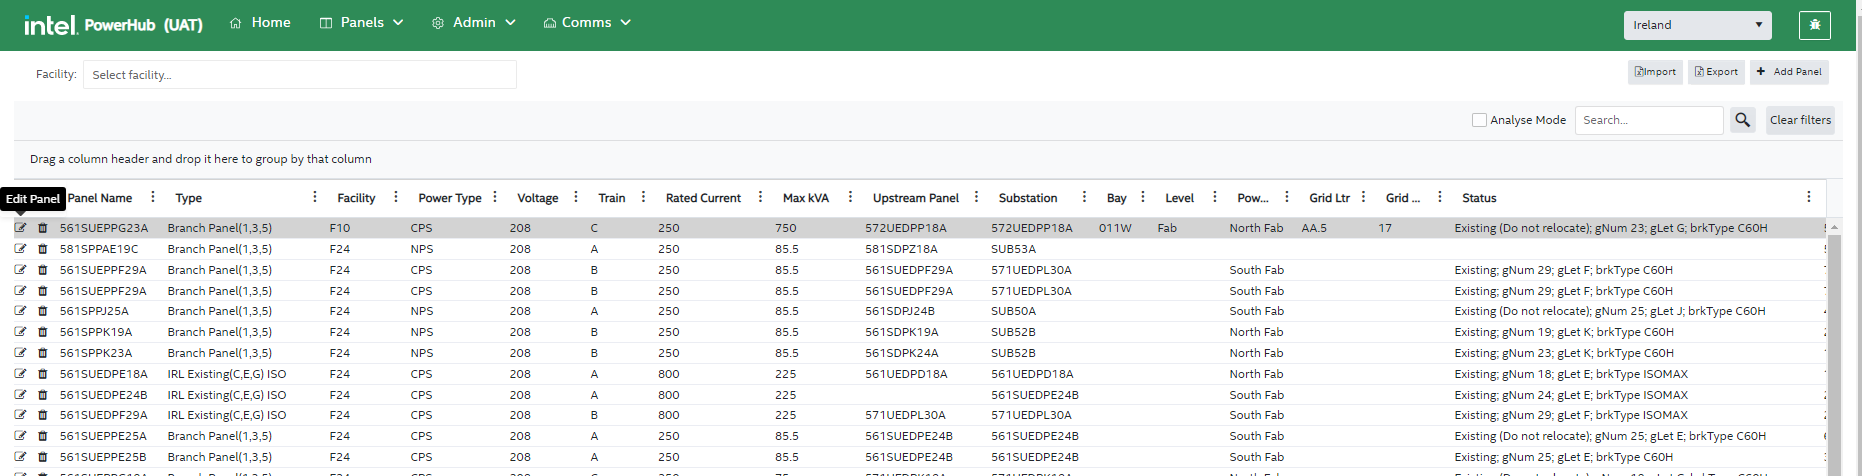
3. Edit Panel
Along with panel details, under the Actions column to the left of the panel grid, there is a pencil icon that allows the user to edit panels.
When you click the edit icon, an edit panel screen displays. It has the following main components:
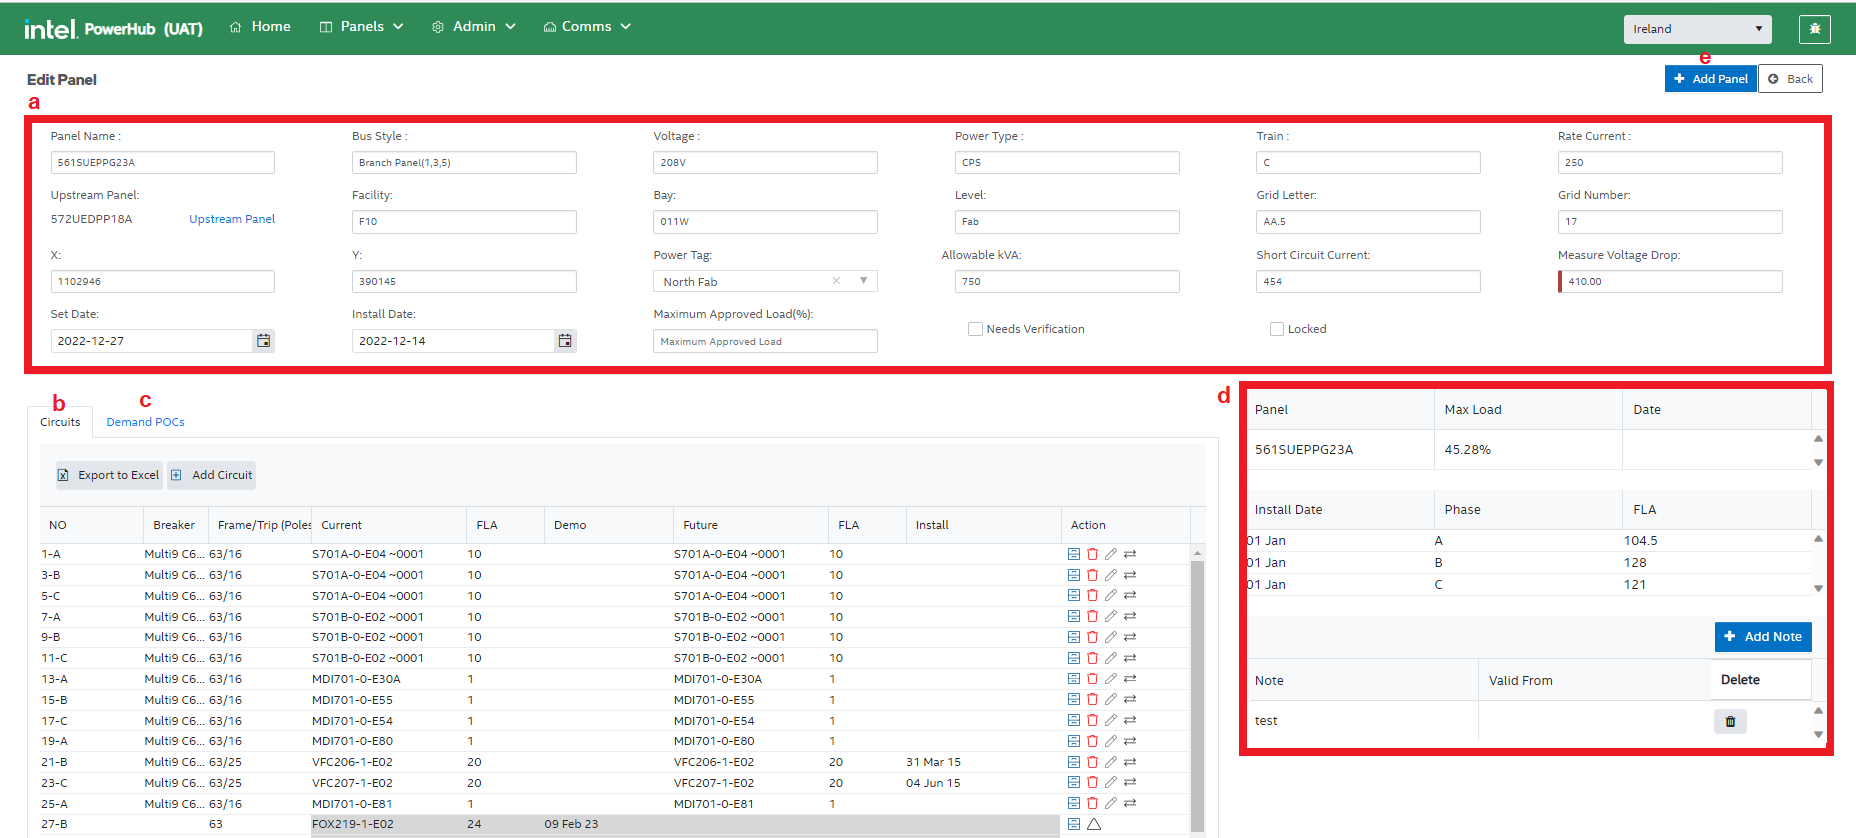
a. Panel Attributes
In the top area of the screen, all the panel attributes are shown such as panel name, bus type, voltage, power type, and more. You can update the values in these fields and they are automatically be saved.
b. Circuits Grid
In the circuit grid, you will find all the details of the panel circuits such as circuit number, breaker, frame/trip(poles), current assignment, FLA, demo date, future assignments, FLA, install date, and available actions that can be performed on a circuit.
See the section below on the Circuit Grid for details.
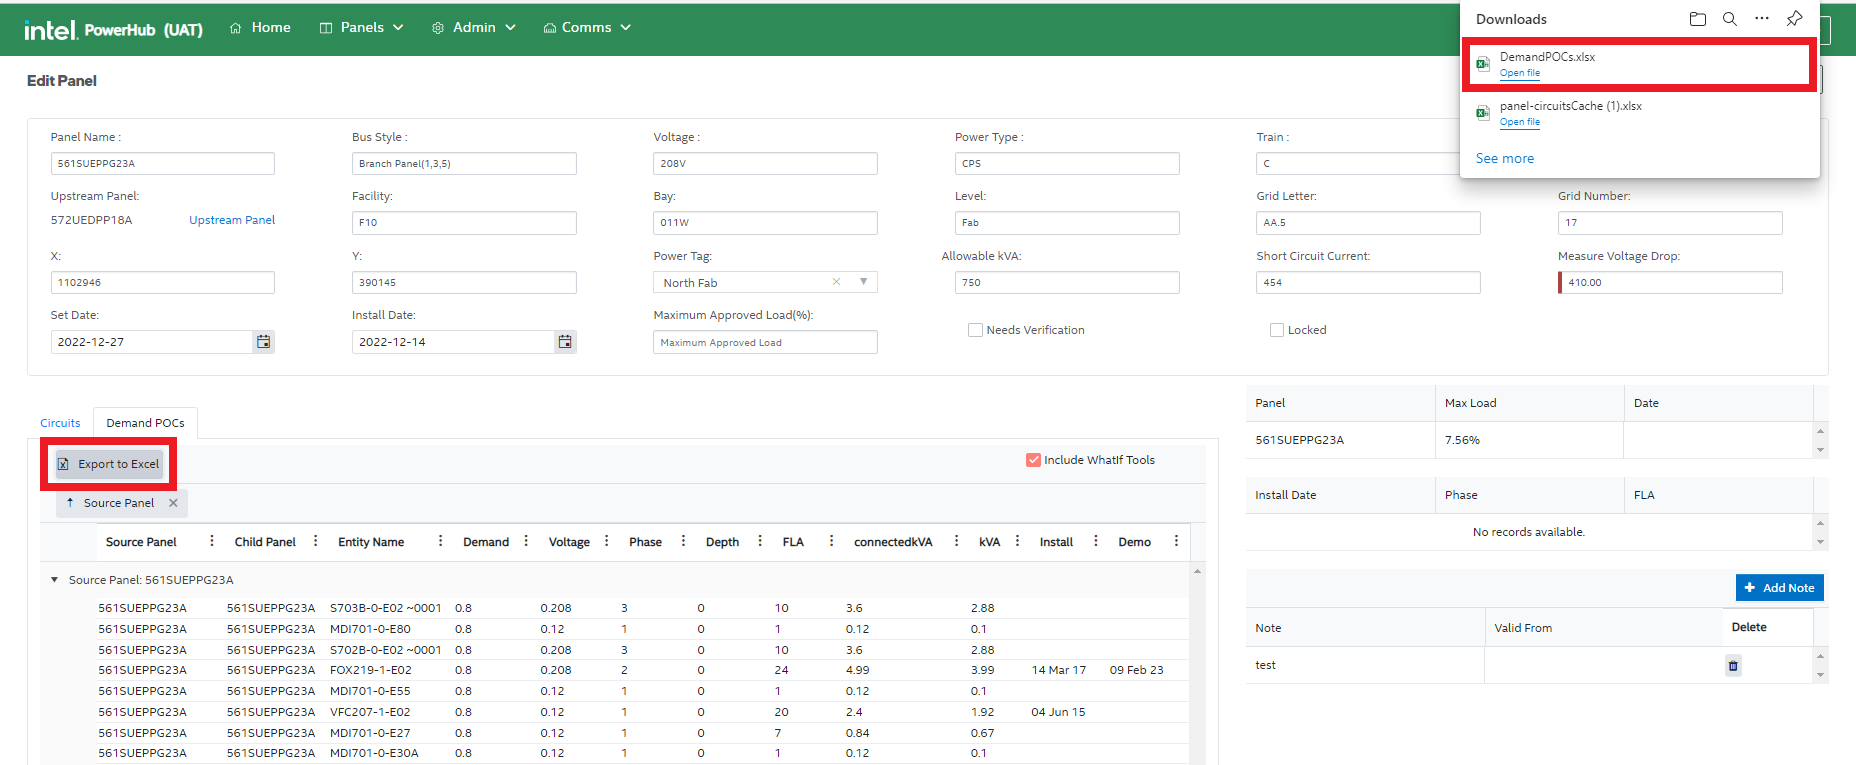
c. Demand POCs
This tab displays the various details of demand POCs such as Source Panel, Child Panel, Entity Name, Demand, Voltage, Phase, FLA, ConnectedkVA, kVA, Install date, and Demo date.
See the section below on the Circuit Grid for details.
d. Panel Load
In this section, the first table displays the max load of the panel and its parent panels. If the panel is a branch panel, a second table show the load balance of the 3 phases on this panel.
The following table has a button to add notes and functionality to delete the notes.
e. Add Panel
When a user clicks the Add Panel button in the top-right corner of the Edit Panel screen, the Add Panel screen is displayed.
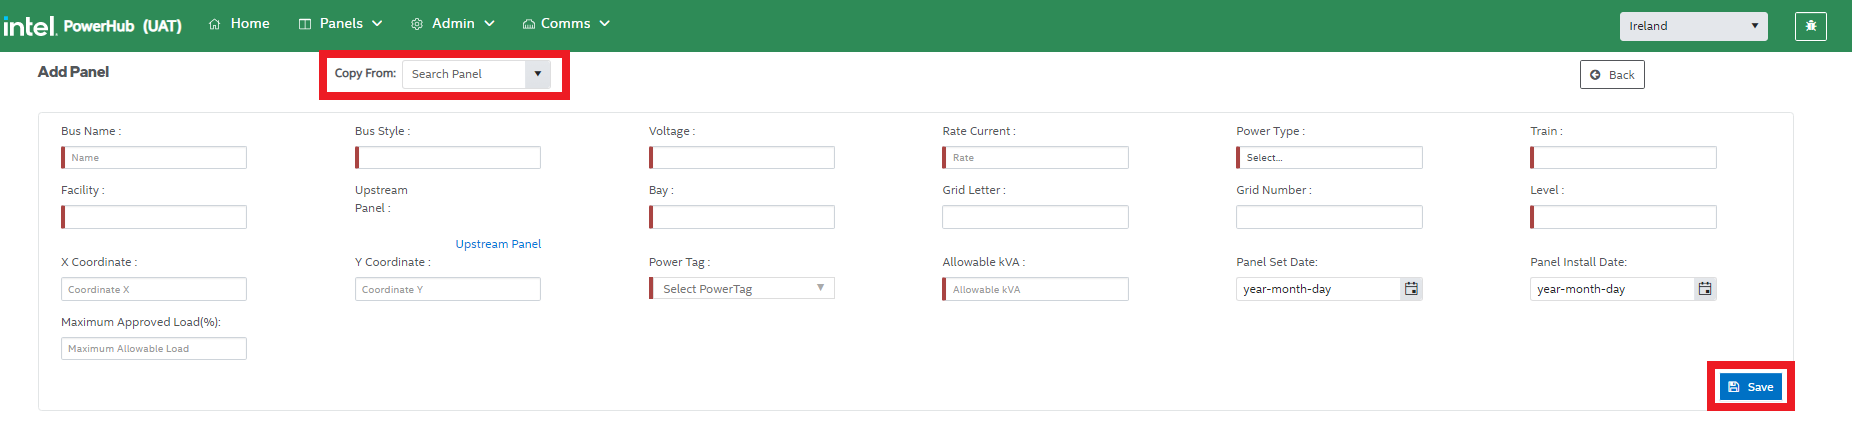
The user can select a panel in Copy From field to copy its values in the new panel attributes. In this case, the user doesn’t need to supply the values for each attribute individually to create a new panel .
Alternatively, the user can enter the value for each attribute manually.
Click Save to add a new panel.
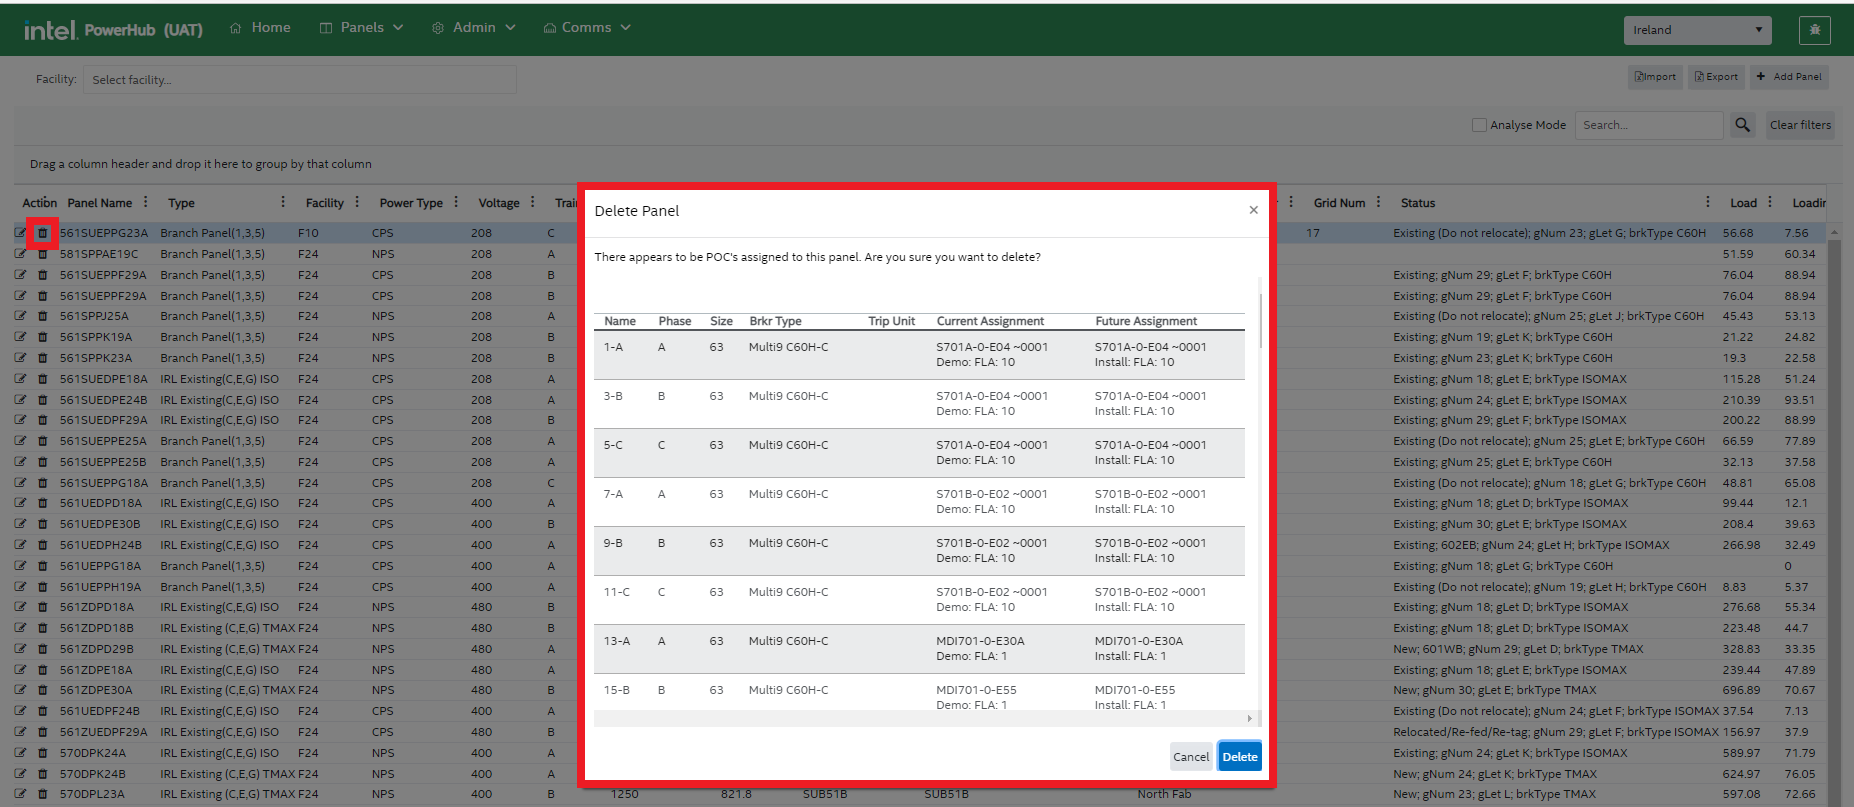
4. Delete Panel
Along with panel details, under the Actions column in the panel grid, there is a icon to delete the panel.
Upon clicking the trash icon of the selected panel, a delete confirmation pops up. If you click Delete it will delete the panel along with all its associated POC assignments.
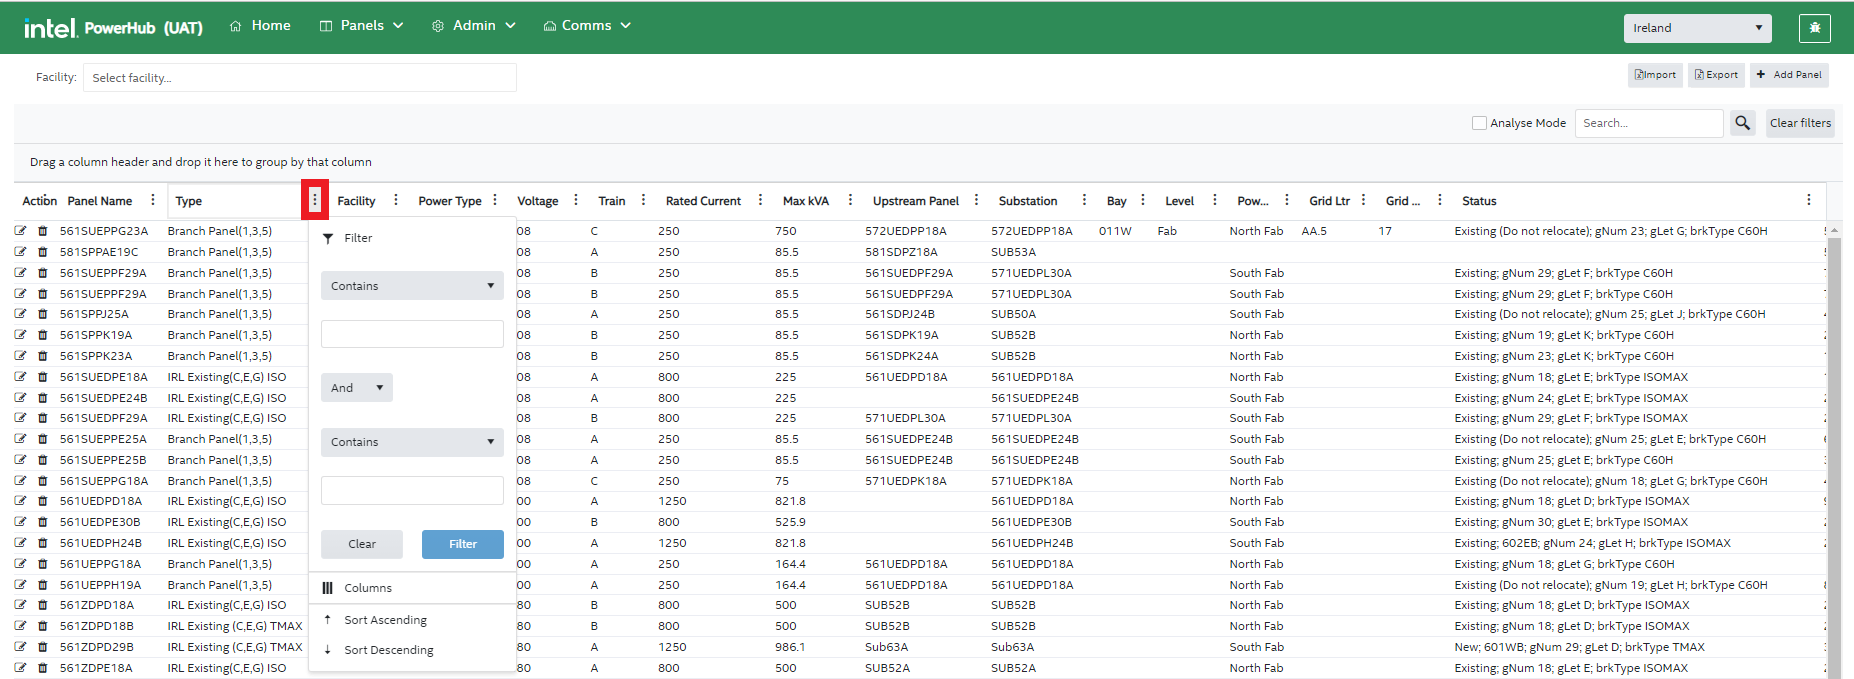
5. Filtering the Panel list
You can filter the values in the grid for any of the attributes by specifying the conditions of your choice.
For example, you can filter the values for “Panel Type” in the grid by clicking on the adjacent vertical ellipsis button and specifying the filter condition such as is equal to Branch Panel or Distribution Panel to filter the data.
6. Add Panel
Add Panel button is placed in the top-right corner of the panel list page. It is used to add a new panel as described above.
7. Export
Use the ‘Export’ button to create and Excel file with the panel details shown in the grid. By default only the records shown on the current page are exported. To export all the panels as displayed by the current filters, check the ‘Analyse” chackbox before pressing the 'Export’ button.
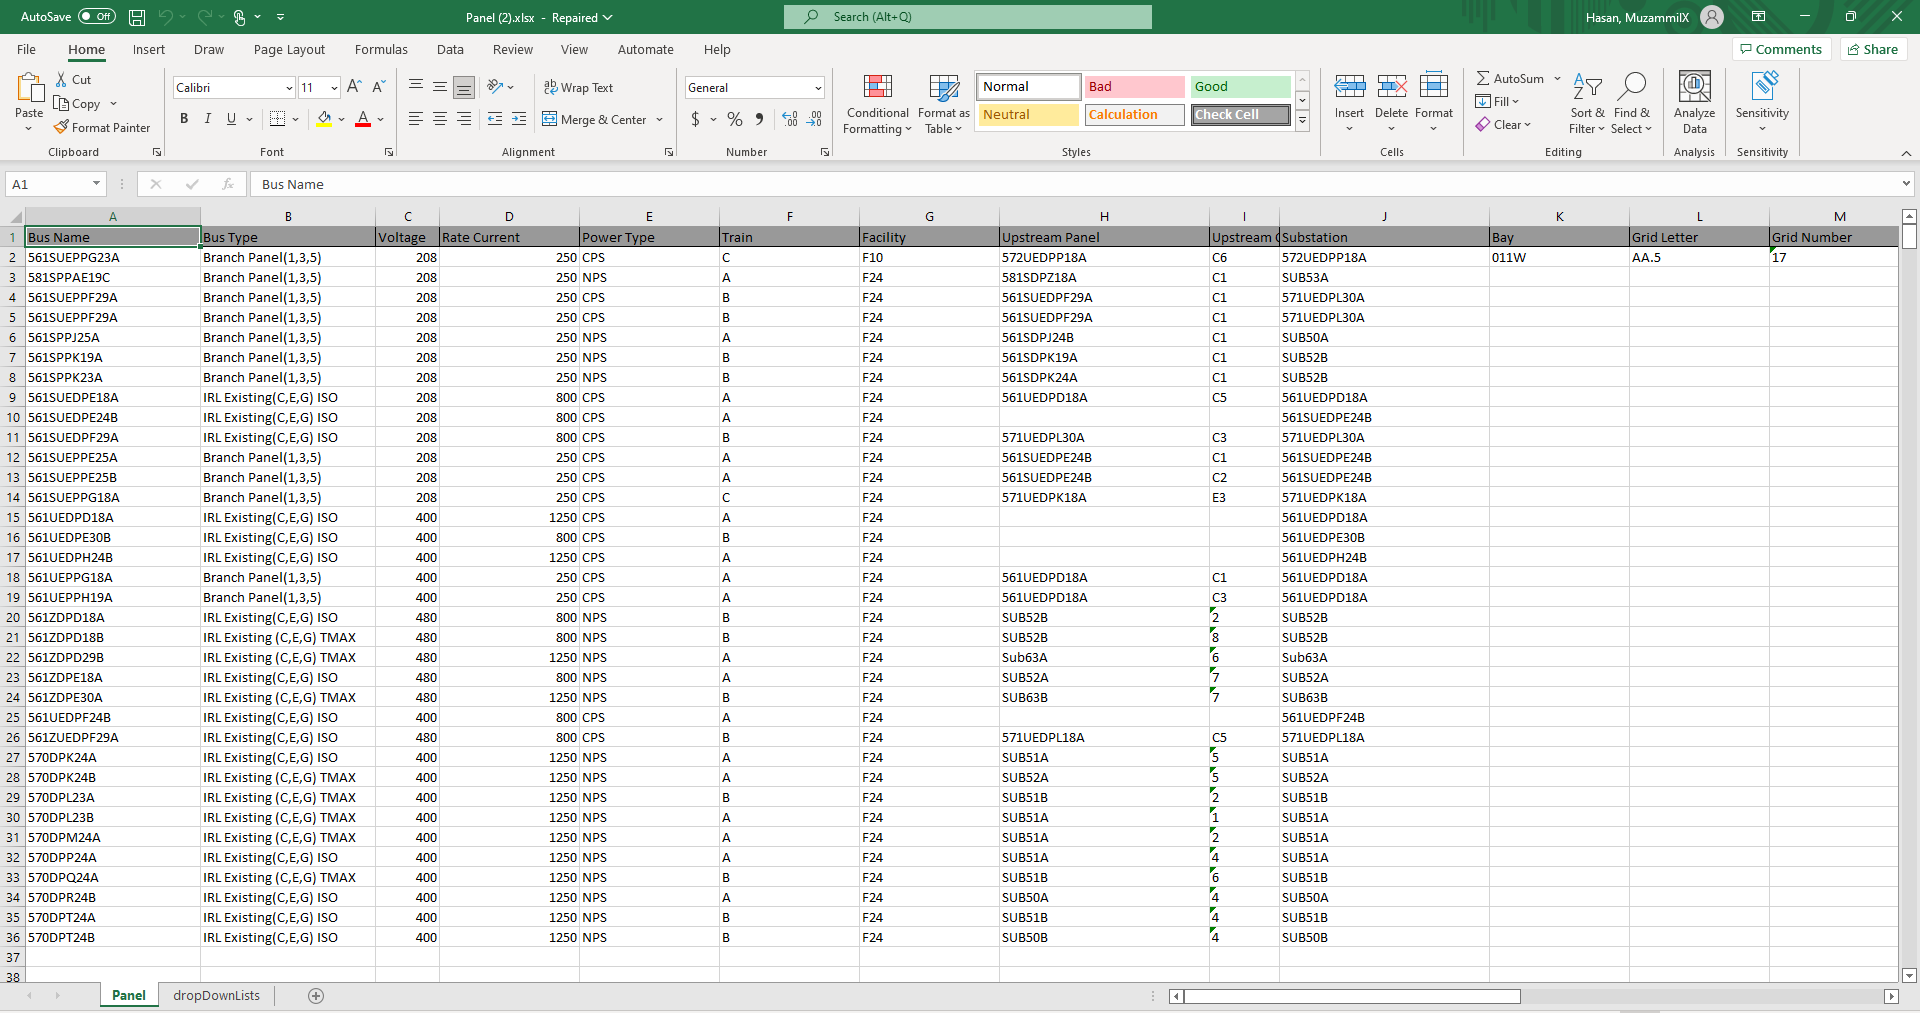
8. Import
This button is used to import the panel details in the format provided on the screen. The user can also download the template to create the file. Note that the bulk management page also has a panel upload feature.

On successful import, the sample tabular grid looks like this:

The Bus column will be the primary key for comparison, and the cells will be highlighted as follows:
a. Green: If the Panel record is not already populated in PowerHub, the cell color of that record appears green.
b. Yellow: If the Panel record is updated in PowerHub, the cell color of that record appears yellow.
c. Red: If the Panel record value is invalid, the cell color of that record appears red.
9. Analyse Mode
If analyse mode is on, as well as allowing the user to export more than one page, the user can group the panels by any of the column headers. With the ‘Analyse’ checkbox checked, drag column headers to the space above the grid and the system will group the grid by that field. The image below shows panels grouped by Type and Train.

10. General Search
This search bar is used to search any term in the panel grid. Whatever the user types in the search bar, the records of matching values will display in the panel grid.
11. Clear Filters
Remove all the filters applied to any of the attributes in the grid.
Panel Circuit Grid
1. Circuits Tab
In this tab, you will find various details of the panel circuits in the circuit grid such as circuit number, breaker, frame/trip(poles), current assignment, FLA, demo date, future assignments, FLA, install date, and available actions that can be performed on a circuit.
Circuit Actions The user can perform actions on the circuit including delete circuit, edit circuit/bucket, assign load to circuit, delete assignment, edit POC, and switch assignment. The features available on the Circuits tab are as follows:
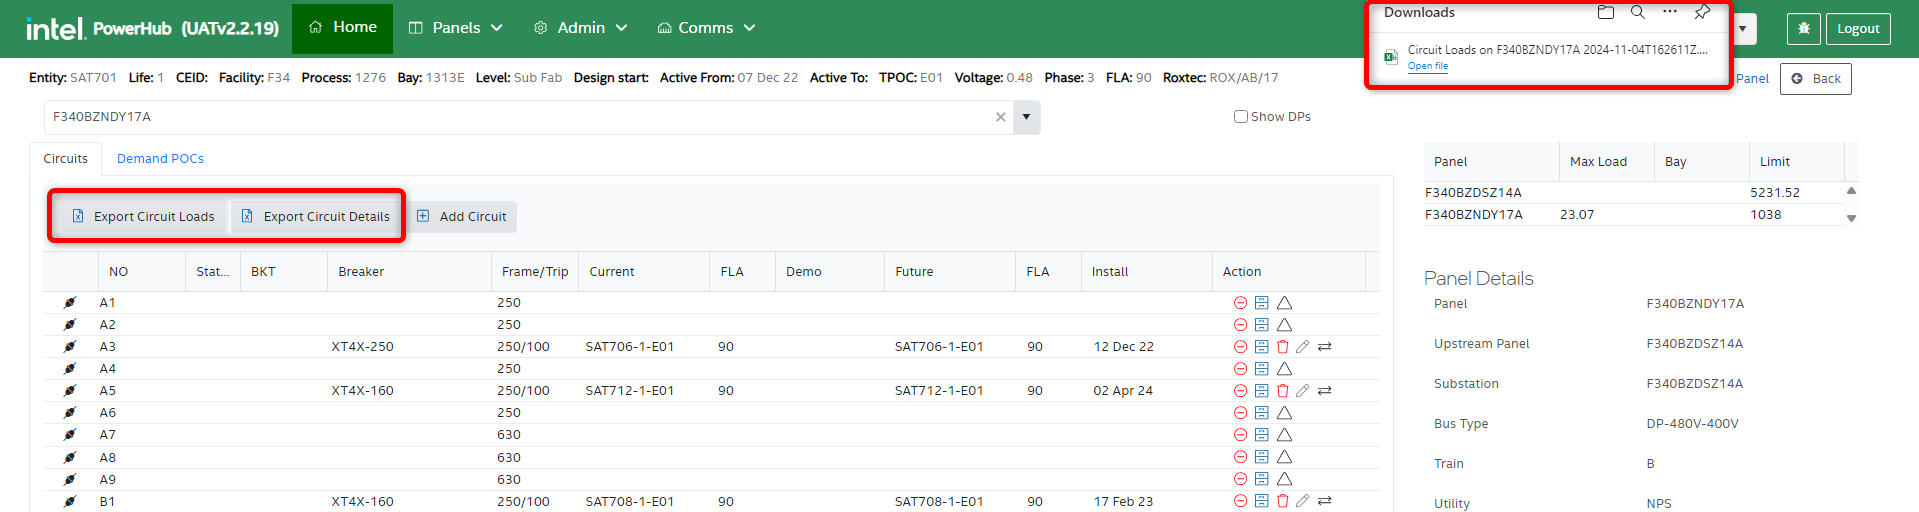
2. Export Circuit Loads and Export Circuit Details
"Export Circuit Loads" exports of all the details of loads assigned to circuits on the panel to an excel file.
"Export Circuit Details" exports the details of the circuits without load information to an excel file. Circuit details files can then be edited and reimported using the Bulk Import feature to modify the configuration of the circuits
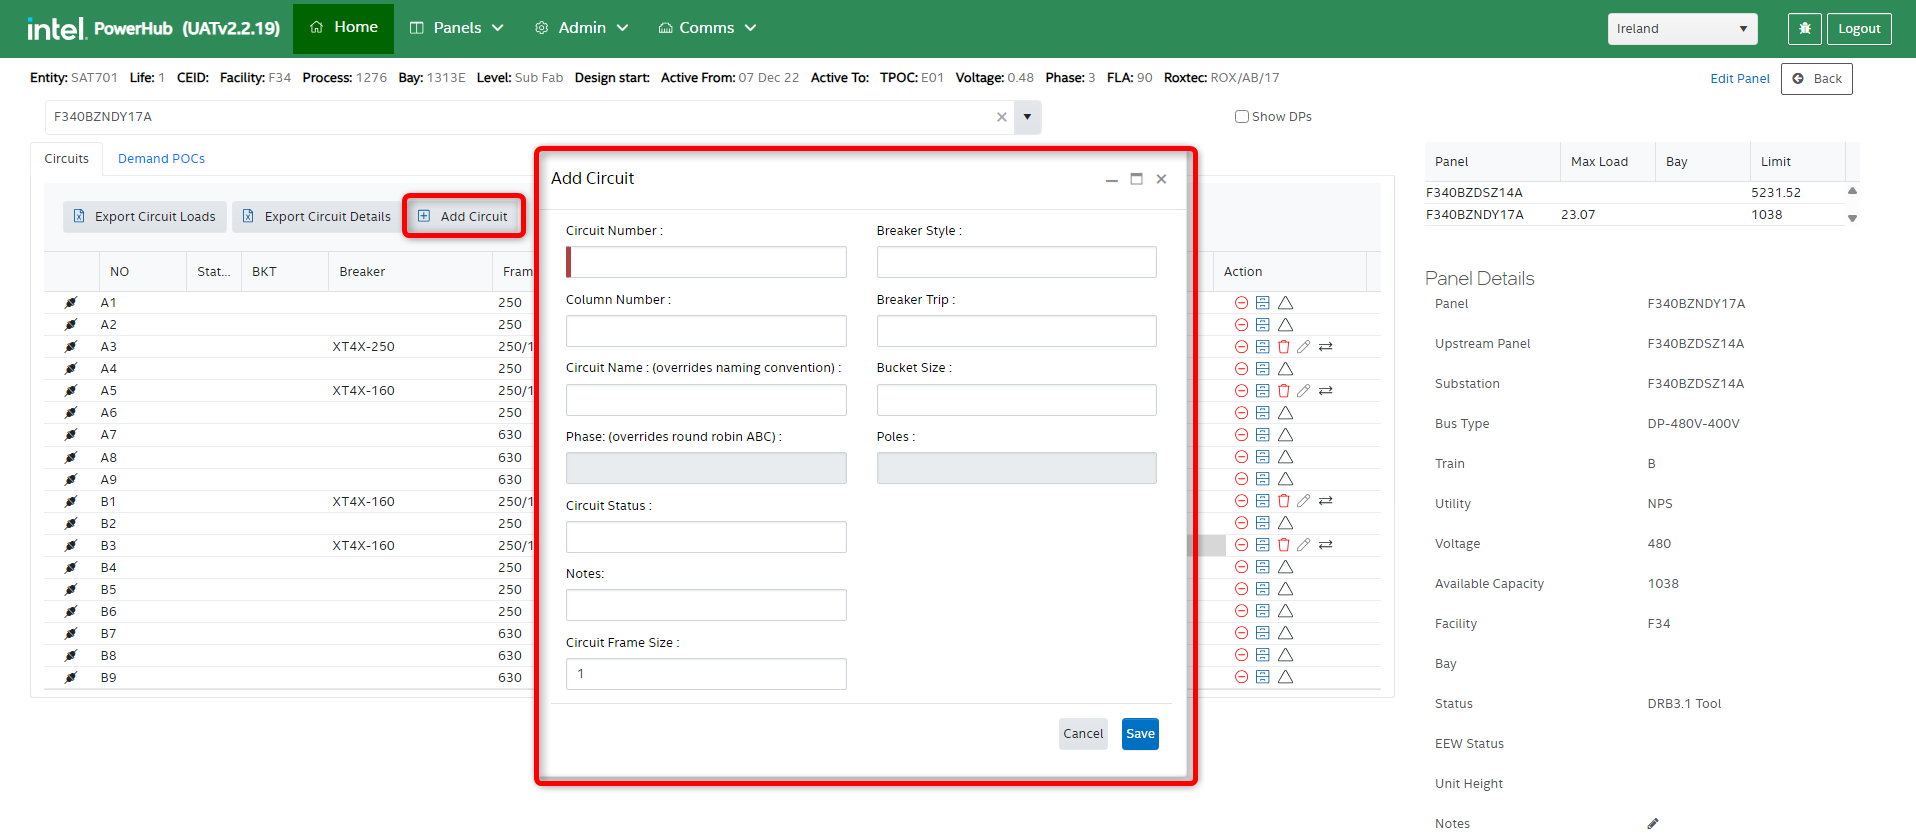
3. Add Circuit
This button allows the user to add a new circuit to the panel by entering information such as circuit number, column number, circuit frame size, bucket number, and poles. Click Save to add the circuit information.
4. Delete circuit
(icon not shown in image above)
 If a circuit does not physically exist on a panel, then it can be deleted from PowerHub. This occurs on legacy panels which were not all configured to a standard template.
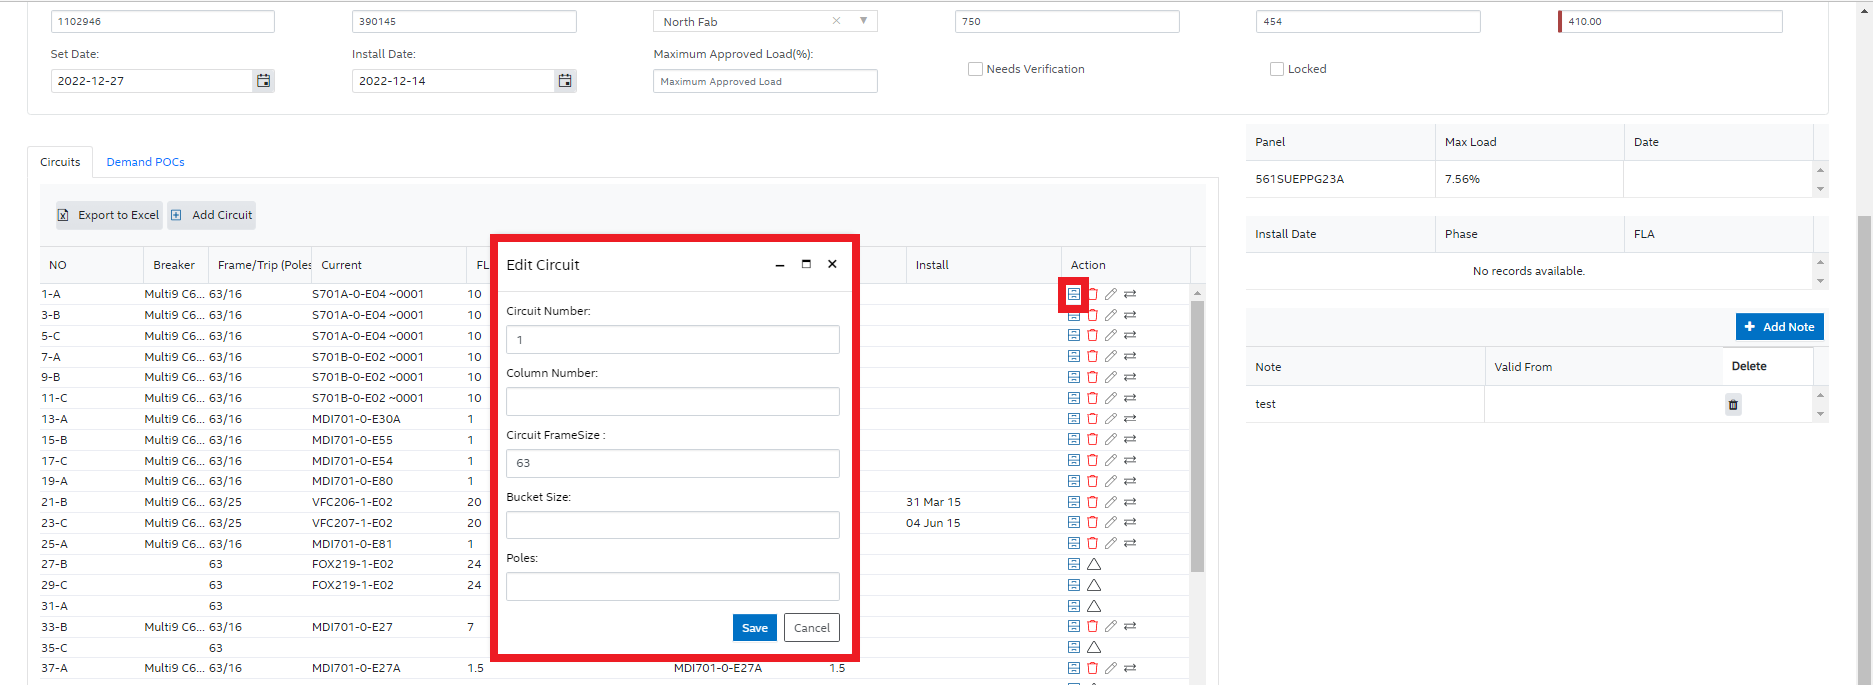
5. Edit Circuit/Bucket
 Enables the user to update the bucket information such as circuit number, column number, circuit frame size, bucket size, and poles. Click save to reflect the changes.
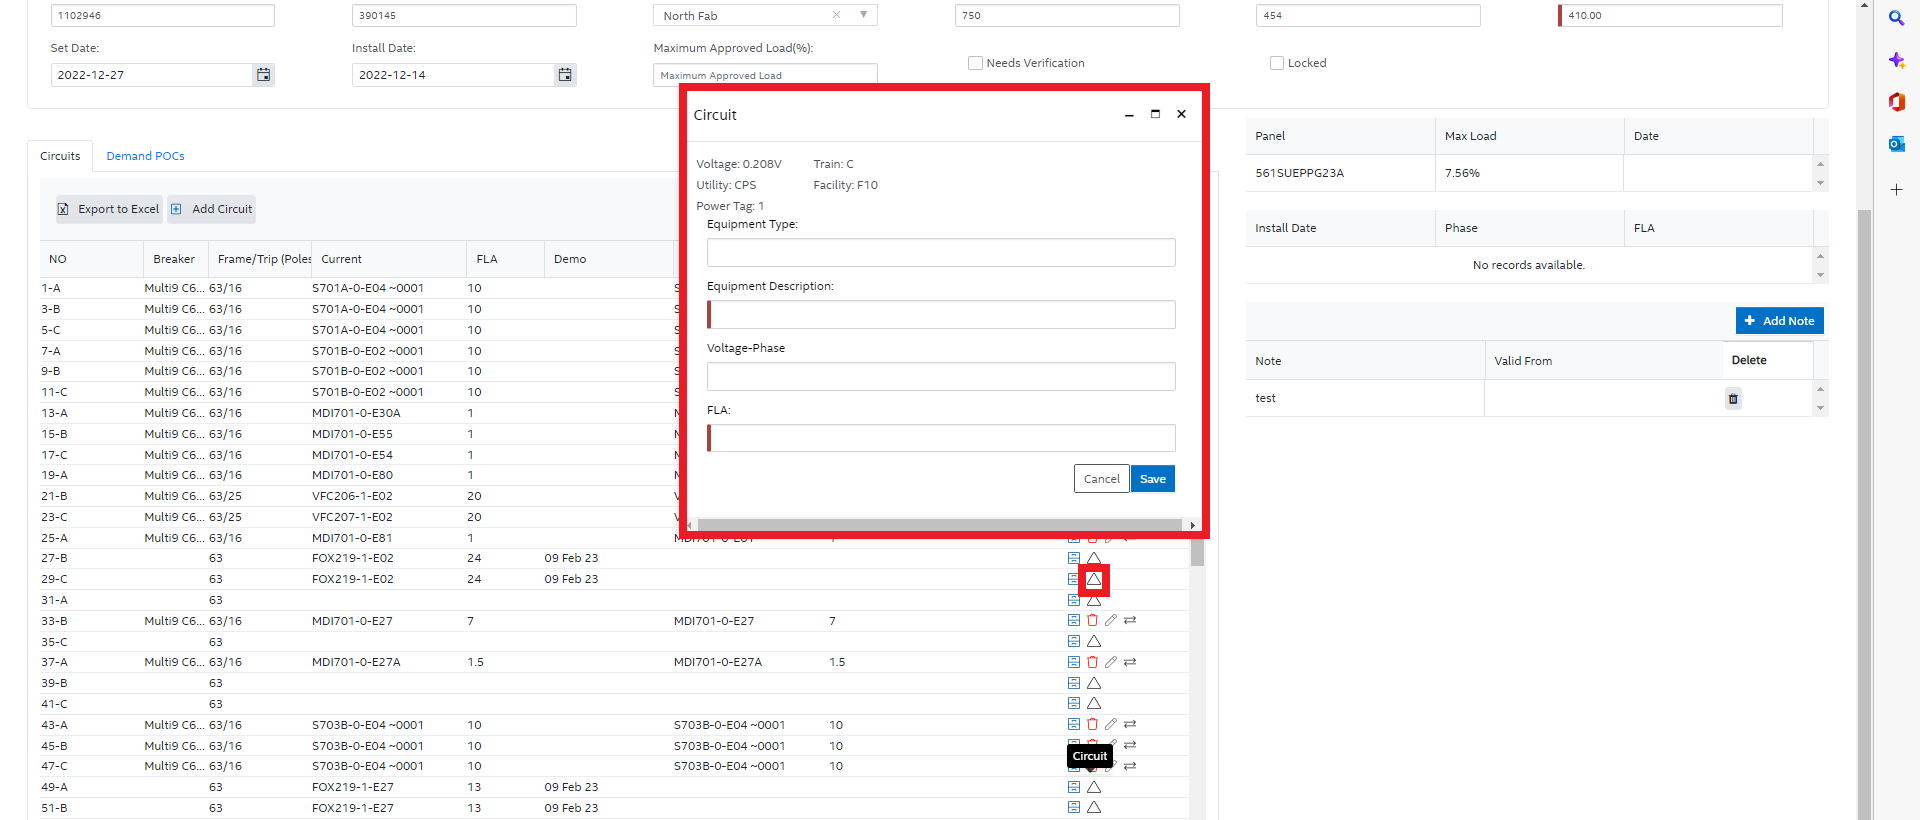
6. Assign load to Circuit
 This icon enables the assignment of a non tool load to a circuit by entering the load information such as equipment type, equipment description, voltage phase, and FLA. Click Save to reflect the changes.
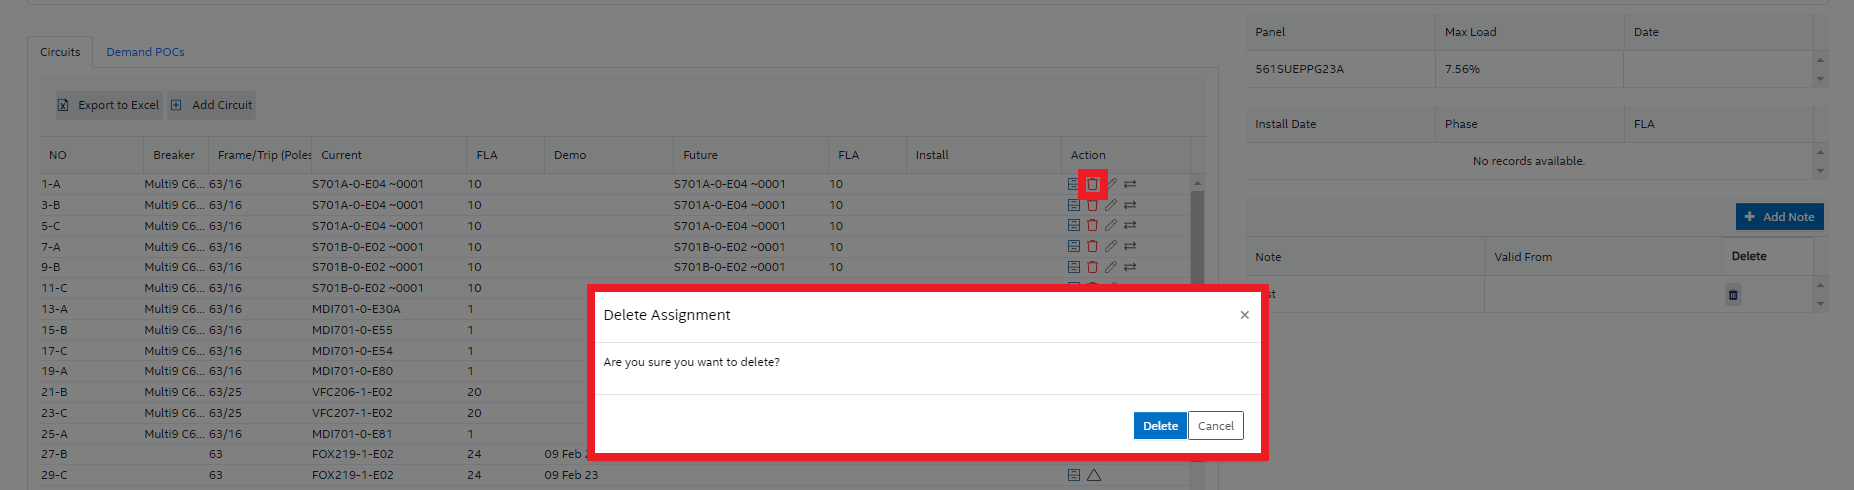
7. Delete Assignment
 This icon is used to remove the assignment of the POC to the circuit.
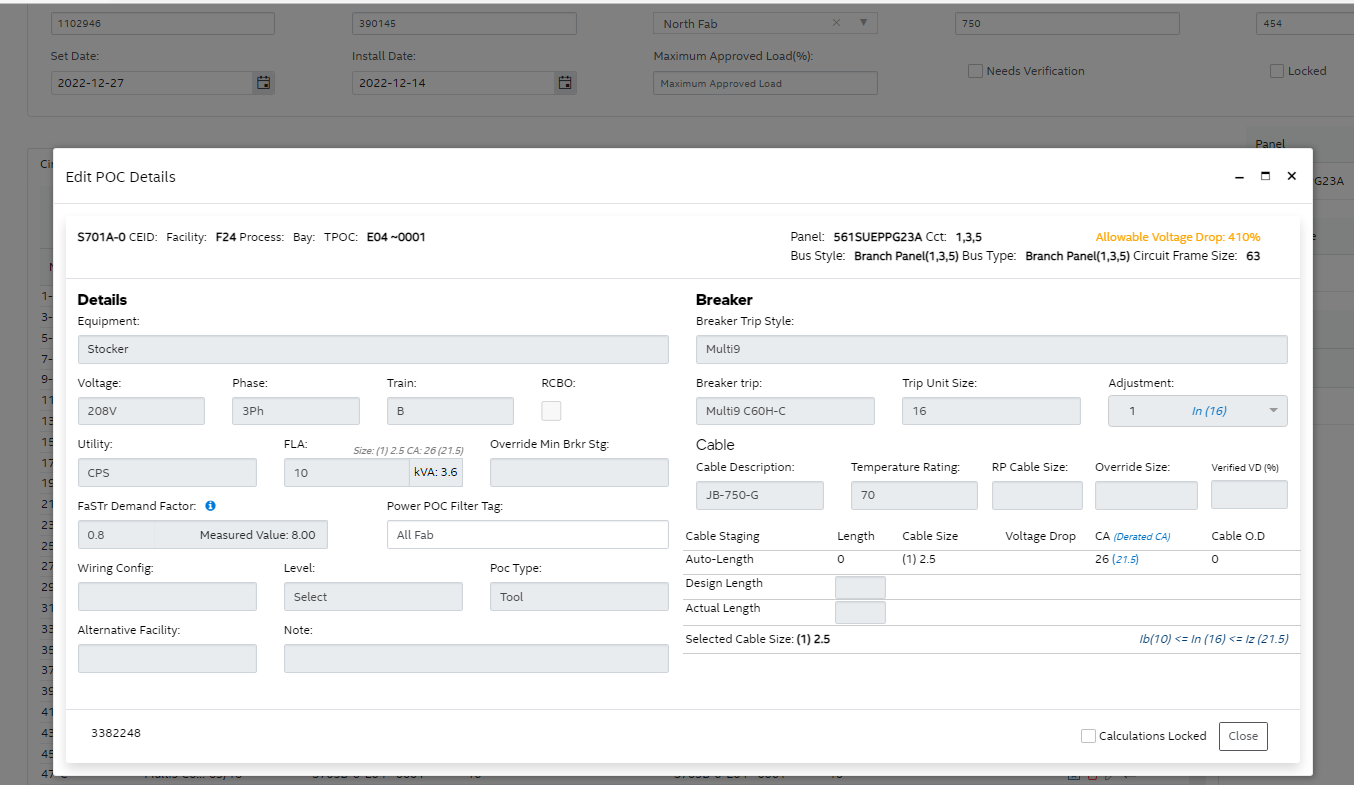
8. Edit POC
 This icon enables the user to edit the POC details that are explained in the Edit POC section of this documentation.
9. Switch
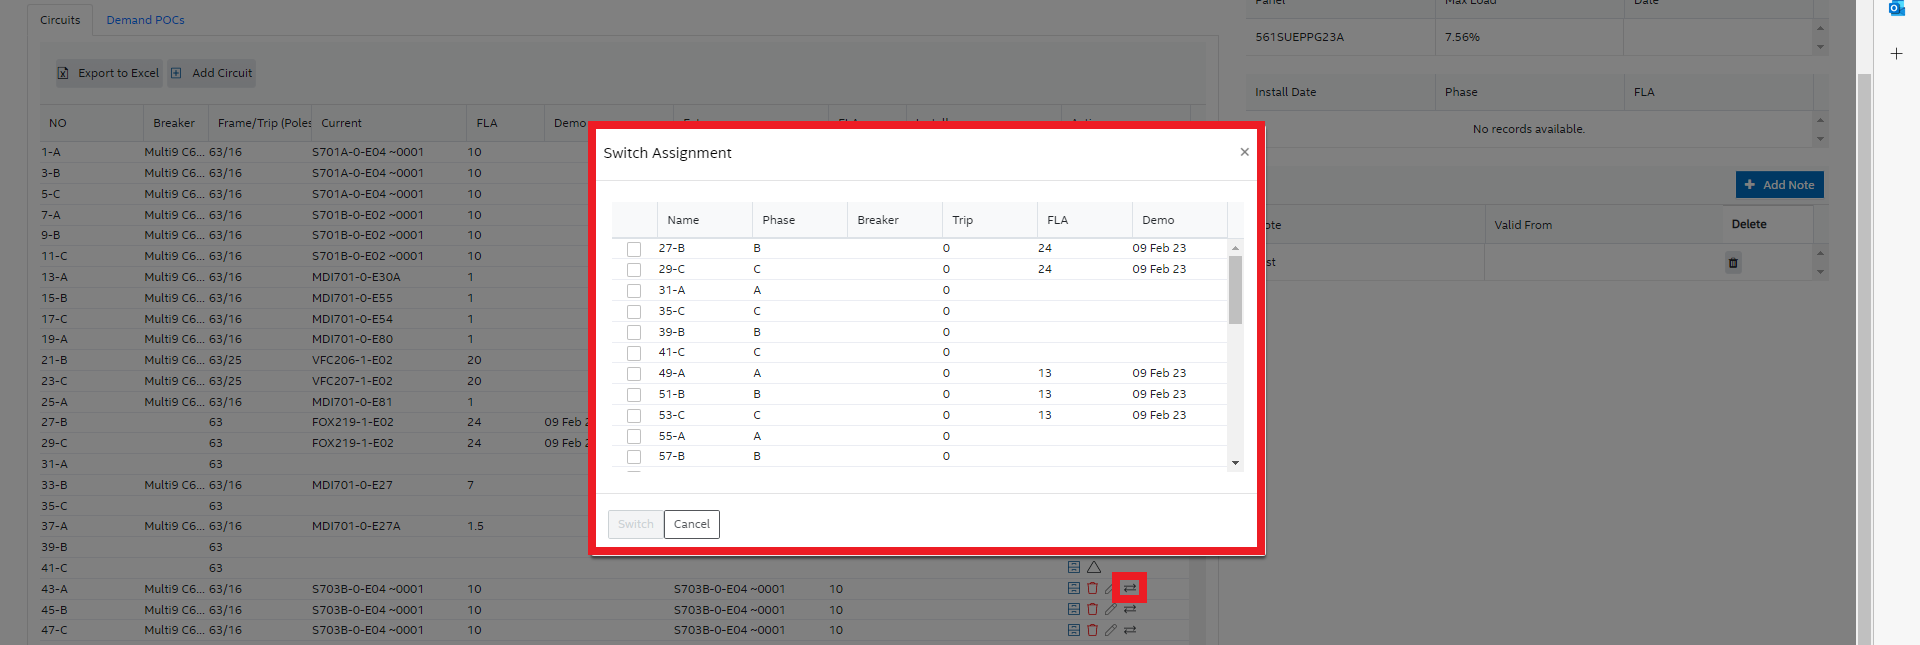
 This icon enables the user to switch the assignment to another circuit on the same panel by choosing a different circuit number.
10. Demand POCs Tab
This tab displays the various details of demand POCs such as Source Panel, Child Panel, Entity Name, Demand, Voltage, Phase, FLA, ConnectedkVA, kVA, Install date, and Demo date.
The demand POCs of Whatif Tools will also be included if the checkbox Include Whatif Tools is selected.
The user can also export this information by clicking the Export to Excel button.
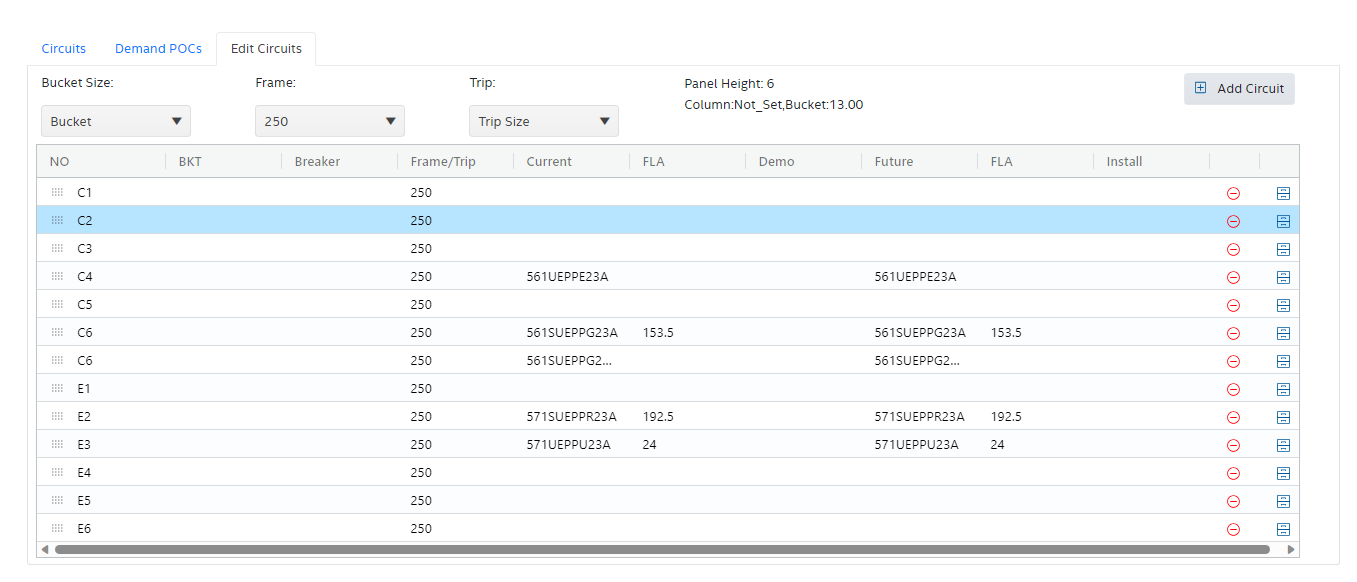
11. Edit Circuits
Distribution panels have an extra tab for editing circuit elevations and details. You can drag and drop circuits to change their position and edit the bucket height, frame size and trip size on multiple circuits simultaneously. This functionality can be used where panel data has been imported and the the elevation or other data was not available in the data source.
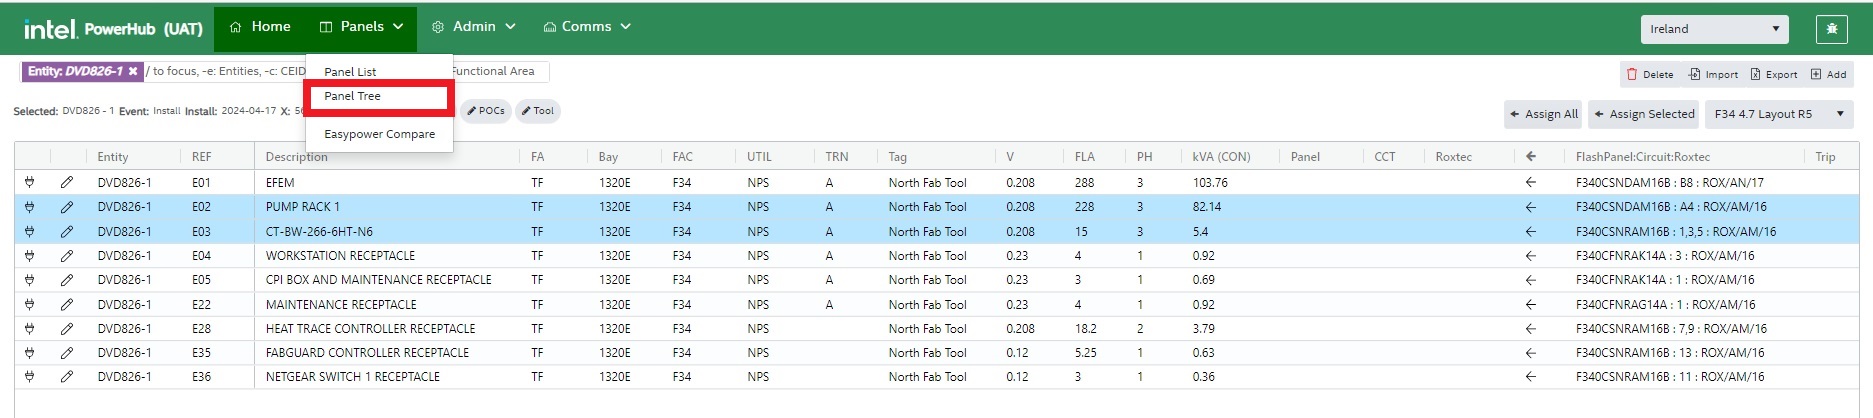
Panel Tree
Selecting “Panel Tree” from the Panels menu at the top of the PowerHub app will bring the user to the the Panel Tree view.
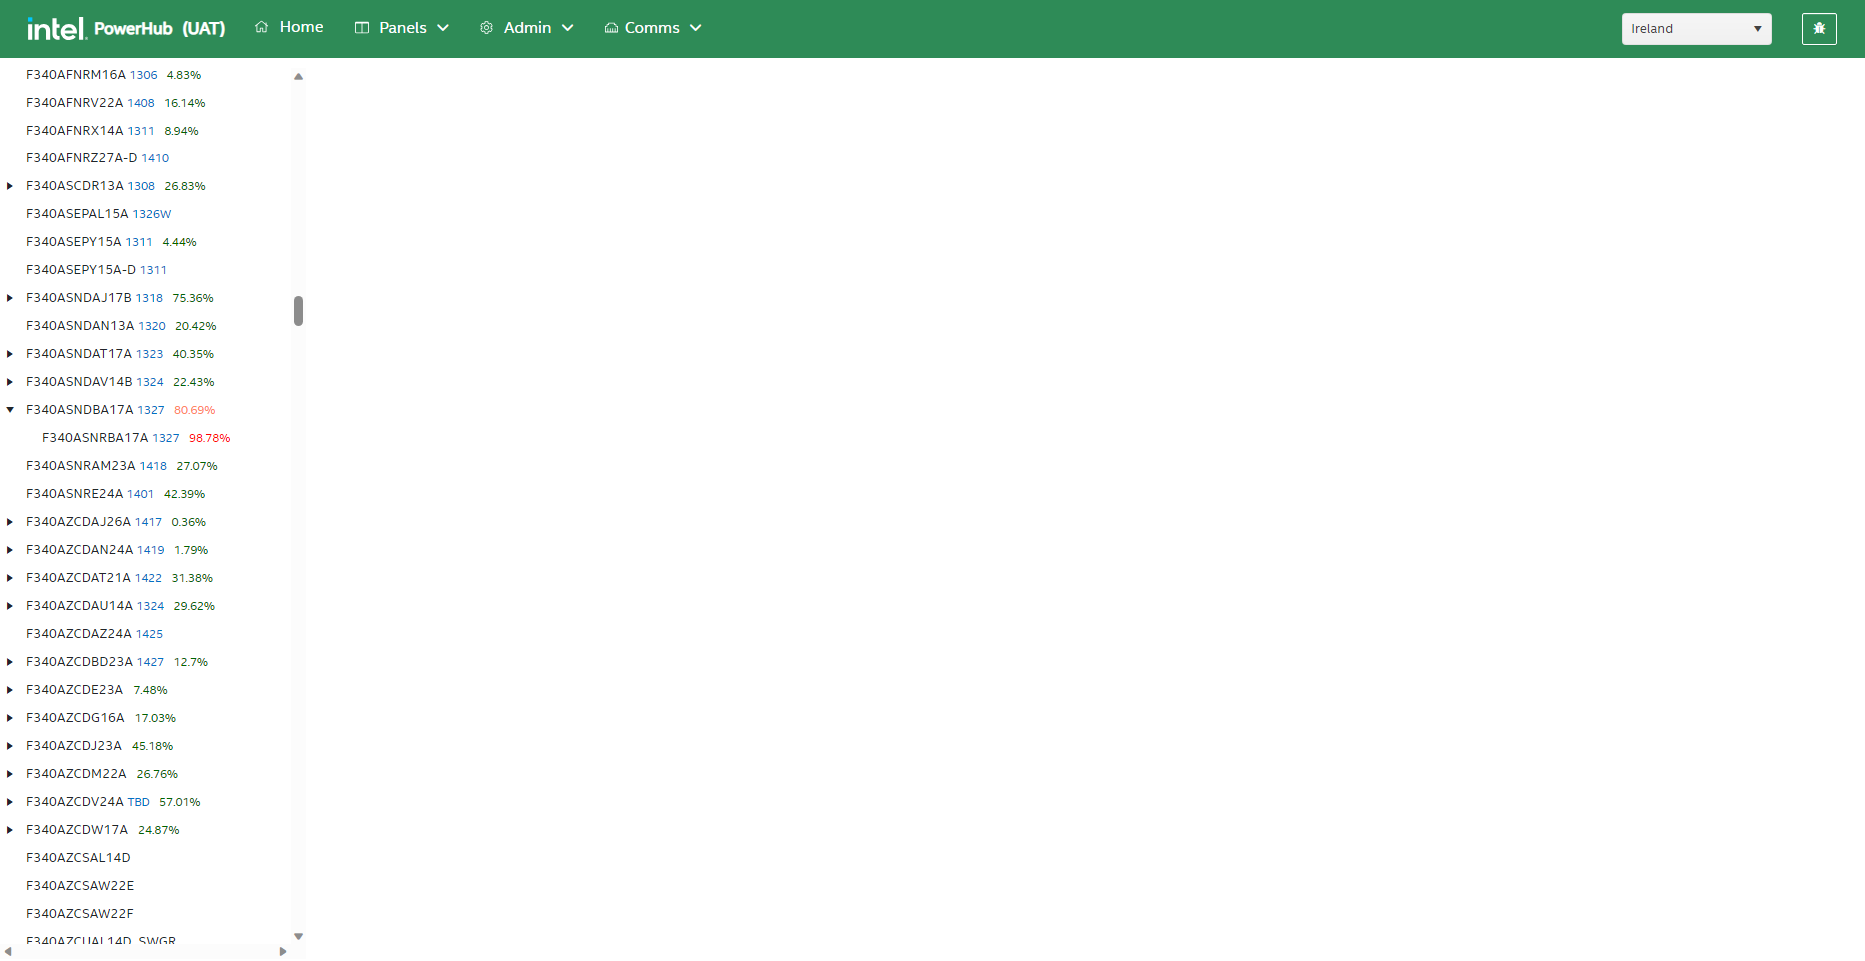
The Panel Tree view shows all the panels of the current site in a hierarchical form in the left pane of the page. If the bay a panel is in is set, then the bay number will be displayed in blue after the panel name. The percentage load currently on each panel is displayed. The percentage load is colour coded as follows:
-
Green: The panel is loaded below 75% capacity
-
Orange: The panel is loaded between 75% and 85% capacity
-
Red: The Panel is loaded above 85% capacity
Note that the percentage is calculated in relation to the value of both ‘Maximum Approved Load (%)’ and ‘Allowable kVA’ ass configured in the panel details page. The ‘Maximum Approved Load (%)’ value is used to increase/decrease the avowable load on individual panels.
You can perform the following operations on this panel tree as follows:
1. Facility Selection
You can filter the panel tree to one or more facilities within the currently selected site.
2. Search
You can type the panel in the search bar and all the related panels will get displayed in the tree.
3. View Panel Loads
You can click any panel in the panel tree to see the connected loads displayed on the right side of the screen. Basic panel details are displayed at the top of the screen. The ‘Edit’ and ‘Delete’ buttons on the top right work the same as in the Panel List described above.
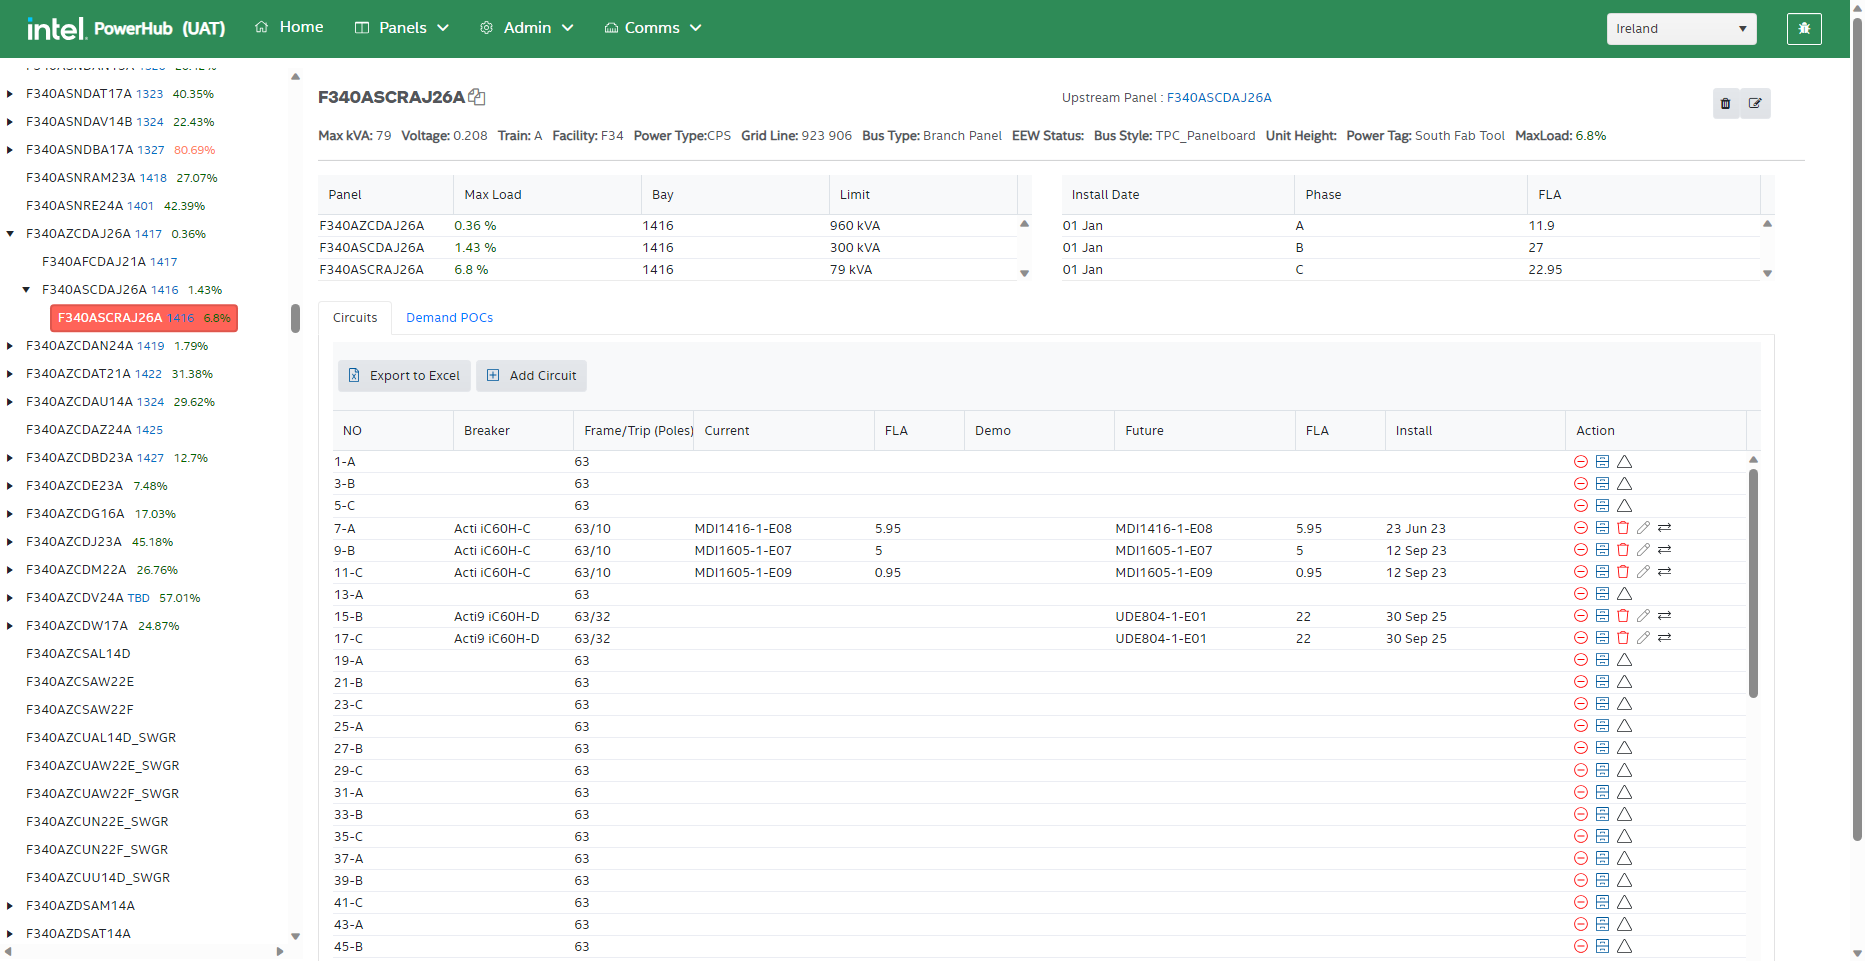
4. Set upstream panel
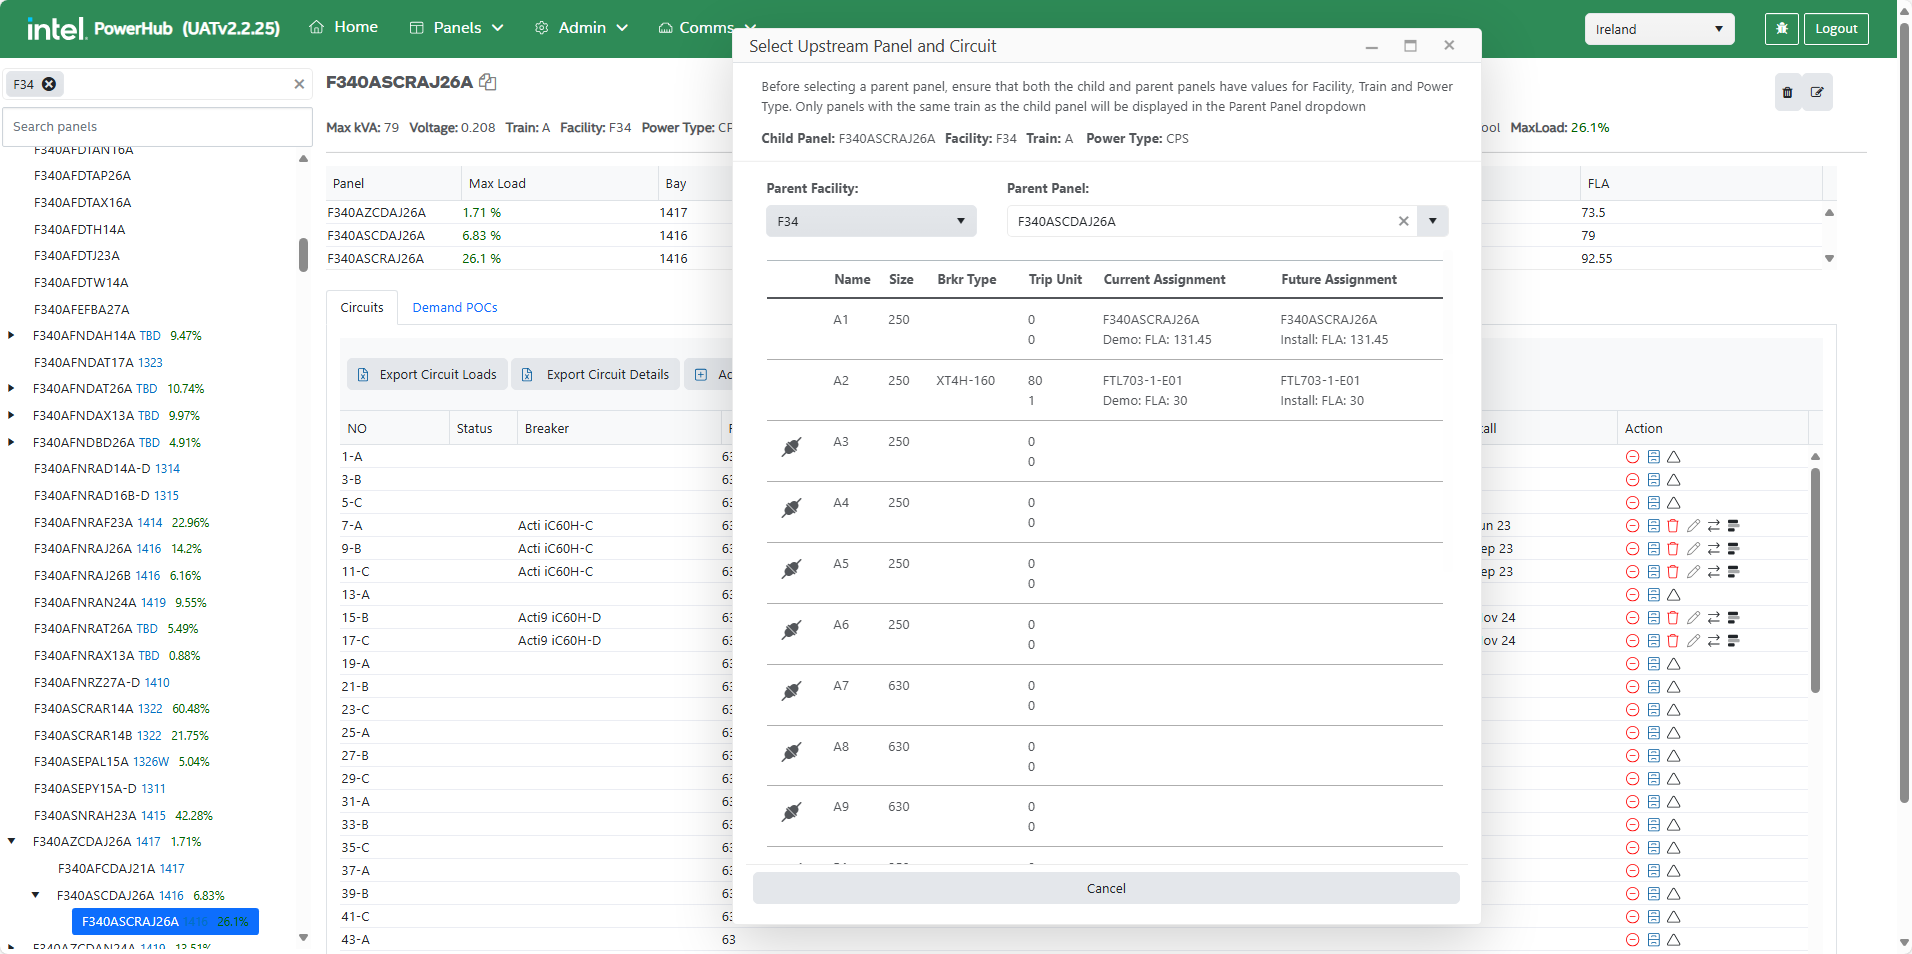
Clicking on the Upstream panel’s name displays a dialog which allows the user to select a new parent panel. Note that if the panel does not have a parent, the parent name is shown as a 'Select Parent' link which the user clicks to display the dialog.
Before selecting a parent panel, ensure that both the child and parent panels have values for Facility, Train and Power Type. Only panels with the same train as the child panel will be displayed in the Parent Panel dropdown
First select the facility of the parent panel and a parent panel from the dropdown list. Then use the assign icon in the circuit grid to assign the panel to a circuit (on the parent selected in the dropdown).
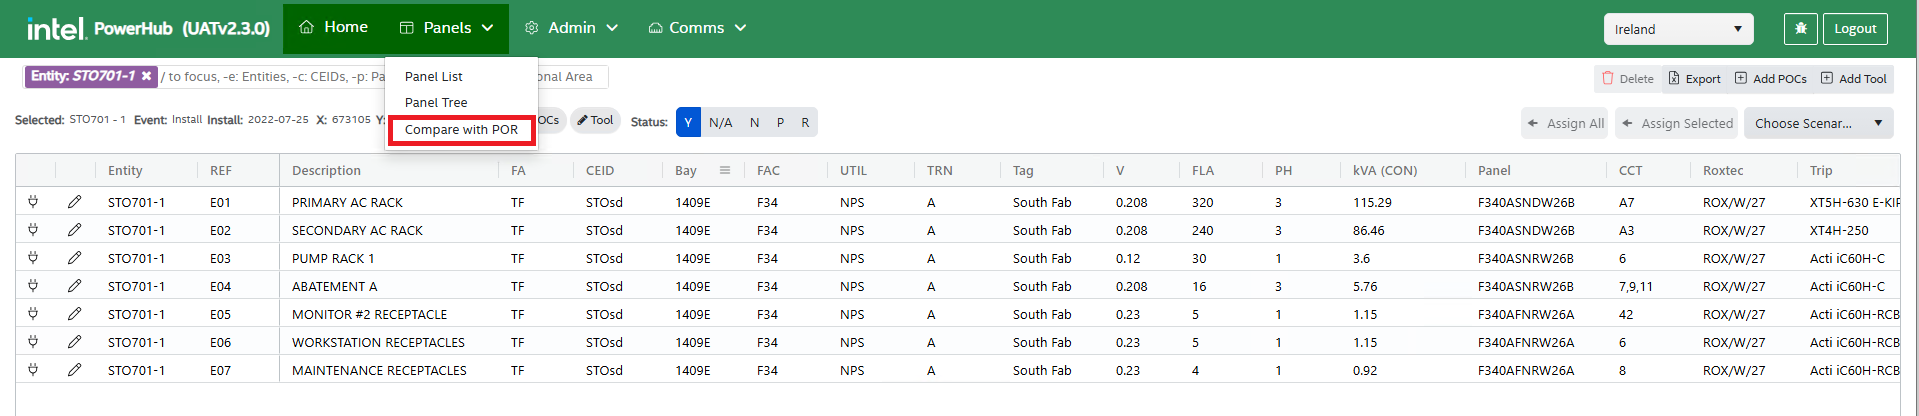
Compare with POR
The Compare with POR feature allows PowerHub users to compare the loads on panels in PowerHub with the load on those panels in EasyPower or SKM. A daily sync of data from EasyPower and SKM is performed to ensure the comparison remains up to date. Users can initially compare panels at a high level and, if discrepancies in kVA load or circuits used are detected, they can select a panel for a more detailed comparison. Any differences identified between PowerHub and EasyPower or SKM can then be addressed in the appropriate system.
Intel sites have either EasyPower or SKM as their POR. Some sites, such as Arizona and Ronler Acres, have EasyPower as the POR, while others, like Rio Rancho, have SKM as the POR. Certain sites, such as Ireland, have both EasyPower and SKM as the POR (For Ireland, the F34 facility has EasyPower as the POR, whereas the F14 and F24 facilities have SKM as the POR).
Selecting Compare with POR from the Panels menu at the top of the PowerHub app will bring the user to the Panels Comparison page.
This page has the following features:
- Facility dropdown
- Comparative Panel List grid
- Panel Summary grids - POR and PowerHub
- Panel search box
- Export Button
- Clear Filters Button
1. Facility Dropdown
It displays the list of all facilities that have POR (SKM/EasyPower) data in the database within the currently selected site. Users can select only one facility at a time from this dropdown.
If no facilities appear in the facility dropdown for a selected site, it indicates that the site does not have any POR data.
If only some facilities are displayed while others are missing, it means that POR data is available only for the displayed facilities under the selected site.
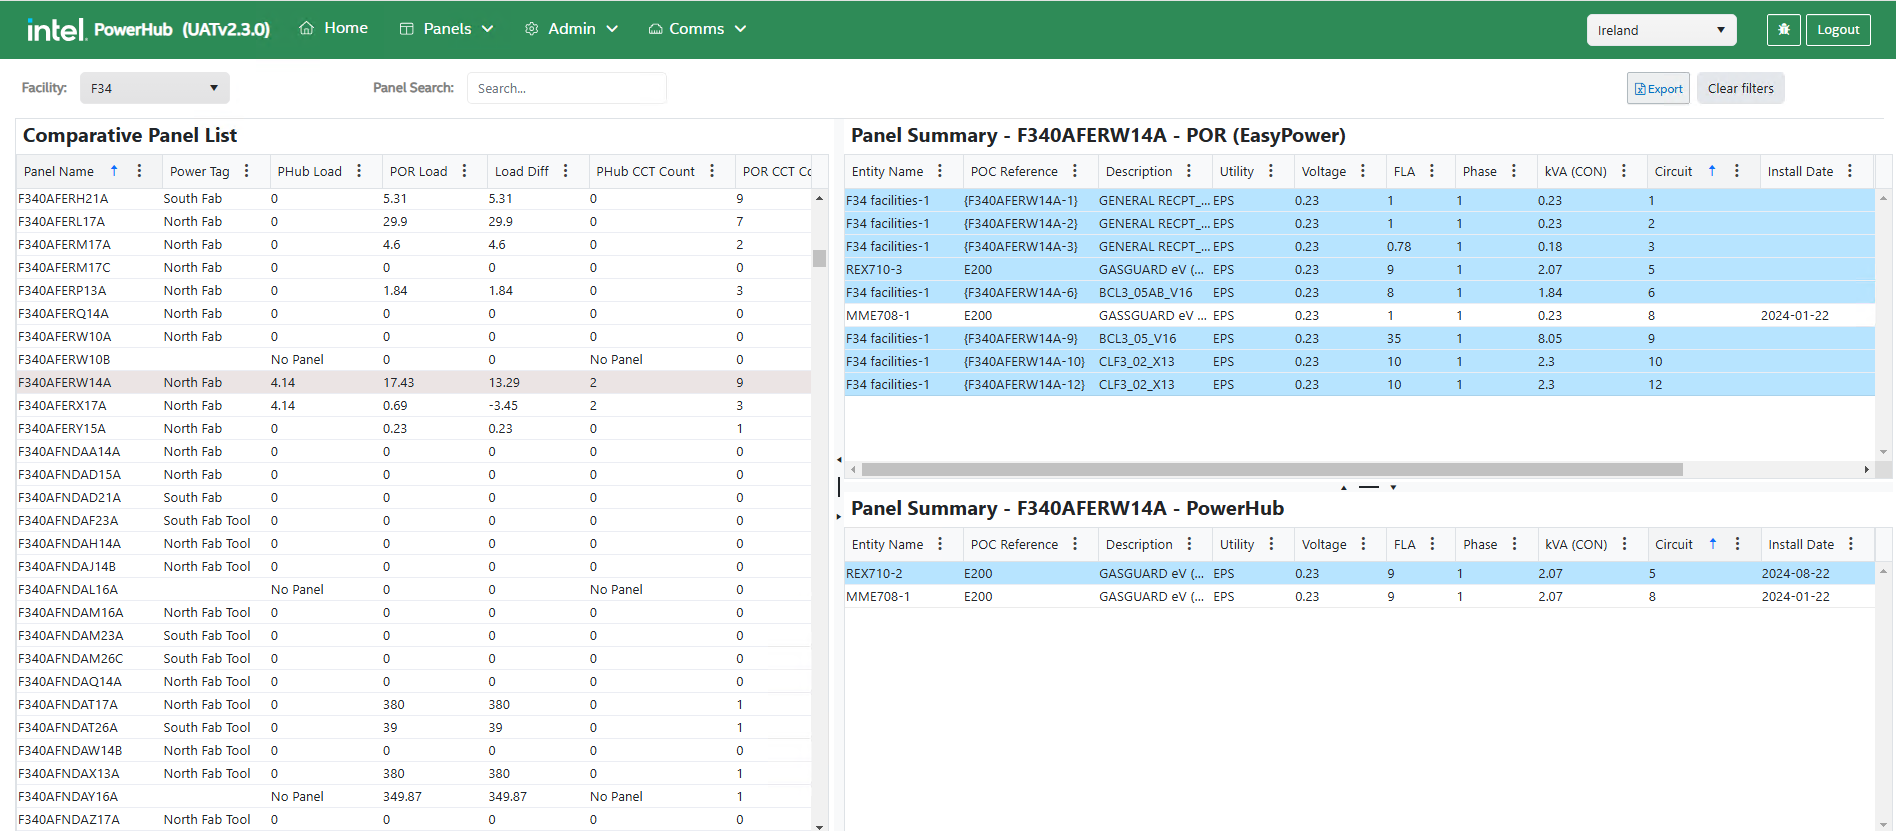
2. Comparative Panel List Grid
This grid lists all panels from PowerHub and POR (EasyPower/SKM) for the facility selected in the Facility dropdown. It displays the load and circuit count for each panel from both sources and also displays the differences in circuit count and load between PowerHub and POR (EasyPower/SKM).
The grid contains the columns listed below:
| Field | Comments |
|---|---|
| Panel Name | All the panels from both PowerHub and POR are displayed under this column |
| Power Tag | Displays the PowerTag associated to the panel in PowerHub |
| PHub Load | It displays the sum of current and future loads on the panels. Loads from the past which have been disconnected or demoed will not be considered. Also, Load of the connected sub panels is also not considered. |
| POR Load | It displays the sum of the 'kva' loads connected to circuits on the panel in POR (SKM/EasyPOwer) |
| Load Diff | Load difference between POR and PowerHub (POR Load - Phub Load). |
| PHub CCT Count | It displays the count of current and future POCs connected, POCs from the past which have been disconnected or demoed will not be considered. Also, Circuits connected to the sub panels are also not considered.. |
| POR CCT Count | It displays the number of POCs connected to circuits on the panel in POR (SKM/EasyPOwer) |
| CCT Count Diff | Circuit Count difference between POR and PowerHub (POR CCT Count - PHub CCT Count). |
If a panel exists in POR but not in PowerHub, the grid will display No Panel under the Phub Load and Phub CCT Count columns. Likewise, if a panel exists in PowerHub but not in POR, the grid will display No Panel under the POR Load and POR CCT Count columns.
The Comparative Panel List grid may show a minor difference of less than 0.01 kVA in the Load Diff column, even when the FLA and Voltage values for the POCs in POR and PowerHub are identical for the selected panel. This is due to slight variations in the rounding logic used for kVA load calculations in PowerHub and POR. This does not affect the overall accuracy of the data.
This grid provides a high-level comparison of load and circuit count differences for all panels. To view detailed differences for a specific panel, users can click on the panel. This will display its detailed data from both POR and PowerHub in the panel summary grids.
3. Panel Summary grids - POR and PowerHub
When a user selects a panel in the Comparative Panel List grid, the POC load assignment details of that panel are displayed in the below two Panel Summary grids.
-
The Panel Summary - POR grid shows the load assignment details on the panel from POR.
-
If the POR for the selected facility is EasyPower, the grid is labeled as Panel Summary - POR (EasyPower).
-
If the POR for the selected facility is SKM, the grid is labeled as Panel Summary - POR (SKM).
-
-
The Panel Summary - PowerHub grid shows the load assignment details on the panel from PowerHub.
| Field | Panel Summary - POR (EasyPower/SKM) | Panel Summary - PowerHub |
|---|---|---|
| Entity Name | Name of Tool assigned to the Panel in POR | Name of Tool assigned to the Panel in PowerHub |
| POC Reference | TPOC assigned to the Panel in POR | TPOC assigned to the Panel in PowerHub |
| Description | TPOC description | TPOC description |
| Utility | Normal (NPS), Emergency (EPS) or Critical power supply (CPS) | Normal (NPS), Emergency (EPS) or Critical power supply (CPS) |
| Voltage | Voltage of the POC | Voltage of the POC |
| FLA | Full Load Amperage of the POC | Full Load Amperage of the POC |
| Phase | Phase of the POC | Phase of the POC |
| kVA (CON) | Connected kVA | Connected kVA |
| Circuit | Circuit number on the panel for which TPOC is preassigned/connected to | Circuit number on the panel for which TPOC is preassigned/connected to |
| Install Date | Tool Installed Date (Taken from PowerHub) | Tool Installed Date |
| Demo Date | Tool Demoed Date (Taken from PowerHub) | Tool Demoed Date |
| Tool Event | Refer the note below for populating the Tool Event for SKM and EasyPower | N/A |
For SKM, as agreed with the Intel SME, the Description field must follow a specific format:
-
It should include both the Tool Name and the POC Reference Number.
-
The POC Reference Number should have a hyphen ('-') before the letter E and a space at the end (Example: STO701 -E10 RMT AC)
Additionally, users must provide the Tool Life.
-
If the Tool Life is not provided, or the Description field does not contain the Tool Name, then the Entity Name will not be populated correctly in the Panel Summary - POR grid.
-
If the POC Reference Number does not follow the required format, it will not be populated correctly in the grid.
Users must enter the information accurately in the agreed format in the Description field of SKM to ensure that the Entity Name and POC Reference fields display the correct data in the Panel Summary-POR grid.
Tool Event Logic:
-
For SKM:
- If the tool in the Description field contains () brackets, we load Demo in this field.
- If the tool in the Description field contains <> brackets, we load Future in this field.
- If the tool in the Description field contains no brackets, we leave this field blank.
-
For EasyPower: Status field from ECCM taken as Tool Event.
The Panel Summary grids display all load assignments, including past, current, and future loads. However, past/demoed loads are not included in the calculations for PHub Load, POR Load, PHub CCT Count, and POR CCT Count in the Comparative Panel List grid.
POR (SKM & EasyPower) data does not contain Demo Date and Install Date. So these dates are taken from PowerHub and displayed in the POR grid.
The two grids visually highlight the demo tools, and the differences in POC assignments on a panel between POR and PowerHub.
-
Demo Tools: If a tool is a demo tool, the corresponding row will be highlighted in gray in both grids.
-
Differences in POC assignments: Differences are identified based on the unique combination of Entity Name and POC Reference.
- If a combination of Entity Name and POC Reference exists in the POR grid but not in the PowerHub grid, it will be highlighted in sky blue color in the POR grid.
- Similarly, if a combination exists in PowerHub but not in POR, it will also be highlighted in sky blue color in the PowerHub grid.
4. Panel Search
Users can use this search box to find a specific panel. If the panel is available, the Comparative Panel List grid will be filtered to display the searched panel. If the panel is not available, users will see a message: The panel is not available under the selected facility and site
5. Export
Users can use this Export button to export the entire Comparative Panel List grid data to excel.
6. Clear Filters
Users can click the Clear Filters button to reset all applied filters across all grids and the panel search box.