
1. Introduction
The Design Change Request (DCR) form is a change control management system for documenting and tracking all changes (design or layout) requested after completion of the initial design review. Typically, DCRs are submitted by Tool Owners (TO). Once submitted, the DCRs undergo an initial review and approval process by the Area Coordinators (AC) and Project Managers (PM). After the initial approval, the DCRs are subject to a final review by the DCR Chair or the Design Manager (DM), who will either approve or reject the changes.
Submission of the DCRs has been discontinued in FCEConnect on Friday, September 27th, 2024. From this date, all DCR in FCEConnect will be in READ-ONLY mode. DCR submission must be completed in the LSPx application from Wednesday, October 02, 2024
2. Workflow
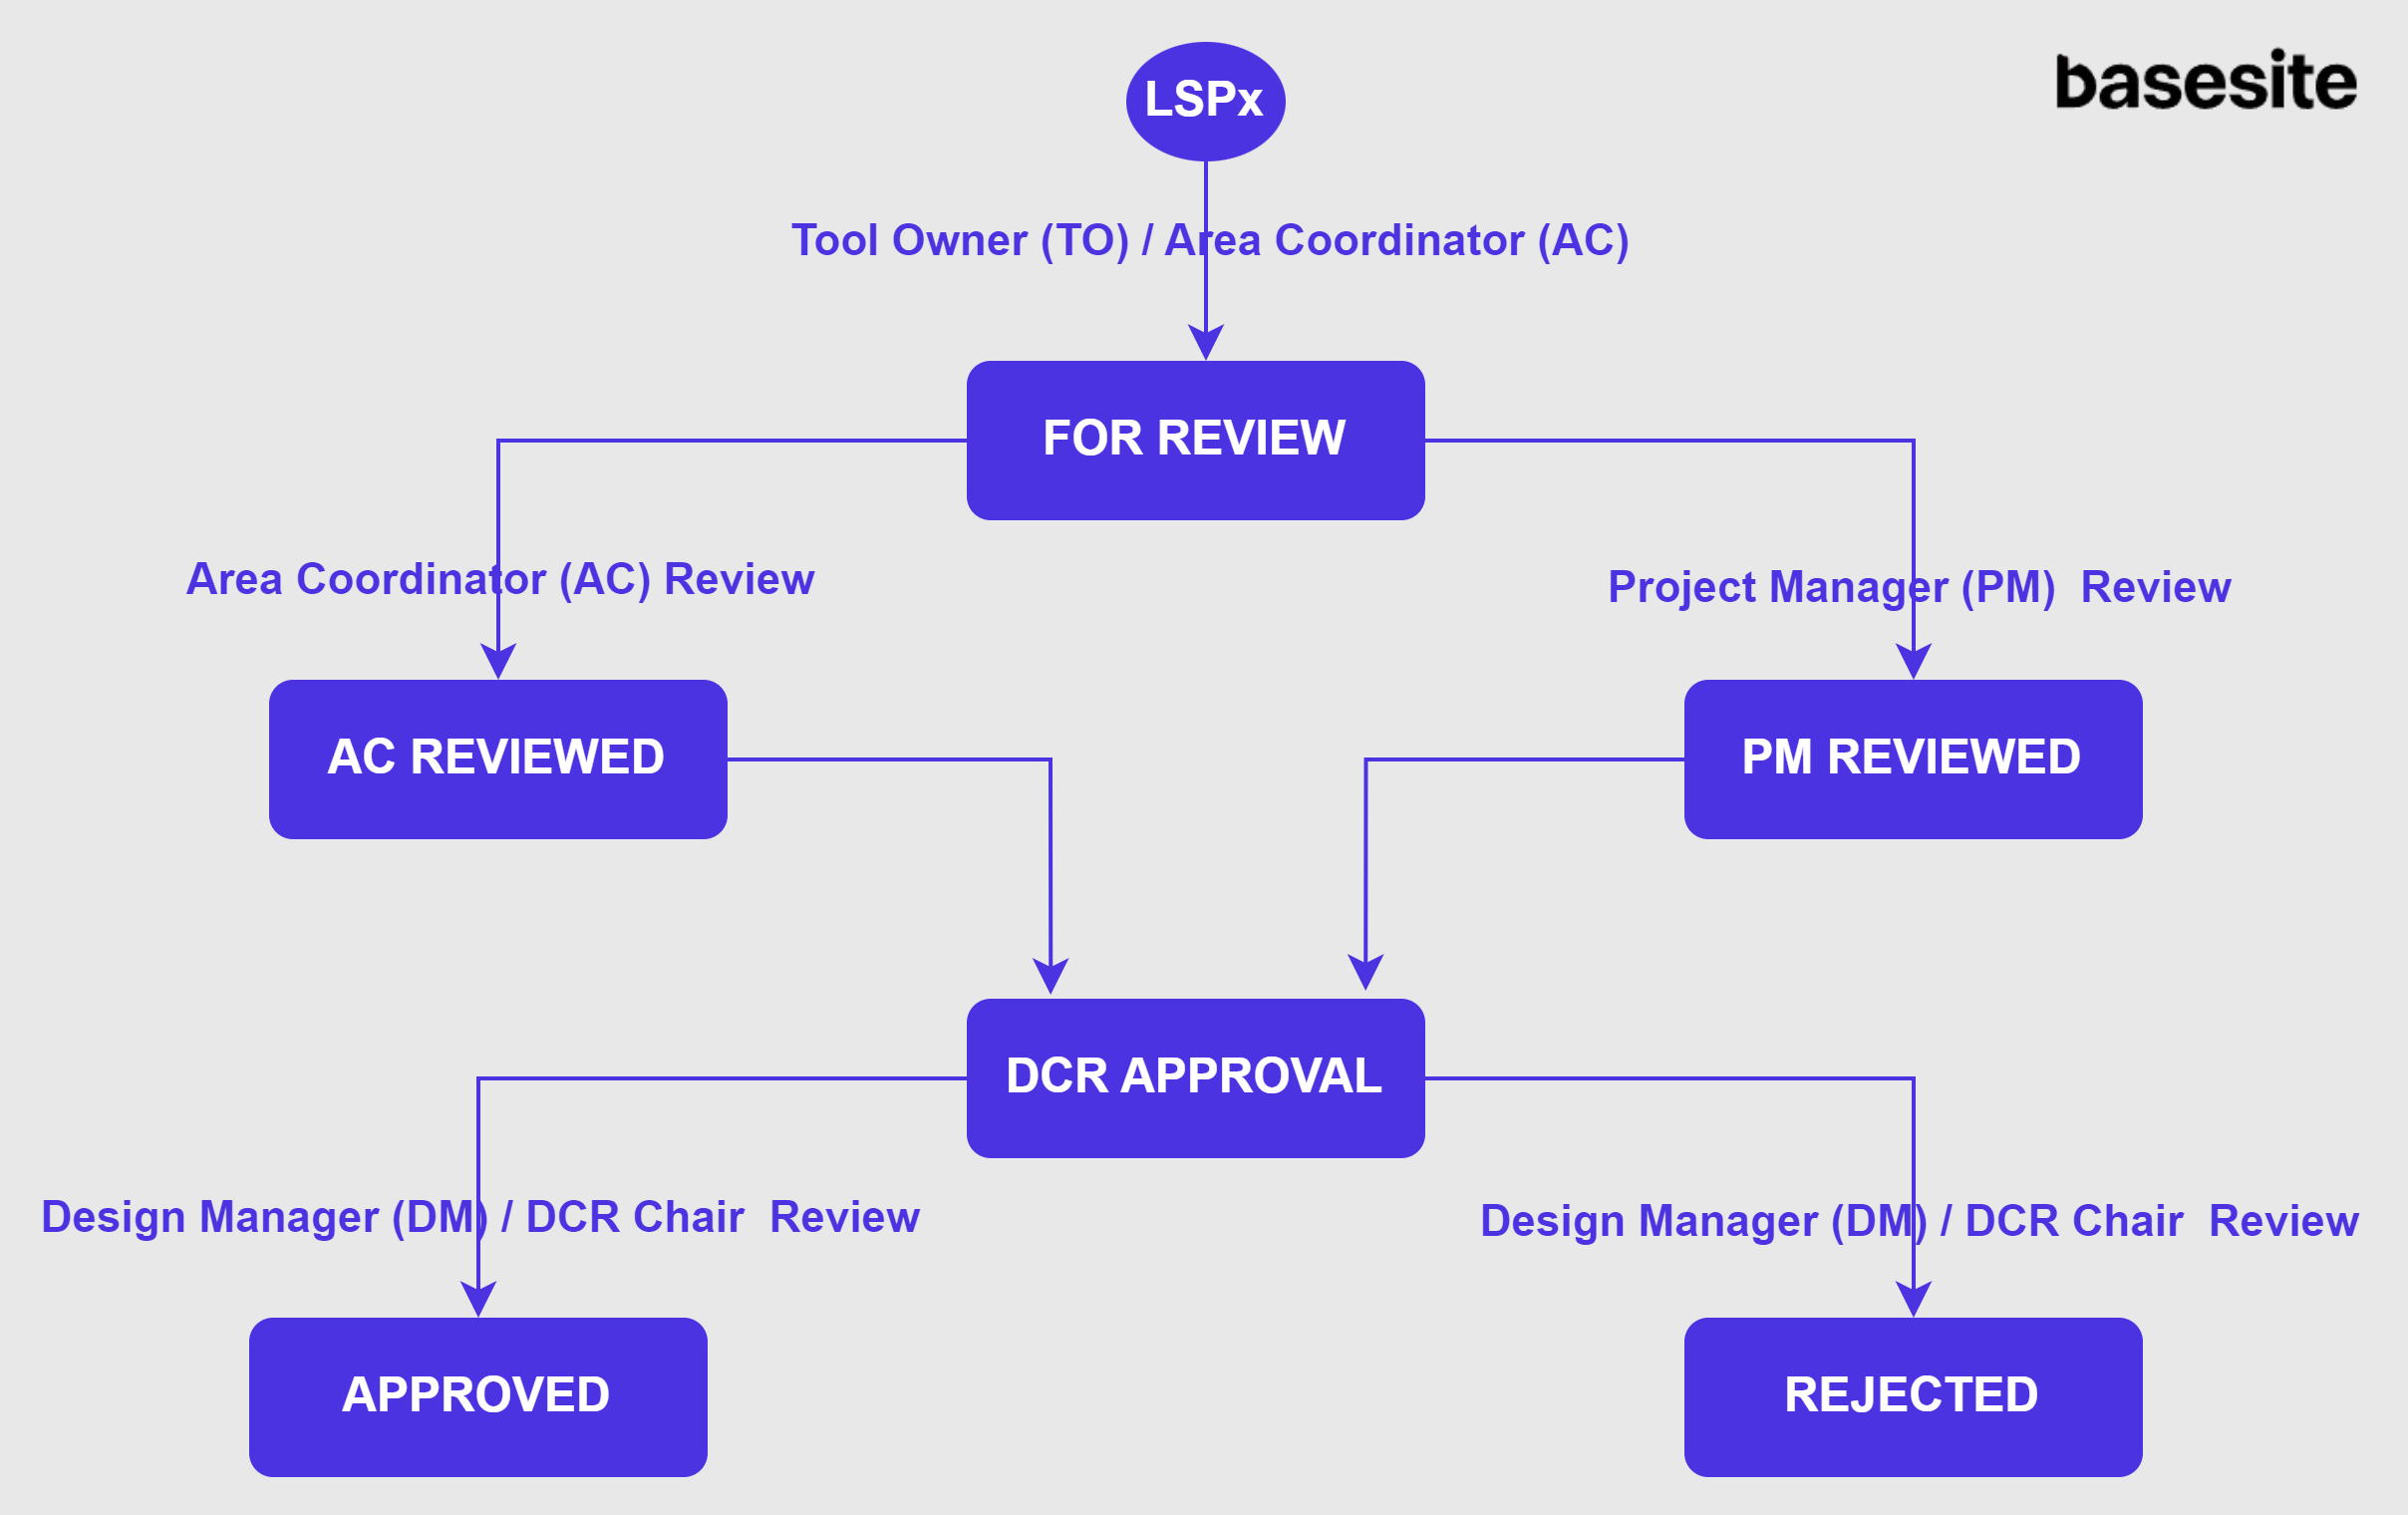
2.1. Tool Owner > Area Coordinator / Project Manager > Design Manager / DCR Chair
2.2. Process / User Journey
The DCR workflow is consistent across all sites and is outlined as follows:
1. DCR Creation The Tool Owner (TO) or Area Coordinator (AC) typically creates / submits a Design Change Request (DCR). Once the DCR is created, the ticket status is set to "FOR REVIEW", and all relevant stakeholders are notified of the new DCR ticket.
2.AC / PM Review Once submitted, the DCR is initially reviewed by both the Area Coordinator (AC) and the Project Manager (PM). While neither the AC nor the PM can directly reject the DCR, they may leave comments if any issues arise during their review. The status of the ticket will change to "AC REVIEWED" or "PM REVIEWED", depending on which party approves the request first.
3.Transition to DCR Approval Once both the AC Review and PM Review completed, the ticket automatically transitions to the "DCR APPROVAL" status.
4.Final Approval or Rejection At this stage, the DCR Chair or Design Manager reviews the request and provides the final decision. They have the authority to either approve or reject the DCR.
-
If the DCR is rejected, the ticket status changes to "REJECTED", and all stakeholders are notified of the rejection.
-
If the DCR is approved, the ticket status changes to "APPROVED", and all stakeholders are notified of the approval.
-
It is important to note that the AC cannot approve on behalf of the PM, and vice versa. Additionally, the PM is required to input both the Trade Cost and Design Hours before the process can move forward.
-
The DCR Chair and Design Manager can override the Area Coordinator and Project Manager if they have not responded. In cases where they choose to progress the ticket on behalf of the PM, they are required to enter the Trade Cost and Design Hours.
3. Creating the DCR
Follow the below steps to create or submit the DCR tickets in LSPx.
-
Access the LSPx application using the URL: fcelspx.intel.com
-
Ensure that you are on the right site before starting the DCR creation process. The DCR will be created on the tools that are available in the site you are on. Change the site if needed using the dropdown shown in below screenshot.

- Click on Create dropdown button and select DCR option. Create DCR form will appear on the screen. Fill the details in each field as given in below table and click on create button on the form to submit the DCR ticket.
- There are couple of mandatory fields on DCR form. Users should fill all these mandatory fields in order to submit the DCR ticket. The form will not allow users to submit the ticket without filling these mandatory fields. Refer to below table for the mandatory fields list.
- DCRs can be created by Tool Owner (TO), Area Coordinator (AC), DCR Chair, Design Manager (DM) role users. So the DCR value in the dropdown is visible to these role users only.
| Field in LSPx | Notes | Mandatory or Optional | |
|---|---|---|---|
| 1 | Entity Code - Life | This is a single-select dropdown field. It displays all the tools available within the site. Start typing the tool name to bring up what you are searching for, or choose from the dropdown. | Mandatory |
| 2 | NON-POR Description | This is a free-text field. This field will only appear and is mandatory if you have selected “NON-POR” check box below the Entity Code. Select this check-box only if you want to raise NON-POR DCR. | Mandatory |
| 3 | Summary | This is a free-text field. Provide a brief “Summary” to help others understand the issue. Note that this field is limited to 250 characters. | Mandatory |
| 4 | Description | This field is a rich text editor that allows you to add text, links, images, and other web components. Provide a “Description” to help others understand the issue. Add images, links etc.. if needed. | Mandatory |
| 5 | GIT Scope | This is a dropdown field with Yes or No options. Select Yes if the ""GIT Scope"" applies to this DCR. Select No if the ""GIT Scope"" does not apply to this DCR. Note: GIT stands for Global Integration Team (Pre-assignment Change). | Mandatory |
| 6 | SYCCB | This is a dropdown field with Yes or No options. Select Yes if the ""SYCCB"" applies to this DCR. Select No if the ""SYCCB"" does not apply to this DCR. Note: SYCCBs stands for System Change Control Board. | Mandatory |
| 7 | Impacted Tools | This is a multi-select dropdown field. Similar to Entity Code - Life field, It displays all the tools available within the site. Select any additional tools for this DCR scope in the “Impacted Tools” field. | Optional |
| 8 | AE Firm | This field will get populated automatically based on the Entity Code - Life chosen in Step 1. User can edit this field to update the AE firm assigned to the tool selected in step 1. Note: The update to this field will reflect in stakeholders section of tool details page in LSPx. | Automatically populated. Can be updated manually. |
| 9 | Tool Owner | This field will get populated automatically based on the Entity Code - Life chosen in Step 1. If the Tool Owners are incorrect, they can be updated in the Stakeholder component of the Tool Details page. | Automatically populated |
| 10 | Area Coordinator | This field will get populated automatically based on the Entity Code - Life chosen in Step 1. If the Area Coordinators are incorrect, they can be updated in the Stakeholder component of the Tool Details page. | Automatically populated |
| 11 | TI Project Manager | This field will get populated automatically based on the Entity Code - Life chosen in Step 1. If the TI Project Managers are incorrect, they can be updated in the Stakeholder component of the Tool Details page. | Automatically populated |
| 12 | TICE Design Manager | This field will get populated automatically based on the site the user is on. If the TICE Design Managers are incorrect, contact the Stakeholder Admin. | Automatically populated |
| 13 | DCR Chair | This field will get populated automatically based on the site the user is on. If the DCR Chairs are incorrect, contact the Stakeholder Admin. | Automatically populated |
| 14 | AE Design Lead | This field will get populated automatically based on the Entity Code - Life chosen in Step 1. If the AE Design Leads are incorrect, they can be updated in the Stakeholder component of the Tool Details page. | Automatically populated |
| 15 | Integration Lead | This field will get populated automatically based on the site the user is on. If the Integration Leads are incorrect, contact the Stakeholder Admin. | Automatically populated |
| 16 | Industrial Engineer (IE) | This field will get populated automatically based on the Entity Code - Life chosen in Step 1. If the Industrial Engineer (IE)s are incorrect, they can be updated in the Stakeholder component of the Tool Details page. | Automatically populated |
| 17 | Assignee | Select the Assignee from the dropdown. Select the Area Coordinator or the Project Manager assigned to the selected tool. In case of NON-POR, assign it to the DCR Chair or Design Manager. | Optional |
| 18 | Abatement Unit Restrictions? | This is a dropdown field with Yes or No options. Select Yes if the Abatement Unit Restrictions? applies to this DCR, Otherwise, select No | Optional |
| 19 | Design Hours | This is a free-text field that accepts only numeric input, including digits and decimals. Enter the Design Hours required for this change. | Optional |
| 20 | Trade Cost | This is a free-text field that accepts only numeric input, including digits and decimals. Enter the Trade Cost involved for this change. | Optional |
| 21 | SL2 Construction Finish | This field will get populated automatically based on the Entity Code - Life chosen in Step 1. | Automatically populated |
| 22 | Implementation Type | This is a single-select dropdown field. Select one of the available Implementation options from the dropdown menu. | Optional |
| 23 | Implementation Date | This is a date field. Choose a date from the Calendar. | Optional |
| 24 | Intermediate MS | This is a single-select dropdown field. Select one of the available Intermediate MS options from the dropdown menu. MS stands for Milestone (related to designs) | Optional |
| 25 | Root Cause Category | This is a single-select dropdown field. Select one of the available Root Cause Category options from the dropdown menu. | Optional |
| 26 | Watchers | This is a multi-select dropdown field. Notify more users [via email] about this change request by selecting their names in the “Watchers” field. Multiple users can be added in this field as long as they have access to LSPx application. Start typing to get the list of possible matches and pick from the dropdown. | Optional |
| 27 | Attachments | Add required files as attachments in this field. The supported file types are: ""doc"", ""docx"", ""txt"", ""pdf"", ""csv"", ""xlsx"", ""xml"", ""xltx"", ""jpg"", ""jpeg"", ""png"", ""dwg"", ""msg"", ""dwf"", ""nwd"", ""eml"" | Optional |
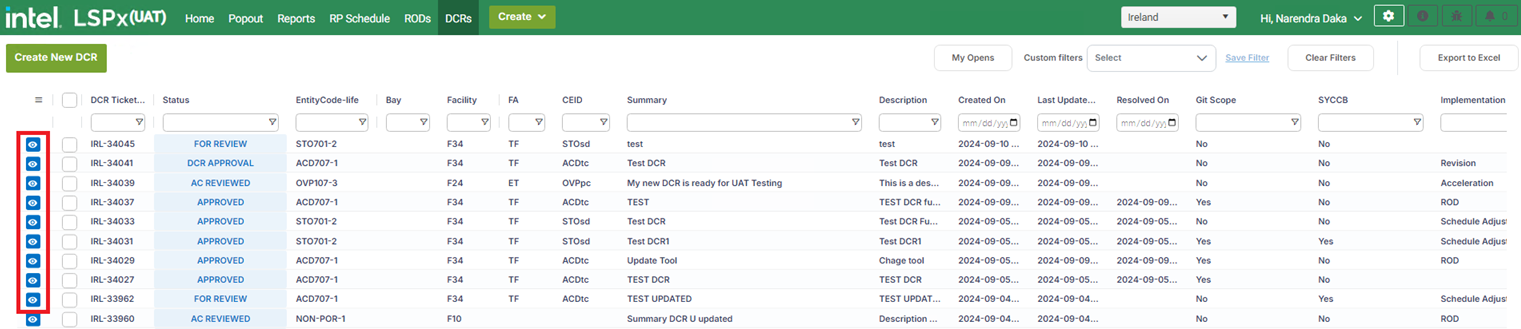
4. DCR Landing Page
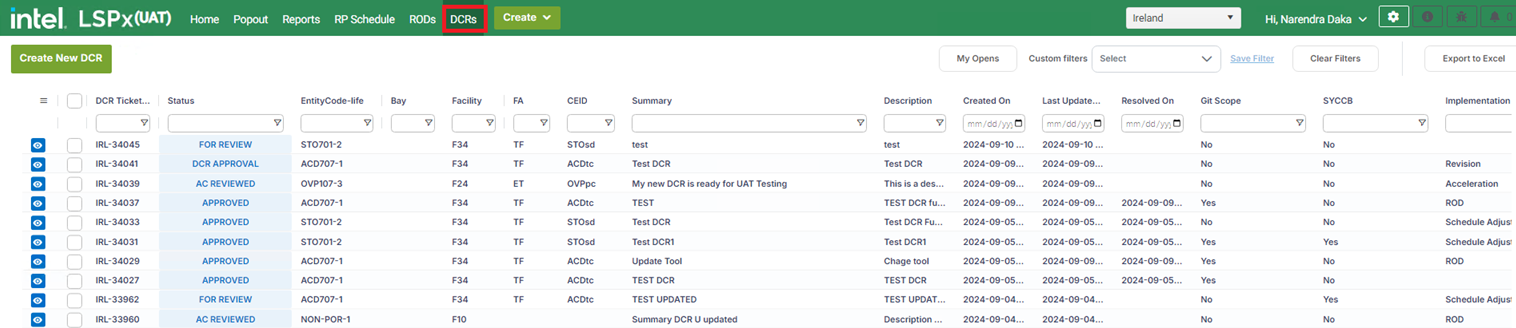
Click on the DCRs button on LSPx home page to access DCR landing page. All the DCRs created under the selected site appears in a grid here on the landing page.
Users with view access only can see this button on LSPx home page. Refer to section 6 of this user guide to see who can view this DCRs button.
This page contains below buttons:
-
My Opens: Click on this button to filter to the DCRs created or assigned to you that are still being reviewed by AC/PM/DM/DCR Chair. The approved or rejected DCRs will not appear in this list.
-
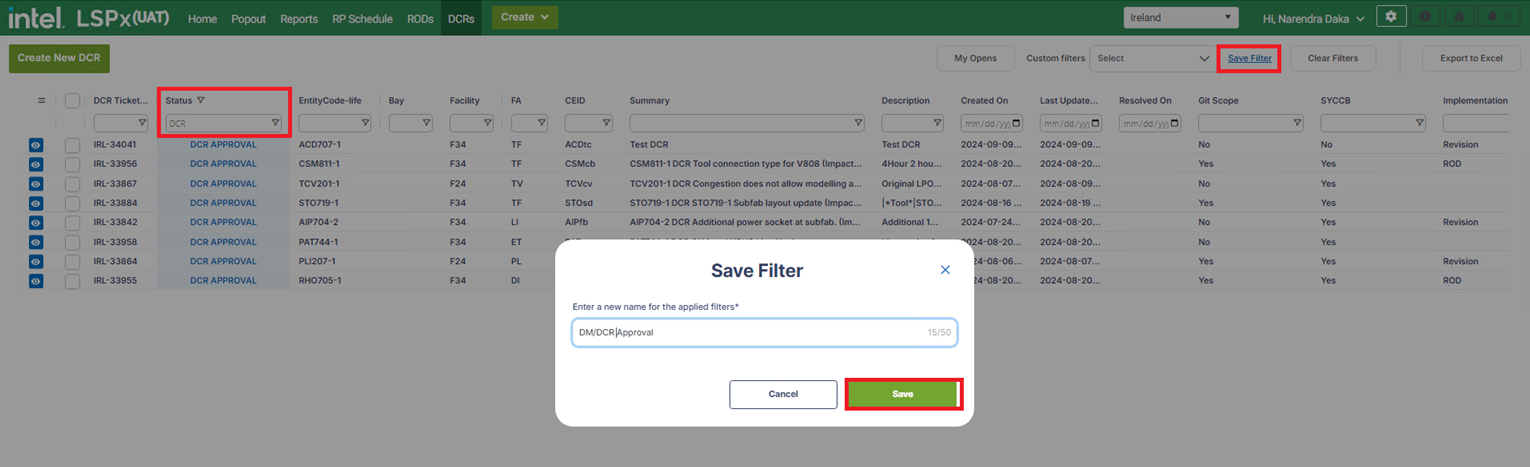
Save Filters: You can apply filters on the columns on the grid to filter to the required DCRs. You can save this filter criteria applied on the grid using this Save Filters button for future use. After applying the filters on the required columns, click on Save Filters button. A save filter pop-up window appears on the screen. Enter the name with which you want to save the filter and click on save button to save the filter as custom filter.
-
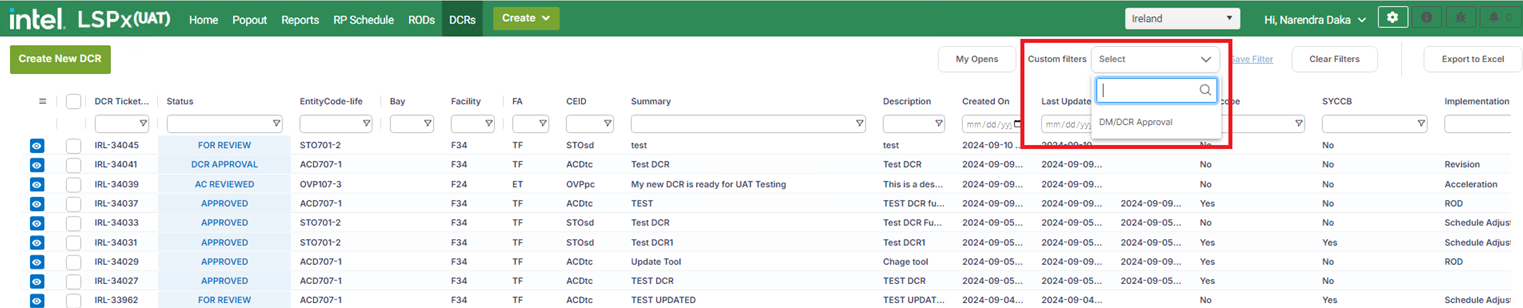
Custom filters: The saved filters will appear under the custom filters dropdown. Select the required filter from the dropdown to apply that filter criteria to the grid and see the DCRs that satisfy the filter criteria.
-
Export to Excel: Click on this button to export all the DCRs to excel spreadsheet. If you want to export only specific DCRs, select the check box of the required DCRs as shown in below screenshot and then click on the Export to Excel button.
If you select only limited number of DCRs (Say less than 25), then they will get exported to excel directly. If the number of DCRs exported exceeds certain limit (Say more than 25), then export will not work directly. You will receive an email with a link to download the exported DCRs.
- View button: This button is available in front of each DCR as shown in the screenshot. Click on this button to open the DCR ticket in full view. Refer the next section to understand more on DCR ticket full view.
5. DCR Ticket Full View
You can navigate to this full view page by clicking on the view button of a specific DCR on the landing page. The page contains below sections.
- Action Buttons
- DCR Details
- Peoples
- Dates
- Activity
5.1. Action Buttons
Refer to the below table to understand more on the action buttons.
| Button | Purpose |
|---|---|
| Edit | Use this button to make updates to the DCR ticket. This button is available to the Design Manager and DCR Chair roles only. Note: Entity Code - Life field is not editable. If the DCR is raised on a wrong tool or the tool needs to be changed to NON-POR, the DCR ticket needs to be rejected and the TO/AC should raise the ticket by selecting the correct tool. |
| Add Comment | Add comments about the DCR issue. Type “@” and someone’s name to notify them of your comments. For example, typing “@John” will display the system's potential users named John. Note: The tagged user will be notified of your comments. |
| Assign | Use this button to assign the ticket to AC/PM/DCR Chair/DM based the status of the DCR ticket. |
| Transition Buttons AC Review PM Review Approve Reject | These button will be visible to AC/PM/DM/DCR Chair role users only. AC Review: This button appears when the DCR ticket is in FOR REVIEW status or PM REVIEWED status. Only AC/DCR Chair/DM can access this button. Use this button to complete the AC Review. PM Review: This button appears when the DCR ticket is in FOR REVIEW status or AC REVIEWED status. Only PM/DCR Chair/DM can access this button. Use this button to complete the PM Review. Approve: This button appears when the DCR ticket is in DCR APPROVAL status. Only DCR Chair/DM can access this button. Use this button to Approve the DCR ticket. A notification will go to all stakeholders once the ticket is approved. Reject: This button appears when the DCR ticket is in DCR APPROVAL status. Only DCR Chair/DM can access this button. Use this button to Reject the DCR ticket. A notification will go to all stakeholders once the ticket is rejected. |
| Export | Use this button to export the DCR ticket to HTML and then save as to pdf format. |
| View All DCRs | Use this button to navigate back to the DCR landing page |
5.2. DCR Details
The details added by TO/AC while raising the DCR ticket, or the details added by PM while completing the PM review, or the details updated by DM/DCR chair will appear in this section.
5.3. People
The stakeholders assigned to the tool on which DCR is raised and the site level stakeholders (DM and DCR Chair) will appear in this section. If the stakeholder's details are not auto-populated on a DCR, or populated stakeholders are not up to date, permitted users can update the information from the Stakeholder component on the Tool Details page. Changes from the Stakeholder component on the Tool Details synchronizes back to the Stakeholder Matrix (FCEHome).
Refer to the section 6 for the stakeholders access rights on DCR.
Watchers can be added to the DCR ticket using the '+' symbol next to watchers in people section. They can be deleted by clicking the 'X' button.
5.4. Dates
| Dates | Description |
|---|---|
| Created | The date the DCR was created in LSPx. |
| Updated | The last time this DCR was updated in LSPx. |
| Resolved | The date the DCR was Approved / Rejected in LSPx. |
| Design Start | The date which the design is expected to start. |
| Design Finish | The date which the design is expected to finish. |
5.5. Activity
| Tab | Description |
|---|---|
| Comments | The Comments tab within the Activity section of the DCR form serves as a collaborative communication platform. It allows users to post observations, feedback, and queries about the DCR form they are reviewing. This feature facilitates real-time dialogue among stakeholders, ensuring a seamless exchange of ideas and insights. Users can add new comments, respond to existing ones, and tag colleagues to draw attention to specific discussion points, enhancing the collaborative process and ensuring all relevant parties are kept in the loop |
| DCR History | The DCR History tab provides a comprehensive chronological record of all changes made to the DCR form. This includes updates to data fields, modifications in DCR status, and any alterations in user assignments or permissions. By offering a detailed audit trail, this tab serves as an essential tool for tracking the progression of the DCR, enabling users to review past actions, understand the evolution of the DCR, and verify the accuracy and rationale behind each change. |
| Transitions | The Transitions tab focuses on documenting the progression and status changes of the DCR form throughout its lifecycle. It captures significant milestones, such as FOR REVIEW, AC REVIEWED, PM REVIEWED, DCR APPROVAL, APPROVED, REJECTED, providing users with a clear view of the DCR’s current phase and pending actions. The Transitions tab ensures that the DCR’s movement through various stages is orderly, transparent, and aligned with project timelines. |
6. People and Access Rights Matrix
| Role | Role Description | Create | View | Edit | Review | Approve / Reject |
|---|---|---|---|---|---|---|
| Assignee | The assignee is the user currently responsible for taking action on the DCR. | |||||
| Reporter | The reporter is a user who raised the ticket. The Tool Owners of a project typically raise DCR issues. DCR Chair and Design Managers can also raise DCRs. | |||||
| Tool Owner | The Tool Owners assigned to the tool to oversee the functionality and maintenance. They ensure these tools operate efficiently, meet production requirements, and maintain high-quality standards. | |||||
| Area Coordinator | The Area Coordinators assigned to the tool to manage and oversee specific areas within the manufacturing process on a site. They coordinate activities, ensure production goals and quality standards are met, and facilitate communication between different teams. | |||||
| TI Project Manager | TI Project Manager. | |||||
| TICE Design Manager | TICE Design Manager. | |||||
| AE Design Manager | AE Design Manager. | |||||
| DCR Chair | DCR Chair. | |||||
| AE Design Lead | AE Design Lead. | |||||
| Integration Lead | Integration Lead. | |||||
| Watchers | Watchers. |
7. Email Notifications
Email notifications will go to the users given in below table when DCR ticket is created or Approved or Rejected or tagged in a comment.
| Stage | Users Notified |
|---|---|
| DCR Created | Assignee, Reporter, Watchers Tool Owner, Area Coordinator, Project Manager, Design Manager, DCR Chair, AE Design Lead, AE Project Manager, AE Design Manager, Integration Lead |
| DCR Approved | Assignee, Reporter, Watchers Tool Owner, Area Coordinator, Project Manager, Design Manager, DCR Chair, AE Design Lead, AE Project Manager, AE Design Manager, Integration Lead |
| DCR Rejected | Assignee, Reporter, Watchers Tool Owner, Area Coordinator, Project Manager, Design Manager, DCR Chair, AE Design Lead, AE Project Manager, AE Design Manager, Integration Lead |
| '@mentions' in comments | Only the tagged person will get the email notification. |
If a user unsubscribes from a Functional Area (FA) or CEID on the "My Profile" page of LSPx, they will no longer receive email notifications for any DCRs associated with tools within that FA/CEID. However, the user will still receive notifications if they are added as an assignee, watcher, or tagged in a comment on the DCR ticket. To resume receiving email notifications for that FA/CEID, the user must re-subscribe.
8. Additional Notes
- DCRs can not be deleted once they were created.
- No action can be taken by any user (i.e., can’t edit, can’t add comments etc..) once DCR is approved or rejected. DCR will turn to read-only mode once it got approved or rejected.
- Once the DCR is approved and the change is implemented, and if the change needs to be reverted, a fresh DCR needs to be created to revert the changes. The existing DCR (that is in approved status) can’t be re-opened to change the status to rejected and use it to revert the changes.
- Once the DCR is rejected, it can’t be re-opened to approve it. A fresh DCR needs to be submitted to get it approved.
9. Important Links/Guides
- Watch the Training Videos for how to create, submit and complete DACs in the LSPx application.
- Learn how to manage Stakeholders in LSPx.
- Frequently Asked Questions for the DCR.